I am the maintainer of a BurpSuite extension that is implementing a REST API on top of Burp Suite. The goal of this REST API is to offer basic actions (retrieve a report, trigger a scan, retrieve the list of scanned url) and is executed on a headless Burp Suite from a CICD pipeline.
From the technical point of view, the extension is implemented in Java and I’m using the JAX-RS specification in order to implement the REST-APIs and Jersey as JAX-RS implementation.
Problem
One of the REST entry points was returning a Set<OBJECT> where OBJECT is a POJO specific to the extension. When a client was calling this entry point, the following exception was thrown:
Caused by: java.lang.ClassNotFoundException: org.eclipse.persistence.internal.jaxb.many.CollectionValue
at java.base jdk.internal.loader.BuiltinClassLoader.loadClass(BuiltinClassLoader.java:641)
at java.base/jdk.internal.loader.ClassLoaders$AppClassLoader.loadClass(ClassLoaders.java:188)
at java.base/java.lang.ClassLoader.loadClass(ClassLoader.java:520)
at org.eclipse.persistence.internal.jaxb.JaxbClassLoader.loadClass(JaxbClassLoader.java:110)
Root Cause
A ClassNotFoundException is thrown when the JVM tries to load a class that is not available in the classpath or when there is a class loading issue. I was sure that the missing class (CollectionValue) was in the extension classpath so the root cause of the problem was a class loading issues.
In Java the classes are loaded by a Java classloader. A Java classloader is a component of the Java Virtual Machine (JVM) responsible for loading Java classes into memory at runtime. The classloader’s primary role is to locate and load class files from various sources, such as the file system, network.
Classloaders in Java typically follow a hierarchical delegation model. When a class is requested for loading, the classloader first delegates the request to its parent classloader. If the parent classloader cannot find the class, the child classloader attempts to load the class itself. This delegation continues recursively until the class is successfully loaded or all classloaders in the hierarchy have been exhausted.
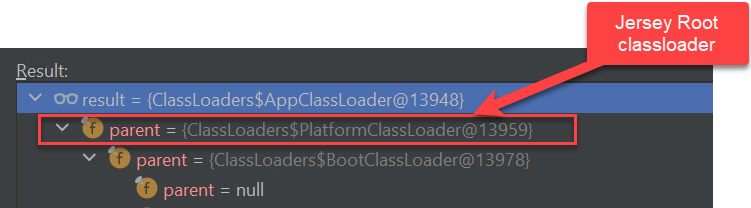
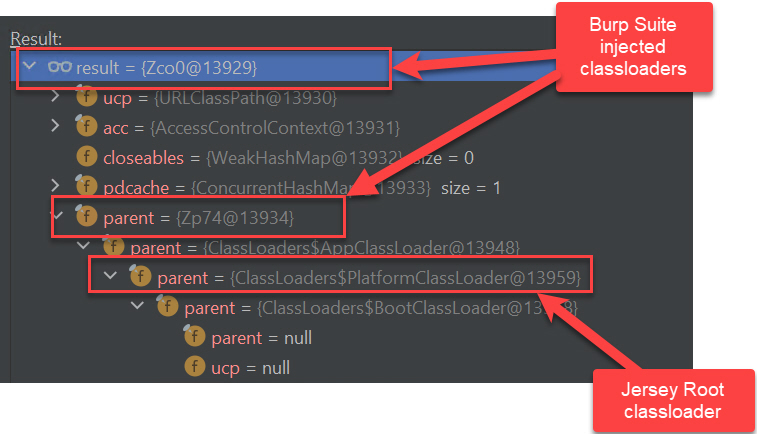
The classloader hierarchy of a thread that is serving a JAX-RS call looks like this:
The classloader hierarchy of the thread that is executing the Burp Suite extension looks like this:
So, the root cause of the ClassNotFoundException is that the classloader hierarchy of the threads serving the JAX-RS calls it does not include the (Burp Suite) extension classloader and so none of the classes from the (Burp Suite) extension classpath can be loaded by the JAX-RS calls.
Solution
The solution is to create a custom classloader that will have to be injected into the classloader hierarchy of the threads serving the JAX-RS calls. This custom classloader will implement the delegation pattern and will contains the original JAX-RS classloader and the Burp Suite extension classloader.
The custom classloader will delegate all the calls to the original Jersey classloader and in the case of loadClass method (which is throwing a ClassNotFoundException) if the Jersey classloader is not finding a class then it will delegate the call to the Burp Suite extension classloader.
The custom classloader will look like this:
public class CustomClassLoader extends ClassLoader{
  private final ClassLoader burpClassLoader;
  private final ClassLoader jerseyClassLoader;

  public CustomClassLoader(
                            ClassLoader bcl,
                            ClassLoader jcl){
     this.burpClassLoader = bcl;
     this.jerseyClassLoader = jcl;
  }

 @Override
  public String getName(){
     return "CustomJerseyBurpClassloader";
  }

 @Override
  public Class<?> loadClass(String name)
      throws ClassNotFoundException {
     try {
        return this.jerseyClassLoader.loadClass(name);
     } catch (ClassNotFoundException ex) {
         //use the Burp classloader if class cannot be load from the jersey classloader
        return this.burpClassLoader.loadClass(name);
    }
  }

//all the other methods implementation will just delegate
//to the return jerseyClassLoader
//for ex:
 @Override
  public URL getResource(String name) {
  return return this.jerseyClassLoader.getResource(name);
  }
 .......
}
Now, we have the custom classloader; what is missing is to replace the original Jersey classloader with the custom one for each REST call of the API. In order to do this, we will create a Jersey ContainerRequestFilter which will be called before the execution of each request.
The request filter will look like this:
public class ClassloaderSwitchFilter
  implements ContainerRequestFilter {
  @Override
  public void filter(ContainerRequestContext requestContext)
        throws IOException {
        Thread currentThread = Thread.currentThread();
        ClassLoader initialClassloader =
              currentThread.getContextClassLoader();

        //custom classloader already injected
        if (initialClassloader instanceof CustomClassLoader) {
            return;
        }

        ClassLoader customClassloader =
                new CustomClassLoader(
                        CustomClassLoader.class.getClassLoader(),
                        initialClassloader);

        currentThread.setContextClassLoader(customClassloader);
  }
}
I would definitively add this book to the list of (software) security books that every software engineer should read (see “5 (software) security books that every (software) developer should read”) and I would put it on the first place. This book does not treat software security in a classic way but from software design point of view. The main idea of the book is that a good software design will drastically improve the application security posture.
For me this book could be seen as an extension of the Domain-Driven Design: Tackling Complexity in the Heart of Software book but applied to software security. The main audience of the book is any software engineer and security professionals that are working with the development teams to help them to have a better security posture.
1: Why Design Matters for Security
The fist chapter explains why when developing software centered on design, security will become a natural part of the development process instead of being perceived as a forced requirement.
The traditional approach to software security have e few shortcomings; the user have to explicitly think about security and it have to be knowledgeable in different security topics. On the other side driving security through design can have the following advantages:
Software design is central to the interest and competence of most developers.
By focusing on design, business and security concerns gain equal priority in the view of both business experts and developers.
By choosing good design constructs, non-security experts are able to write secure code.
By focusing on good domain design, many security bugs are solved implicitly.
2: Intermission: The anti-Hamlet
This chapter (which is based on a real case) presents an example of how a flaw in designing a model of an bookstore e-shop application negatively impacted the business.
The mistake done in the model was to represent the quantity of items from a shopping card as an integer, so the users of the application could add negative numbers of items so at the end the customers could receive money from the bookstore.
3: Core concepts of Domain-Driven Design
The chapter starts with the definition of the Domain Driven Design (DDD) and describing what are the qualities of a domain model to be effective:
Be simple so you focus on the essentials.
Be strict so it can be a foundation for writing code.
Capture deep understanding to make the system truly useful and helpful.
Be the best choice from a pragmatic viewpoint.
Provide you with a language you can use when you talk about the system.
The main notions from DDD that can be beneficial in the context of a more robust model are:
Entities
Entities are objects representing a thread of continuity and identity, going through a lifecycle, though their attributes may change.
Entities are one type of model objects that have some distinct properties. What makes
an entity special is that:
It has an identity that defines it and makes it distinguishable from others.
It has an identity that’s consistent during its life cycle.
It can contain other objects, such as other entities or value objects (see further for a value object definition).
It’s responsible for the coordination of operations on the objects it owns.
Value Objects
Value objects are objects describing or computing some characteristics of a thing.The key characteristics of a value objectare as follows:
It has no identity that defines it, but rather it’s defined by its value.
It’s immutable.
It should form a conceptual whole.
It can reference entities.
It explicitly defines and enforces important constraints.
It can be used as an attribute of entities and other value objects.
It can be short-lived.
Aggregates
An aggregate is a conceptual boundary used to group parts of the model together. The purpose of this grouping is to treat the aggregate as a unit. The key characteristics of a aggregates are:
Every aggregate has a boundary and a root.
The root is a single, specific entity contained in the aggregate.
The root is the only member of the aggregate that objects outside the boundary
can hold references to.
Objects within the aggregate can hold references to other aggregates.
Bounding context
Multiple models are in play on a large project; it’s possible to have two or more models having the same concepts but with different semantics. In the case of different models, there is a need to define explicitly the scope of a particular model as a bounded part of a software system. A bounded contextdelimits the applicability of a particular model.
Data crossing a semantic boundary is of special interest from a security perspective because this is where the meaning of a concept could implicitly change.
4: Code constructs promoting security
Problems areas addressed and the proposed constructs:
Problem
Section
Security problems involving data integrity and availability
Immutable objects
Security problems involving illegal input and state
Design by Contract
Security problems involving input validation
(Input) Validation
Immutable objects
Immutable objects are safe to share between threads and open up high data availability which is an important aspect when protecting a system against denial of service attacks. Immutable object could protect against security problems involving availability of a system.
Mutable objects, on the other hand, are designed for change, which can lead to illegal updates and modifications. Immutable objects will enforce the integrity of the data of an application.
Design by Contract
Design By Contract (see Meyer, Bertrand: Applying “Design by Contract”) is an approach for designing software that uses preconditions and post-conditions to document (or programmatically assert) the change in state caused by a piece of a program. Thinking about design in terms of preconditions and contracts helps you clarify which part of a design takes on which responsibility.
Many security problems arise because one part of the system assumes another part takes responsibility for something when, in fact, that part assumes the opposite.
The authors are presenting some example of checking preconditions for method arguments and constructors. The goal is to fail if the contract is not met and the program is not using the classes in a way they were designed to be used. The program has lost control of what’s happening, and the safest thing to do is to stop as fast as possible.
(Input) Validation
In the case of input validation the authors are going through a framework that tries to separate the different kinds of (input) validation. The list presented also suggests a good order in which to do the different kinds of validation. Cheap operations like checking the length of data come early in the list, and more expensive operations that require calling the database come later. If one the steps is failing then the entire validation process must fail.
Different validation steps:
Origin – Is the data from a legitimate sender?
Origin checks can be done by checking the origin IP or requiring an access token
Size – Is the size of the data in line with the context on which the data is used?
Lexical content – Does it contain the right characters and encoding?
When checking the lexical content of data, the important part is the content not the structure so, the data is scanned to see that it contains the expected characters and the expected encoding.
Syntax – Is the format right?
Semantics – Does the data make sense from the business point of view?
5: Domain primitives
Problems areas addressed:
Problem
Section
Security issues caused by inexact, error-prone, and
ambiguous code
Domain primitives
Security problems due to leakage of sensitive data
Read-once objects
Domain primitives
Domain primitives are similar to value objects in Domain-Driven Design. Key difference is and they must be enforced at the point of creation. Also the usage of language primitives or generic types (including null ) are forbidden to represent concepts in the domain model because it could caused inexact, error-prone, and ambiguous code.
At the creation of the domain primitives the different validation steps could be applied as explained into the previous chapter; see (Input) Validation section of chapter 4: Code constructs promoting security
A typical example of a domain primitive is a quantity (see the example from the chapter 2: Intermission: The anti-Hamlet) that should not be defined as a primitive type (a float or an int) but as a distinguish type that will contains all the necessary logic for creation of valid (from the domain point of view) instances of quantity type.
For example in the context of a book shop a quantity which is negative or a not an integer greater is not valid from the business domain point of view.
Read-once objects
A read-once object is an object designed to be read once (or a limited number of times). This object usually represents a value or concept in your domain that’s considered to be sensitive (for example, passport numbers, credit card numbers, or passwords). The main purpose of the read-once object is to facilitate detection of unintentional use of the data it encapsulates.
Here’s a list of the key aspects of a read-once object:
Its main purpose is to facilitate detection of unintentional use.
It represents a sensitive value or concept.
It’s often a domain primitive.
Its value can be read once, and once only.
It prevents serialization of sensitive data.
It prevents sub-classing and extension.
6: Ensuring integrity of state
This chapter it’s about the integrity of the DDD entities objects.Entities contains the state that represents the business rules so it is important that a newly created entity follow the business rules.
The first goal is to have entities already consisted at the creation time. This can be done forcing the object creation through a constructor with all mandatory attributes and optional attributes set via method calls. This works very well for simple business rules; for more complex business rules the usage of the Builder pattern is advised.
The second goal is to keep the entities consistency after the creations time during the usage of the entities by other software components. The main idea is to share only final attributes (that cannot be changed), not share mutable objects and use immutable domain primitives.
In the case of attributes containing collections, should not expose a collection but rather expose a useful property of the collection (for example to add an item into a collection, add a method that receive as parameter the item to be added). Collection can be protected by exposing an non modifiable version (see Collections.unmodifiableCollection)
7: Reducing complexity of state
This chapter is extending the discussion from the previous chapter and it presents how to handle DDD entities objects that can have multiple states. For example an entity representing an order can have a few valid states like “paid”, “shipped”, “lost” or “delivered”. Keeping the state of entities controlled becomes hard when entities become complex, especially when there are lots of states with complex transitions between them.
The authors are proposing 3 patterns to handle the entities state complexity:
Entity state object
The proposal is to have entity state be explicitly designed and implemented as a class of its own. With this approach, the state object is used as a delegated helper object for the entity. Every call to the entity is first checked with the state object. This approach makes it easier to grasp what states the entity can have.
Entity Snapshot
The pattern consist of generating immutable objects called snapshots from the an entity. The clients will use the snapshots for the read only operations. For changing the state of the underlying entity, the clients will have to use a domain service to which they’ll have to send updates.
A drawback of this approach is that it violates some of the ideas of object orientation, especially the guideline to keep data and its accompanying behavior close together, preferably in the same class.
From the security point of view this pattern it improves the integrity because because the snapshot is immutable so there’s no risk at all of the representation mutating to a foul state.
Entity relay
This pattern is to be used in the case when the entity have a big number of possible states with a complex graph of changing states. The basic idea of entity relay is to split the entity’s lifespan into phases, and let each entity represent its own phase. When a phase is over, the entity goes away, and another kind of entity takes over—like a relay race.
8: Leveraging your delivery pipeline for security
The chapter treats different test strategies that could be applied in order to have a better security posture.
For the unit tests, the authors propose to divide the tests into:
normal testing – Verifies that the design accepts input that clearly passes the domain rules
boundary testing – Verifies that only structurally correct input is accepted. Examples of boundary checks are length, size, and quantity,
invalid input testing – Verifies that the design doesn’t break when invalid input is handled. Empty data structures, null, and strange characters are often considered invalid input.
extreme input testing – Verifies that the design doesn’t break when extreme input is handled. For example, such input might include a string of 40 million characters.
Other topics covered are :
testing of feature toggles that can cause security vulnerabilities. A good rule of thumb is to create a test for every existing toggle and should test all possible combinations using automated tests.
testing of the availability of the application by simulating DOS attacks.
9: Handling failures securely
The chapter treats different topics around handling failures and program exceptions.
It’s a good practice to separate business exceptions and technical exceptions. For business exception the best practice is to create exception having a business meaning.
As a practice to avoid, shouldn’t intermix technical and business exceptions using the same type and never include business data in technical exceptions, regardless of whether it’s sensitive or not.
Another interesting idea is to not handle business failures as exceptions. A failure should be modeled as a possible result of a performed operation in the same way a success is. By designing failures as unexceptional outcomes, it’s possible to avoid the problems that come from using exceptions including ambiguity between domain and technical exceptions, and inadvertently leaking sensitive information.
Resilience and responsiveness are attributes of a system that are improving the system availability. To achieve this attributes the authors are presenting 2 patterns:
circuit breaker pattern – Circuit Breaker allows graceful handling of failed remote services. It’s especially useful when all parts of an application are highly decoupled from each other, and failure of one component doesn’t mean the other parts will stop working.
bulkhead pattern – The Bulkhead pattern is a type of application design that is tolerant of failure. In a bulkhead architecture, elements of an application are isolated into pools so that if one fails, the others will continue to function.
10: Benefits of cloud thinking
This chapter is treating design concepts to be used for achieving a better security posture in the context of cloud deployments.
The most important concept it’s the “The three R’s of enterprise security“. The methodology of three Rs is: Rotate, Repave and Repair and it offers a simple approach towards greater security of cloud deployments.
The basic idea is to be proactive than be reactive as seen in traditional enterprise security. Speed is of essence. The longer a deployment stays in a given configuration, the greater is the opportunity for threats to exploit any vulnerabilities.
Rotate: Rotate secrets every few minutes or hours. Rotating secrets doesn’t improve the security of the secrets themselves, but it’s an
effective way of reducing the time during which a leaked secret can be misused.
Repave: Repave servers and applications every few hours.Recreating all servers and containers and the applications running on them from a known good state every few hours is an effective way of making it hard for malicious software to spread through the system.
Repair: Repair vulnerable software as soon as possible after a patch is available. This goes for both operating systems and applications third party dependencies. The reason for repairing as often as you can is that for every new version of the software, something will have changed so an attacker constantly needs to find new ways to break it.
11: Intermission: An insurance policy for free
This chapter is very similar with the chapter 2, Intermission: The anti-Hamlet. It presents a real case (of an insurance company) that migrated a monolithic application to a micro-service application.
Due to this migration, the application was split into 2 different micro-services handled by 2 different teams. Having 2 independent teams handling different parts of the application and some functional changes in one of the micro-services will have as impact that the notion of Payment will have different meanings for the 2 micro-services. This miss-match will generate some subtle bugs even if none of the 2 systems were not broken.
12: Guidance in legacy code
This chapter is a kind of review of all the practices described in previous chapters that are applicable to legacy code.
It treats about the usage of domain primitives (see chapter 5 Domain primitives) to replace ambiguous parameters in APIs which are a common source of security bugs, the usage of read-once objects (see chapter 5 Domain primitives) which limits the number of times a sensitive values can be accessed allowing it to detect unintentional access, the usage of security tests that are testing look for invalid and extreme inputs (see chapter 8 Leveraging your delivery pipeline for security)
13: Guidance in micro-services
This chapter is very similar with the previous one but the context is the new approach of writing applications using micro-services.
Implementing security for a micro-service architecture is more difficult that in a case of a monolithic architecture because of the loose coupling of micro-services.
Splitting a monolithic application to different micro-services is rather a difficult task but a good design principle is to think of each service as a bounded context (see chapter 3 Core concepts of Domain-Driven Design for definition of bounded context).
Analyzing confidentiality, integrity, availability, and traceability across all services and data sensitivity is more difficult than in a case of classical architecture. The only way to treat this security topics in a complete way is to have a broader view of the entire applications and not only on a subset of the micro-services.
14: A final world: Don’t forget about security!
The entire book was talking about how to not think about security, but still getting a good security posture anyway. This chapter speaks about how important is to think and learn about the security anyway and it gives advises that could be found in more “classical” security books:
Should use code security reviews as a recurring part of secure development lifecycle (SDLC)
It is important to invest in tooling that provides quick access to information about security vulnerabilities across the technological entire stack.
Penetration tests should be done recurrently and the feedback from this tests should be used as an opportunity to improve the application design.
Having a team and processes to handle security incidents and the security incident mechanism should focus on learning to become more resistant to attacks.
All the Linux security mechanisms that are used under the hood by containers are very well explained with multiple (valuable) examples; namespaces, cgroups, capabilities, system calls, AppArmor, SecComp. At the end of the day, container security is just a subset of Linux security.
No hidden (or un-hidden) publicity to any commercial tools, despite the fact that the author is working for AquaSecurity company.
A lot of references towards Internet accessible resources; unfortunately, the author is using url shortening so I wish you good luck to copy them into a browser if you have the paper version of the book.
Clear and concise writing style.
What I think could have been done better:
Even if the book is about security of/in containers, there is no general introduction of the container notion or the actual container landscape.
A lot of forward references in different chapters; usually in technical books you find backward references because (very often) the knowledge is build on top of the knowledge of previous chapters.
There are a few chapters which are very thin, especially toward the end; the last chapter (chapter 14) for example is just 2 pages long.
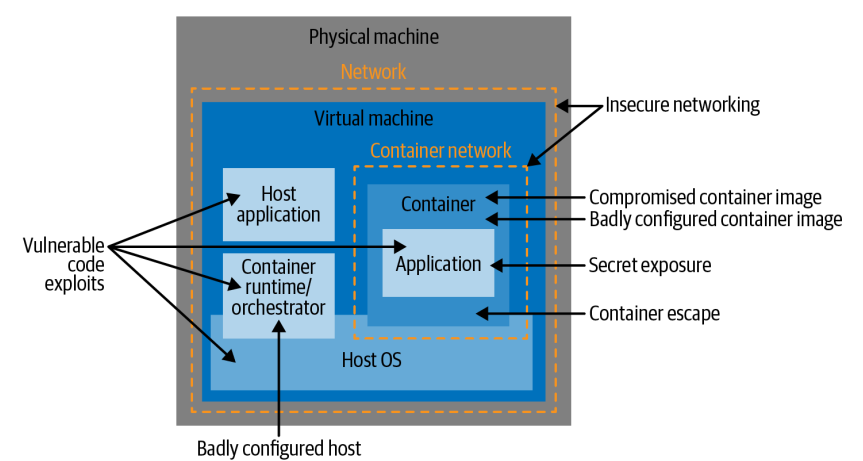
This chapter defines different attack vectors for the containers and the infrastructure that they are running on. This attack vectors specifically linked to containers are:
Application code vulnerabilities
Badly configured images
Badly configured containers
Build Image attack
Supply chain attack
Vulnerable hosts
Exposed secrets
Insecure networking
Container runtime vulnerabilities
Containers attack vectors
The containers very often are deployed on cloud infrastructures very often using a multi-tenant model which brings new threats and new attack vectors on top of previous ones.
After presenting and explaining the problems that usage of containers will bring the author is focusing on (security) general guidelines that should be used when implementing different mitigations controls:
least privilege
each container should have a minimum set of permissions to fulfill it’s function.
defense in depth
reducing the attack surface
split the monolithic application in smaller, simpler microservices that would imply a less complex architecture that would reduce the attack surface.
limiting the blast radius
if one container is compromised some controls should be put in place to not affect the others software components
segregation of duties
permissions and credentials can be passed only into the containers that need them
2. Linux System Calls, Permissions and Capabilities
This chapter it presents the basics of Linux System calls, the Linux file permissions (an extensive explanation is done on the usage of of setuid and getuid) and the Linux Capabilities. For each of this Linux features some examples are given and the author emphasizes that this capabilities are heavily used by the containers and the containers run-times because at the end of the day, a container is just a Linux process running on a host.
3. Control Groups
This chapter is very similar with the previous one in the sense that it does not speak about containers but about a Linux security feature that is heavily used by the containers. This chapter is dedicated to Linux control groups (a.k.a cgroups) which have as goal to limit the resources, such as memory, CPU, network input/output, that a process or a group of processes can use.
Containers runtimes are using cgroups behind the scene to limit resources used by containers, so cgroups provides protection against a class of attacks that attempt to disrupt running applications by consuming excessive resources, thereby starving legitimate applications.
4. Container Isolation
This chapter treats another Linux feature that is cornerstone for container security: Linux namespaces.
Linux namespaces are a feature of the Linux kernel that partitions kernel resources such that one or more processes sees one set of resources while another set of processes sees a different set of resources. If cgroups control the resources that a process can use, namespaces control what it can see.
For each of the existing namespaces (Unix Timesharing System, Process IDs, Mount Points, Network, Users and Group Ids, Inter-Process Communications) the author shows how can be created from command line. For some namespaces a comparison is done between the isolation implemented by a container runtime and the isolation offered just using the tools offered out of the box by Linux.
5. Virtual Machines
This chapter is an introduction to virtual machines. It is explained different types of hypervisors (a.k.a VMM – Virtual Machine Monitor):
Type1 – the hypervisor is installed directly on top of the hardware with no operating system underneath (ex: Hyper-V, Xen)
Type2 – the hypervisor is installed on top of a Host Os (ex: VirtualBox, Parallels, QEMU)
Kernel Based Virtual Machines – this is a kind of hybrid type because it consists in a hypervisor running within the kernel of the hos Os (ex: Linux KVM).
Different types of hypervisors
After describing the types of hypervisors the author explained how the hypervisors are achieving the virtualization via a mechanism called “trap and emulate“. When an OS is running as a virtual machine in a hypervisor, some of its instructions may conflict with the host operation system. So the hypervisor will emulates the effect of that specific instruction or action without carrying it out. In this way, the host OS is not effected by the guest’s actions.
The chapter is concluded with the advantages of hypervisors for process isolation compared with the kernel processes (which are the cornerstone of containers) and the main drawbacks of hypervisors.
From the process isolation point of view the hypervisors are offering a greater isolation and the difference is that hypervisors have a simpler job to fulfill comparing with OS kernels. In a kernel, user space processes are allowed some visibility of each other, but there is no sharing of memory or sharing of processes in the case of hypervisors.
On the drawback side, the VMs have start-up times that are several orders of magnitude greater than a container, containers give developers a convenient ability to “build once, run anywhere” quickly and efficiently, each virtual machine has the overhead of running a whole kernel compared with containers that are sharing a kernel so containers can be very efficient in both resource use and performance.
6. Container Images
This chapter is focusing on the images; it starts by explaining the OCI standards covering the image specification. In this chapter you will be able to see how different topics from previous chapters (namespaces, capabilities, control groups, root file system) are fitting together so the end user can define, build and execute a container.
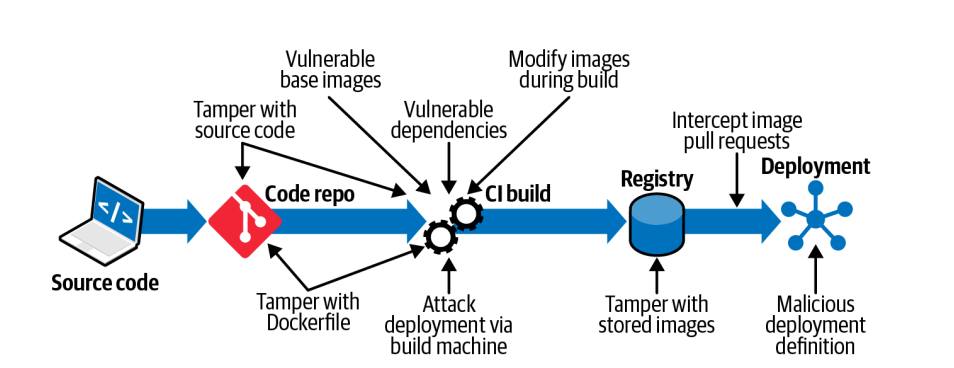
The second par of the chapter is focusing on different attack vectors on an image:
Image Attack Vectors
Some of this attack vectors are not really linked to container technology (tamper source code, vulnerable dependencies, attack deployment via build machine) but others are container specific attack vectors (tamper the docker file, usage of vulnerable base images, modify images during build).
7. Software Vulnerabilities in Images
The chapter is dedicated to vulnerabilities managements in general and also in the context of containers. For the general/generic part, the author explains what is the workflow when a vulnerability is discovered:
after the discovery the person the new issue will get a unique identifier that begins with “CVE” (Common Vulnerabilities and Exposures) , followed by the year and an unique id.
A responsible security disclosure is agreed between the entity that found the vulnerability and the entity that “owns” the software. Both parties agree on a timeframe after which the researcher can publish their findings.
The entity that “owns” the software is fixing the vulnerability and delivers a patch.
Once the vulnerability can be disclosed, it receive a unique identifier that begins with “CVE,” which stands for Common Vulnerabilities and Exposures.
Strangely enough, the author does not mention the usage of CVSS (Common Vulnerability Scoring System) score of a vulnerability. Usually CVSS score is used to judge the impact of the vulnerability.
The second part of the chapter is focusing on ways to handle the vulnerability management in the context of containers. A few interesting and valuable ideas:
(always) use immutable containers :
If containers are downloading code at runtime, different instances of the container could be running different versions of that code, but it would be difficult to know which instance is running what version.
It’s harder to control and ensure the provenance of the software running in each container if it could be downloaded at any time and from anywhere.
Building a container image and storing it in a registry is very simple to automate in a CI/CD pipeline.
regular scan of images.
Regularly re-scanning container images allows the scanning tool to check the contents against its most up-to-date knowledge about vulnerabilities. A very common approach is to re-scan all deployed images every 24 hours, in addition to scanning new images as they are built, as part of an automated CI/CD pipeline.
use a tool that can do more than scanning for vulnerabilities (if possible). A (non-exhaustive) list of extra features that the scanner could have:
Known malware within the image
Executables with the setuid bit
Images configured to run as root
Secret credentials such as tokens or passwords
Sensitive data in the form of credit card or Social Security numbers or something similar
8. Strengthening Container Isolation
This chapter is an extension of the Chapter 4 (Container Isolation); it presents other ways to extend the container isolation using mechanisms and framework beyond the Linux kernel features.
The first part of the chapter presents mechanisms already present in Linux ecosystem that can be used in other contexts than containers, namely:
Seccomp is a mechanism for restricting the set of system calls that an application is allowed to make.
The Docker default seccomp profile blocks more than 40 of the 300+ syscalls (including all the examples just listed) without ill effects on the vast majority of containerized applications. Unless you have a reason not to do so, it’s a good default profile to use.
In AppArmor, a profile can be associated with an executable file, determining what that file is allowed to do in terms of capabilities and file access permissions.
AppArmor implement mandatory access controls. A mandatory access control is set by a central administrator, and once set, other users do not have any ability to modify the control or pass it on to another user.
SElinux lets you constrain what a process is allowed to do in terms of its interactions with files and other processes. Each process runs under an SELinux domain and every file has a type.
Every file on the machine has to be labeled with its SELinux information before you can enforce policies. These policies can dictate what access a process of a particular domain has to files of a particular type.
In the second part of the chapter the author presents container specific technologies that could be used to enforce the containers isolation:
gVisor provides a virtualized environment in order to sandbox containers. The system interfaces normally implemented by the host kernel are moved into a distinct, per-sandbox application kernel in order to minimize the risk of a container escape exploit.
To do this, a component of gVisor called the Sentry intercepts syscalls from the application. Sentry is heavily sandboxed using seccomp, such that it is unable to access filesystem resources itself. When it needs to make systemcalls related to file access, it off-loads them to an entirely separate process called the Gofer. Even those system calls that are unrelated to filesystem access are not passed through to the host kernel directly but instead are reimplemented within the Sentry. Essentially it’s a guest kernel, operating in user space.
The idea with Kata Containers is to run containers within a separate virtual machine. This approach gives the ability to run applications from regular OCI format container images, with all the isolation of a virtual machine.
Kata uses a proxy between the container runtime and a separate target host where the application code runs. The runtime proxy creates a separate virtual machine using QEMU to run the container on its behalf.
Is a virtual machine offering the benefits of secure isolation through a hypervisor and no shared kernel, but with startup times around 100ms.
Firecracker designers have stripped out functionality that is generally included in a kernel but that isn’t required in a container like enumerating devices. The main saving comes from a minimal device model that strips out all but the essential devices.
9. Breaking Container Isolation
After explaining in previous chapters what can be done to enhance the container isolation, this chapter is focusing on how a container could be misconfigured so this isolation is broken.
The following misconfigurations are explained:
Run containers using the default (root) user.
Unless your container image specifies a non-root user or you specify a non default user when you run a container, by default the container will run as root.
The best option is to define a custom user inside the container but if this option is not available then a few other options are presented:
override the user id; this is possible in Docker using the –user flag of the docker run command.
use user namespaces (covered in chapter 2) within the container, so that root inside the container is not the same as root on the host. You can enable the use of user namespaces in Docker, but it’s not turned on by default. If you’re interested about how to do it please take a look to Isolate containers with a user namespace
The use of —priviledged flag
The usage of priviledged flag give extended (Linux) capabilities to the process representing the running container. Docker introduced the –privileged flag to enable DinD (Docker in Docker) which can be used by build tools(very often in the CI/CD context) running as containers, which need access to the Docker daemon in order to use Docker to build container images.
Mounting sensitive directories
Mounting inside the containers the root file system or specific host folders is not a very good idea. List of folders to avoid mounting:
Mounting /etc would permit modifying the host’s /etc/passwd file from within the container.
Mounting /bin, /usr/bin or /usr/sbin would allow the container to write executables into the host directory.
Mounting host log directories into a container could enable an attacker to modify or erase the logs.
Mounting the Docker Socket
In a Docker environment, there is a Docker daemon process that essentially does all the work. When you run the docker command-line utility, this sends instructions to the daemon over the Docker socket that lives at /var/run/docker.sock . Any entity that can write to that socket can also send instructions to the Docker daemon. The daemon runs as root and will happily build and run any software of your choosing on your behalf.
Accessing the Docker Daemon via REST API with no authentication
This in not really mentioned in the book (even that I think that it should) but it’s very similar with the previous paragraph. The docker daemon can be also accessed via a REST API; by default the API is accessible with no authentication.
Sharing namespaces between the container and the host
Containerized processes are all visible from the host; thus, sharing the process namespace to a container lets that container see the other containerized processes.
10. Container Network Security
The chapter starts with an introduction to ISO/OCI networking model and this model is used during the chapter to explain different topics related to network security. The author is focusing on explaining the networking model for containers running under Kubernetes orchestrator but even if you’re not interested on K8s it is still possible to find some technology agnostic best practices:
Default Deny Ingress: define a network policy that denies ingress traffic by default and then add policies to permit traffic only where you expect it
Default Deny Egress: Same as the Ingress part.
Restricts ports: Restrict traffic so that it is accepted only to specific ports for each application.
11. Securely Connecting Components with TLS
Most of the chapter content have noting to do with containers (this is highlighted even by the author itself) and is treating the history of SSL/TLS protocol and the basics of PKI : Public/Private Key, X509 certificates, Certificate Signing Requests, Certificate Revocation and Certificate Authorities.
The only piece of information linked to containers that I found important is the that rather than writing your own code to set up secure connections, you can choose to use a service mesh to do it for you.
12. Passing Secrets to Containers
The chapter starts by enumerating properties that a secret must have:
it should be stored in encrypted form so that it’s not accessible to every user or entity.
it should never be written to disk unencrypted (and even better just held it in memory and never write it on disk).
it should be revocable (make them invalid in the event that the secret should no longer be trusted).
it should be able to rotate it.
it should be independent of the lifecycle of the consumers.
only software components that need the access to it should be able to read the secret
Next paragraph enumerates different ways of injecting information (secrets included) into containers:
store the information into the image
obviously this is not a very good idea for secrets because can be accessed by anyone having the image and it cannot be changed unless the images are rebuild.
use environment variables as part of the configuration that goes along with the image
same problems as the hard-coded secrets
pass the secret over the network
the running container will make the appropriate network calls to retrieve or receive the information.
in this case the date(secret) in transit should be encrypted, most probably using a service mesh
the principal drawback of this approach is how the container will be able to authenticate to this service offering the secret; the author does not offer any solution
pass the secrets at runtime using the environment variables.
environment variables defined for the container can be seen using different commands like docker inspect.
pass the secrets through files.
This option consists in write the secrets into files that the container can access through a mounted volume.
Combining this with a secure secrets store ensures that secrets are never stored “at rest” unencrypted.
I found this chapter rather strange because it explains how to not pass secrets to containers instead of presenting the good practices. Speaking about good practices, this are very briefly mentioned like the usage of a third-party (commercial) solution for secret storage. I would have preferred to have more insights on how this tools are working.
13. Container Runtime Protection
This chapter treats the controls to put in place in order to assure the protection of the running containers.
The first idea is to compute a container profile. This profile should be computed prior to the deployment of the container in live and should contains the normal behavior of the container. Once this profile is known, then at runtime a (container security)tool would be able to compare the profile with the real behavior of the container and detect any discrepancy.
This container profile could contains the following information:
network traffic – the other containers and or hosts that the container normally communicates with.
executable – what kind of commands the normal cunning container is executing. In this case the author suggests to use eBPF (which stands for extended Berkeley Packet Filter) technology.
file access – what files from the container file system are usually accessed.
user IDs – as a general rule, if the container is doing one job, it probably needs to operate under only one user identity.
(Linux) capabilities – the (minimal) list of capabilities the container needs in order to execute properly; any attempt to use a capability not present in the list should raise a red flag.
The second idea presented is the drift prevention. It’s considered best practice to treat containers as immutable. The container is instantiated from its image, and then the contents of the container should not change. In the case of drift prevention the (container security) tool will be able to make the difference between the software that came from the image, and the software that is running in the workload so it gives the ability to immediately stop any software that doesn’t belong to the (original) image.
14. Containers and the OWASP Top 10
This sounds a very interesting topic but unfortunately the author it expedite it very fast. In some of the cases the author is even confessing that the type of risk is not linked to containers and could be applied to non containers world also.
Same OWASP Top 10 (2017) have direct applicability in the container word:
This can be linked with the usage of secrets in container word. These secrets need to be stored with care and passed into containers at runtime, as discussed in Chapter 12.
The containerized applications that must communicate between them would need to identify each other using certificates, and communicate using secure connections. This can be handled directly by containers, or you can use a service mesh
This book is doing a very good job in covering different mechanisms that could be used in order to build secure (RESTful) APIs. For each security control the author explains what kind of attacks the respective control is able to mitigate.
The reader should be comfortable with Java and Maven because most of the code examples of the book (and there are a lot) are implemented in Java.
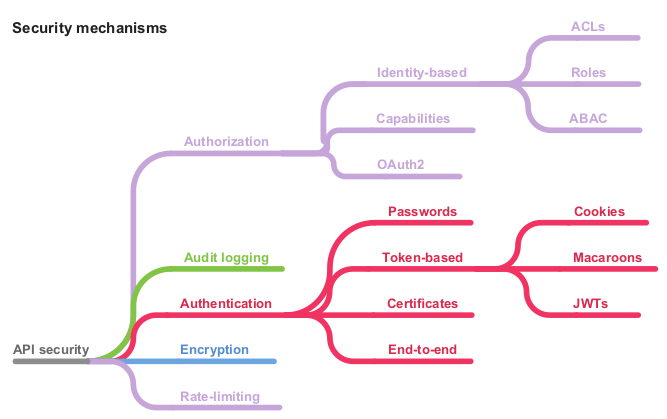
The diagram of all the security mechanism presented:
Part 1: Foundations
The goal of the first part is to learn the basics of securing an API. The author starts by explaining what is an API from the user and from developer point of view and what are the security properties that any software component (APIs included) should fill in:
Confidentiality – Ensuring information can only be read by its intended audience
Integrity – Preventing unauthorized creation, modification, or destruction of information
Availability – Ensuring that the legitimate users of an API can access it when they need to and are not prevented from doing so.
Even if this security properties looks very theoretical the author is explaining how applying specific security controls would fulfill the previously specified security properties. The following security controls are proposed:
Encryption of data in transit and at rest – Encryption prevents data being read or modified in transit or at rest
Authentication – Authentication is the process of verifying whether a user is who they say they are.
Authorization/Access Control – Authorization controls who has access to what and what actions they are allowed to perform
Audit logging – An audit log is a record of every operation performed using an API. The purpose of an audit log is to ensure accountability
Rate limiting – Preserves the availability in the face of malicious or accidental DoS attacks.
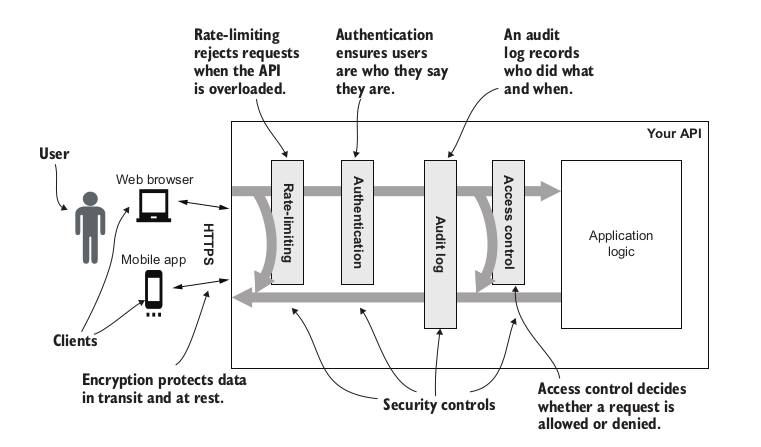
This different controls should be added into a specific order as shown in the following figure:
Different security controls that could/should be applied for any API
To illustrate each control implementation, an example API called Natter API is used. The Natter API is written in Java 11 using the Spark Java framework. To make the examples as clear as possible to non-Java developers, they are written in a simple style, avoiding too many Java-specific idioms. Maven is used to build the code examples, and an H2 in-memory database is used for data storage.
The same API is also used to present different types of vulnerabilities (SQL Injection, XSS) and also the mitigations.
Part 2: Token-based Authentication
This part presents different techniques and approaches for the token-based authentication.
Session cookie authentication
The first authentication technique presented is the “classical” HTTP Basic Authentication. HTTP Basic Authentication have a few drawbacks like there is no obvious way for the user to ask the browser to forget the password, the dialog box presented by browsers for HTTP Basic authentication cannot be customized.
But the most important drawback is that the user’s password is sent on every API call, increasing the chance of it accidentally being exposed by a bug in one of those operations. This is not very practical that’s why a better approach for the user is to login once then be trusted for a specific period of time. This is basically the definition of the Token-Based authentication:
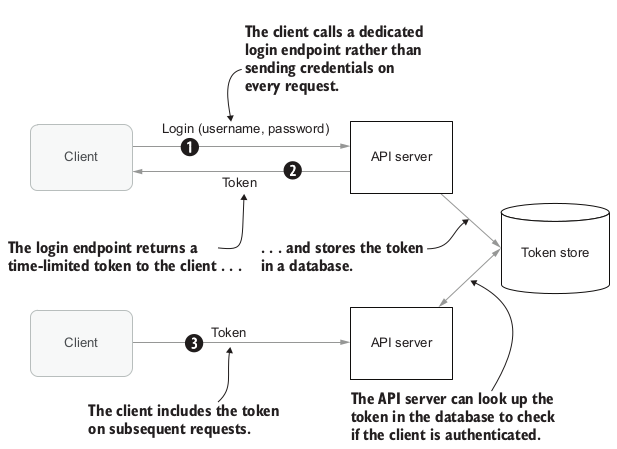
Token Based authentication
The first presented example of Token-Based authentication is using the HTTP Base Authentication for the dedicated login endpoint (step number 1 from the previous figure) and the session cookies for moving the generated token between the client and the API server.
The author take the opportunity to explain how session cookies are working and what are the different attributes but especially he presents the attacks that are possible in the case of using session cookies. The session fixation attack and the Cross-Site Request Forgery attack (CSRF) are presented in details with different options to avoid or mitigate those attacks.
Tokens whiteout cookies
The usage of session cookies is tightly linked to a specific domain and/or sub-domains. In case you want to make requests cross domains then the CORS (Cross-Origin Resource Sharing) mechanism can be used. The last part of the chapter treating the usage of session cookies contains detailed explanations of CORS mechanism.
Using the session cookies as a mechanism to store the authentication tokens have a few drawbacks like the difficulty to share cookies between different distinguished domains or the usage of API clients that do not understand the web standards (mobile clients, IOT clients).
Another option that is presented are the tokens without cookies. On the client side the tokens are stored using the WebStorage API. On the server side the tokens are stored into a “classical” relational data base. For the authentication scheme the Bearer authentication is used (despite the fact that the Bearer authentication scheme was created in the context of OAuth 2.0 Authorization framework is rather popular in other contexts also).
In case of this solution the least secure component is the storage of the authentication token into the DB. In order to mitigate the risk of the tokens being leaked different hardening solutions are proposed:
store into the DB the hash of tokens
store into the DB the HMAC of the tokens and the (API) client will then send the bearer token and the HMAC of the token
This authentication scheme is not vulnerable to session fixation attacks or CSRF attacks (which was the case of the previous scheme) but an XSS vulnerability on the client side that is using the WebStorage API would defeat any kind of mitigation control put in place.
Self-contained tokens and JWTs
The last chapter of this this (second) part of the book treats the self-contained or stateless tokens. Rather than store the token state in the database as it was done in previous cases, you can instead encode that state directly into the token ID and send it to the client.
The most client-side tokens used are the Json Web Token/s (JWT). The main features of a JWT token are:
A standard header format that contains metadata about the JWT, such as which MAC or encryption algorithm was used.
A set of standard claims that can be used in the JSON content of the JWT, with defined meanings, such as exp to indicate the expiry time and sub for the subject.
A wide range of algorithms for authentication and encryption, as well as digital signatures and public key encryption.
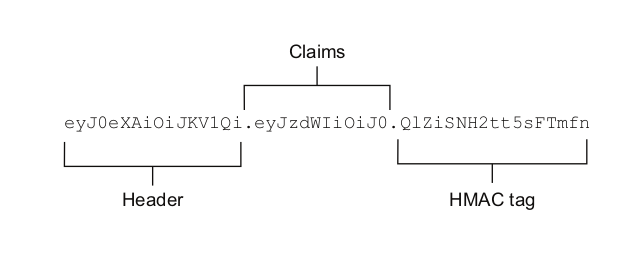
A JWT token can have three parts:
Header – indicates the algorithm of how the JWT was produced, the key used to authenticate the JWT to or an ID of the key used to authenticate. Some of the header values:
alg: Identifies which algorithm is used to generate the signature
kid: Key Id; as the key ID is just a string identifier, it can be safely looked up in server-side set of keys.
jwk: The full key. This is not a safe header to use; Trusting the sender to give you the key to verify a message loses all security properties.
jku: An URL to retrieve the full key. This is not a safe header to use. The intention of this header is that the recipient can retrieve the key from a HTTPS endpoint, rather than including it directly in the message, to save space.
Payload/Claims – pieces of information asserted about a subject. The list of standard claims:
iss (issuer): Issuer of the JWT
sub (subject): Subject of the JWT (the user)
aud (audience): Recipient for which the JWT is intended
exp (expiration time): Time after which the JWT expires
nbf (not before time): Time before which the JWT must not be accepted for processing
iat (issued at time): Time at which the JWT was issued; can be used to determine age of the JWT
jti (JWT ID): Unique identifier; can be used to prevent the JWT from being replayed (allows a token to be used only once)
Signature – Securely validates the token. The signature is calculated by encoding the header and payload using Base64url Encoding and concatenating the two together with a period separator. That string is then run through the cryptographic algorithm specified in the header.
Example of JWT token
Even if the JWT could be used as self-contained token by adding the algorithm and the signing key into the header, this is a very bad idea from the security point of view because you should never trust a token sign by an external entity. A better solution is to store the algorithm as metadata associated with a key on the server.
Storing the algorithm and the signing key on the server side it also helps to implement a way to revoke tokens. For example changing the signing key it can revoke all the tokens using the specified key. Another way to revoke tokens more selectively would be to add to the DB some token metadata like token creation date and use this metadata as revocation criteria.
Part 3: Authorization
OAuth2 and OpenID Connect
A way to implement authorization using JWT tokens is by using scoped tokens. Typically, the scope of a token is represented as one or more string labels stored as an attribute of the token. Because there may be more than one scope label associated with a token, they are often referred to as scopes. The scopes (labels) of a token collectively define the scope of access it grants.
A scoped token limits the operations that can be performed with that token. The set of operations that are allowed is known as the scope of the token. The scope of a token is specified by one or more scope labels, which are often referred to collectively as scopes.
Scopes allow a user to delegate part of their authority to a third-party app, restricting how much access they grant using scopes. This type of control is called discretionary access control (DAC) because users can delegate some of their permissions to other users.
Another type of control is the mandatory access control (MAC), in this case the user permissions are set and enforced by a central authority and cannot be granted by users themselves.
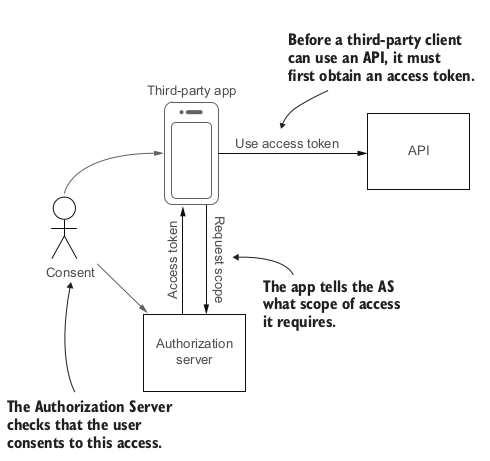
OAuth2 is a standard to implement the DAC. OAuth uses the following specific terms:
The authorization server (AS) authenticates the user and issues tokens to clients.
The user also known as the resource owner (RO), because it’s typically their resources that the third-party app is trying to access.
The third-party app or service is known as the client.
The API that hosts the user’s resources is known as the resource server (RS).
To access an API using OAuth2, an app must first obtain an access token from the Authorization Server (AS). The app tells the AS what scope of access it requires. The AS verifies that the user consents to this access and issues an access token to the app. The app can then use the access token to access the API on the user’s behalf.
One of the advantages of OAuth2 is the ability to centralize authentication of users at the AS, providing a single sign-on (SSO) experience. When the user’s client needs to access an API, it redirects the user to the AS authorization endpoint to get an access token. At this point the AS authenticates the user and asks for consent for the client to be allowed access.
OAuth can provide basic SSO functionality, but the primary focus is on delegated third-party access to APIs rather than user identity or session management. The OpenID Connect (OIDC) suite of standards extend OAuth2 with several features:
A standard way to retrieve identity information about a user, such as their name, email address, postal address, and telephone number.
A way for the client to request that the user is authenticated even if they have an existing session, and to ask for them to be authenticated in a particular way, such as with two-factor authentication.
Extensions for session management and logout, allowing clients to be notified when a user logs out of their session at the AS, enabling the user to log out of all clients at once.
Identity-based access control
In this chapter the author introduces the notion of users, groups, RBAC (Role-Based Access Control) and ABAC (Access-Based Access Control). For each type of access control the author propose an ad-hoc implementation (no specific framework is used) for the Natter API (which is the API used all over the book to present different security controls.)
Capability-based security and macaroons
A capability is an unforgeable reference to an object or resource together with a set of permissions to access that resource. Compared with the more dominant identity-based access control techniques like RBAC and ABAC capabilities have several differences:
Access to resources is via unforgeable references to those objects that also grant authority to access that resource. In an identity-based system, anybody can attempt to access a resource, but they might be denied access depending on who they are. In a capability-based system, it is impossible to send a request to a resource if you do not have a capability to access it.
Capabilities provide fine-grained access to individual resources.
The ability to easily share capabilities can make it harder to determine who has access to which resources via your API.
Some capability-based systems do not support revoking capabilities after they have been granted. When revocation is supported, revoking a widely shared capability may deny access to more people than was intended.
The way to use capability-based security in the context of a REST API is via capabilities URIs. A capability URI (or capability URL) is a URI that both identifies a resource and conveys a set of permissions to access that resource. Typically, a capability URI encodes an unguessable token into some part of the URI structure. To create a capability URI, you can combine a normal URI with a security token.
The author adds the capability URI to the Netter API and implements this with the token encoded into the query parameter because this is simple to implement. To mitigate any threat from tokens leaking in log files, a short-lived tokens are used.
But putting the token representing the capability in the URI path or query parameters is less than ideal because these can leak in audit logs, Referer headers, and through the browser history. These risks are limited when capability URIs are used in an API but can be a real problem when these URIs are directly exposed to users in a web browser client.
One approach to this problem is to put the token in a part of the URI that is not usually sent to the server or included in Referer headers.
The capacities URIs can be also be mixed with identity for handling authentication and authorization.There are a few ways to communicate identity in a capability-based system:
Associate a username and other identity claims with each capability token. The permissions in the token are still what grants access, but the token additionally authenticates identity claims about the user that can be used for audit logging or additional access checks. The major downside of this approach is that sharing a capability URI lets the recipient impersonate you whenever they make calls to the API using that capability.
Use a traditional authentication mechanism, such as a session cookie, to identify the user in addition to requiring a capability token. The cookie would no longer be used to authorize API calls but would instead be used to identify the user for audit logging or for additional checks. Because the cookie is no longer used for access control, it is less sensitive and so can be a long-lived persistent cookie, reducing the need for the user to frequently log in
The last part of the chapter is about macaroons which is a technology invented by Google (https://research.google/pubs/pub41892/). The macaroons are extending the capabilities based security by adding more granularity.
A macaroon is a type of cryptographic token that can be used to represent capabilities and other authorization grants. Anybody can append new caveats to a macaroon that restrict how it can be used
For example is possible to add new capabilities that allows only read access to a message created after a specific date. This new added extensions are called caveats.
Part 4: Microservice APIs in Kubernetes
Microservice APIs in K8S
This chapter is an introduction to Kubernetes orchestrator. The introduction is very basic but if you are interested in something more complete then Kubernetes in Action, Second Edition is the best option. The author also is deploying on K8S a (H2) database, the Natter API (used as demo through the entire book) and a new API called Linked-Preview service; as K8S “cluster” the Minikube is used.
Having an application with multiple components is helping him to show how to secure communication between these components and how to secure incoming (outside) requests. The presented solution for securing the communication is based on the service mesh idea and K8s network policies.
A service mesh works by installing lightweight proxies as sidecar containers into every pod in your network. These proxies intercept all network requests coming into the pod (acting as a reverse proxy) and all requests going out of the pod.
Securing service-to-service APIs
The goal of this chapter is to apply the authentication and authorization techniques already presented in previous chapters but in the context of service-to-service APIs. For the authentication the API’s keys, the JWT are presented. To complement the authentication scheme, the mutual TLS authentication is also used.
For the authorization the OAuth2 is presented. A more flexible alternative is to create and use service accounts which act like regular user accounts but are intended for use by services. Service accounts should be protected with strong authentication mechanisms because they often have elevated privileges compared to normal accounts.
The last part of the chapter is about managing service credentials in the context of K8s. Kubernetes includes a simple method for distributing credentials to services, but it is not very secure (the secrets are Base64 encoded and can be leaked by cluster administrator).
Secret vaults and key management services provide better security but need an initial credential to access. Using secret vaults have the following benefits:
The storage of the secrets is encrypted by default, providing better protection of secret data at rest.
The secret management service can automatically generate and update secrets regularly (secret rotation).
Fine-grained access controls can be applied, ensuring that services only have access to the credentials they need.
The access to secrets can be logged, leaving an audit trail.
Part 5: APIs for the Internet of Things
Securing IoT communications
This chapter is treating how different IoT devices could communicate securely with an API running on a classical system. The IoT devices, compared with classical computer systems have a few constraints:
An IOT device has significantly reduced CPU power, memory, connectivity, or energy availability compared to a server or traditional API client machine.
For efficiency, devices often use compact binary formats and low-level networking based on UDP rather than high-level TCP-based protocols such as HTTP and TLS.
Some commonly used cryptographic algorithms are difficult to implement securely or efficiently on devices due to hardware constraints or threats from physical attackers.
In order to cope with this constraints new protocols have been created based on the existing protocols and standards:
Datagram Transport Layer Security (DTLS). DTLS is a version of TLS designed to work with connectionless UDP-based protocols rather than TCP based ones. It provides the same protections as TLS, except that packets may be reordered or replayed without detection.
JOSE (JSON Object Signing and Encryption) standards. For IoT applications, JSON is often replaced by more efficient binary encodings that make better use of constrained memory and network bandwidth and that have compact software implementations.
COSE (CBOR Object Signing and Encryption) provides encryption and digital signature capabilities for CBOR and is loosely based on JOSE.
In the case when the devices needs to use public key cryptography then the key distribution became a complex problem. This problem could be solved by generating random keys during manufacturing of the IOT device (device-specific keys will be derived from a master key and some device-specific information) or through the use of key distribution servers.
Securing IoT APIs
The last chapter of the book is focusing on how to secure access to APIs in Internet of Things (IoT) environments meaning APIs provided by the devices or cloud APIs which are consumed by devices itself.
For the authentication part, the IoT devices could be identified using credentials associated with a device profile. These credentials could be an encrypted pre-shared key or a certificate containing a public key for the device.
For the authorization part, the IoT devices could use the OAuth2 for IoTwhich is a new specification that adapts the OAuth2 specification for constrained environments .
run the container in read only mode: docker run --read-only...or docker run –v /hostdir:/containerdir:ro
Hardening
Container
docker run --cap-drop option, you can lock down root in a container so that it has limited access within the container.
--security-opt=no-new-privileges prevents the uid transition while running a setuid binary meaning that even if the image has dangerous code in it, we can still prevent the user from escalating privileges
Host
networking – only SSH and NTP
Logging
Securing Containers on the High Seas (by Jack Mannino)
The entire presentation is around the 4 phases used to create an application that runs on containers:
Design
Build
Ship
Run
Design (secure the design)
Understand how the system will be used and abused.
Beware of tightly-coupled components.
Can solve security issues through patterns that lift security out of the container itself. ex Service Mesh Pattern.
Build (secure the build process)
Build first level of security controls into containers.
Orchestration systems can override these controls and mutate containers through an extra layer of abstraction.
Use base images that ship with minimal installed packages and
dependencies.
Use version tags vs. image:latest; do not use latest !
Use images that support security kernel features
Limit privileges
Often, we only need a subset of capabilities
ex: Ping command requires CAP_NET_RAW. So we can run docker image like this:
docker run -d --cap-drop=all --cap-add=net_raw my-image
Kernel Hardening
Seccomp is a Linux kernel feature that allows you to filter dangerous syscalls.
MAC (Mandatory Access Control)
SELinux and AppArmor allow you to set granular controls on files and network access.
Docker leads the way with its default AppArmor profile.
Ship
Validate the integrity of the container.
ex: Docker Content Trust & Notary
Consume only trusted content for tagged Docker builds.
Validate security pre-conditions.
Allow or deny a container’s cluster admission.
Centralized interfaces and validation.
Run
Containers are managed through orchestration systems.
Management API – used to deploy, modify and kill services.
Frequently deployed without authentication or access control.
Authentication
Authenticate subjects (users and service accounts) to the cluster.
Avoid sharing service accounts across multiple services.
Subjects should only have access to the resources they need.


You must be logged in to post a comment.