This is the review of the Data-Oriented programming (Reduce software complexity) book.
(My) Conclusion
This book is about a “new” programming paradigm called Data Oriented Programming (a.k.a. DOP). I put the word new between quotes because the underlying concepts and principles have been around for much longer in various forms and under different names.
DOP is a programming paradigm aimed at simplifying the design and implementation of software systems, where information is at the center in systems such as frontend or backend web applications and web services. Instead of designing information systems around software constructs that combine code and data (e.g., objects instantiated from classes), DOP encourages the separation of code from data.
The author don’t really explains the history of the DOP but it looks like the term was coined for the first time in the gaming industry. One significant influence on the development of data-oriented programming principles was the publication of “Game Engine Architecture” by Jason Gregory in 2009.
The term “data-oriented programming” (DOP) was popularized by Noel Llopis, a software engineer, in his blog post titled “Data-Oriented Design (Or Why You Might Be Shooting Yourself in The Foot With OOP)” published in 2010. In this blog post, Llopis introduced the concept of data-oriented design as an alternative approach to Object-Oriented Programming (OOP) for certain types of performance-critical applications, especially in the context of video games and real-time simulations.
Part 1 – Flexibility
To introduce DOP (Data-Oriented Programming), the initial section of the book commences with an illustration of a project implemented solely in OOP (Object-Oriented Programming). The aim is to demonstrate that a system developed using OOP tends to become intricate and challenging to comprehend due to the mixing of code and data within objects. Additionally, such systems pose greater difficulties when adapting to changing system requirements.
The first principle of DOP advocates a distinct segregation between code (behavior) and data. Data is organized into data entities, while the code is housed within code modules. These code modules consist of stateless functions; this functions receive data they manipulate as an explicit argument.
The second principle of DOP is to represent application data with generic data structures. The most common generic data structures are maps (aka dictionaries) and arrays (or lists). But other generic data structures (e.g., sets, trees, and queues) can be used as well.
The third principle of DOP is that the date is immutable. Within the DOP framework, data modifications are achieved by generating new versions of the data. Although the reference to a variable can be altered to point to a fresh version of the data, the actual value of the data remains unchanged.
This concept of structural sharing enables the efficient creation of new data versions in terms of memory and computation. Instead of duplicating common data between the two versions, they are shared, leading to better memory utilization.
Part 2 – Scalability
The second part of the book delves deeper into the practical application of DOP, addressing its primary limitations from a beginner’s perspective and proposing solutions for handling these challenges:
- DOP is primarily concerned with generic data structures, making it difficult to determine the specific types of data being used. In contrast, OOP allows for clear identification of data types associated with each data element.
- Implementing immutable data structures with structural sharing can result in performance issues, especially for large data structures.
- DOP’s reliance on in-memory data poses challenges when interacting with relational databases or other external services.
To tackle the first issue, the author introduces the fourth (and final) DOP principle: “Separate data schema from data representation.” This involves representing the data schema using JSON schemas. Various libraries are available for implementing JSON schema validators, see JSON Schema Validators.
To tackle the second concern, the author introduces the “persistent data structures”. Persistent data structures refer to data structures that allow for efficient modification and querying while preserving the previous versions of the data structure. These data structures are designed to support operations that create new versions of the structure rather than modifying the existing structure in-place.
Some examples presented in the first part of the book are re-implemented using persistent data structures in JavaScript using the Immutable.js and in Java using Paguro.
To address Database and WebServices operations, same of the DOP principles are used. For instance, regardless of whether the data originates from a relational or non-relational database, it is depicted using generic data structures like maps or lists. These generic data structures can then be manipulated using generic functions. These functions include operations such as generating a list composed of the values from specific data fields, producing a map variant by excluding a particular data field, or grouping maps into a list based on the values of a specific data field.
Part 3 – Maintainability
The final section of the book delves into more advanced subjects, such as data validation using JSON Schema regex patterns, creating data model diagrams from JSON Schema (utilizing tools like JSON Schema Viewer or Malli), and generating unit tests based on schemas using JSON Schema Faker.
Additionally, certain topics, such as implementing polymorphism through multimethods , while not directly related to DOP, are nonetheless highly intriguing and educational.

 The goal of this ticket is to present the different technological components of WebAssembly in comparison with the Java technological stack.
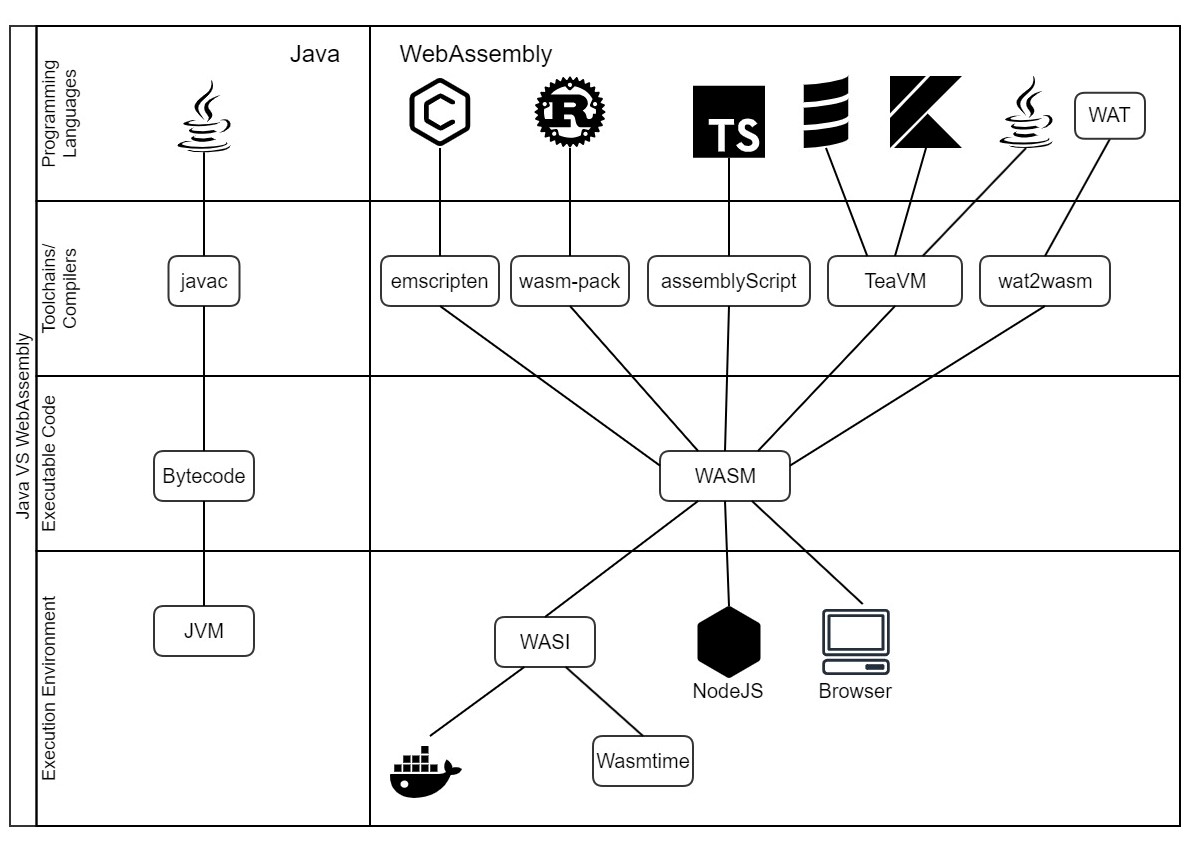


You must be logged in to post a comment.