Recently, I encountered some issues with a (Jenkins) declarative pipeline running on CloudBees CI, specifically for a Python project. The CloudBees CI instance was operating within an OpenShift Platform (OCP) cluster, and I was employing the Kubernetes plugin for managing agents/slaves.
Here are the lessons learned, some of them linked to OCP/K8S, some linked to CloudBees CI, some linked to Python and some other linked to all this technologies put together:
Make sure that the application packaged as image is running properly when executed from a plain Docker/Podman system.
The container/s will be run into a pod so the (Dockerfile) WORKDIR instruction (if defined) in the container/s will be ignored. If you need to define a working directory then you should specify this into the pod definition via pod.spec.template.spec.containers.workingDir.
The default working directory for the running container/s will be (Jenkins) ${env.WORKSPACE}.
If the pipeline code is fetched from a Git repository then the repository will be automatically mapped as volume inside the container/s under the folder ${env.WORKSPACE}
For container/s running Python the sys.path variable will be: ‘ ‘, ${env.WORKSPACE}, container.PYTHONPATH in this specific order, where ‘ ‘ is the current directory which by default will be ${env.WORKSPACE} (see point number 3). So the default sys.path will be: ${env.WORKSPACE}, ${env.WORKSPACE}, container.PYTHONPATH
The (nasty) side effect of the previous point is that if there are Python modules in Git repository (which is mounted in the container, see point number 4) and in the container/s, having the same name, then the module/s from the Git repository will be used for execution and not the one from container/s.
If you want to revert the situation from previous point the only way is to play on the first element of the sys.path variable which will always be the current directory (‘ ‘). If the first element of the sys.path is / then the container/s modules will be used for execution instead of the Git repository modules.
The sys.path variable is computed at runtime by the Python interpreter so it cannot be modified in advance (like the PYTHONPATH environment variable) prior to the execution of a program.
The goal of this ticket is to present a few ways to obtain lighter container images. But why it’s so important to build and use lighter containers ?
Lighter containers means :
less disk space used to store the images
faster transfer (pull/push) of the images to/from the container registry,
faster build process of images and easier to update them (because it contains less components)
better security posture (less components, less vulnerabilities, smaller attack surface).
The hints that I will present could be sorted in two different categories: what to put into an image (to be lighter) and how to build an image (to be lighter).
What to put into your image
1. Use the lighter base image as possible
Choose the base image based of your needs of you application and try to use the minimal base image. If for example your application is Java based then choose as base image something like openjdk:19-slim-buster not a base image containing Java + other components that you don’t need. Following this approach is almost effortless but you will depend of the (base) image maintainer for any updates.
A better, but more difficult and more time consuming approach is to start from a bare minimal image like Alpineor Red Hat Universal Base Image 8 Minimal and install on top whatever components/packages you need. Following this approach will give you much more flexibility because you will be able to patch the needed components as the pace of their update; the drawback is that you have to spend some time creating the Dockerfile that builds the needed image.
2. Use multi-stage build
With multi-stage builds you can use multiple FROM statements in your Dockerfile. Each FROM instruction can use a different base, and each of them begins a new stage of the build. For a very good explanation of this feature you can see the Docker documentation.
The example given in the Docker documentation is around compiling a Go application into a stage and just copy the desired artifacts into another stage that will be used in the final image.
To illustrate the multi-stage build I will use as example Java 9 and the jlink tool that generates a custom Java runtime image that contains only the platform modules that are required for a given application:
FROM openjdk:11.0.14-jdk AS initial_jdk

# build a custom JRE
RUN jlink --add-modules java.management,java.base,java.logging,java.naming,java.sql,java.xml \
 --output ./customJre/ --strip-debug --no-man-pages --no-header-files \
 --compress=2

# use as base image the ubi minimal
FROM registry.access.redhat.com/ubi8/ubi-minimal:8.5-230

# copy the custom JRE into the final image
COPY --from=initial_jdk ./customJre /opt/java/openjdk

ENV JAVA_HOME=/opt/java/openjdk \
    PATH="/opt/java/openjdk/bin:$PATH"
3. Deactivate the package manager cache
Different package managers are copying the installed dependencies also in cache folders so it’s not needed to re-download a dependency if is necessary to be re-installed. Obviously, in the case of containers the cache feature should be deactivated or the cache folders should be deleted after the dependencies installation.
A few examples of package managers and how to deactivate or delete the cache:
pip cache purge – Remove all items from the cache.
dnf clean – Performs cleanup of temporary files kept for repositories. This includes any such data left behind from disabled or removed repositories as well as for different distribution release versions.
Here is an example of a Dockerfile with and without the usage of the cache clean:
#No dnf Clean
FROM registry.access.redhat.com/ubi8/ubi-minimal:8.5-230

RUN microdnf install fontconfig \
&& microdnf install libXtst
#With dnf clean
FROM registry.access.redhat.com/ubi8/ubi-minimal:8.5-230

RUN microdnf install fontconfig \
&& microdnf install libXtst \
&& microdnf clean all
And here are the size of the two images:
The usage of deactivation of package manager cache should be combined with either hint number 4 (Minimize the number of RUN, COPY, ADD instructions) or hint number 5 (Use the squash flag of docker/podman build).
How to build a lighter image
This hints are around the container UnionFS (Union File System) and will explain how to create less or smaller image layers.
4. Minimize the number of RUN, COPY, ADD instructions
Only the instructions RUN, COPY, ADD create layers; each usage of one of this instructions will create a new layer into the final image. Minimizing the number of this instructions will minimize the number of image layers which will minimize the size of the final image.
Let’s use the following Dockerfile as (faulty) example:
FROM registry.access.redhat.com/ubi8/ubi-minimal:8.5-230
# call twice the RUN instruction
RUN microdnf install fontconfig
RUN microdnf install libXtst
In this Dockerfile we called twice the RUN instruction; the image (having an id starting with 14e7) will have 4 layers:
The squash flag is a flag of the docker build command which is still experimental that will squash newly built layers into a single new layer.
Podman build command also have a similar flag; Podman also have a squash-all flag that will squash all of the new image’s layers (including those inherited from a base image) into a single new layer.
6. Use .dockerignore to filter the content of Docker build context
The .dockerignore file is used to filter the content that will be used by the Docker build context to create an image.
The goal of this feature is just to have a faster build process ( because less files will be present in the build context) but it can help also in the case when accidentally the Dockerfile defines more files than needed.
7. Use external tools
I have to admit using external tools to obtain a slimmer image should not be the default or preferred solution especially after docker and podman implemented the squash flags. But if is not possible to use the existing solutions then here are some free tools that you could try:
docker-slim try to figure it out what files are useful from the target image by running a container of the target image.
docker-slim is capable to run static or dynamic analysis; it also capable to probe the running container using http requests.
docker-slim contains also a linter for Dockerfiles; Running the linter on the “No dnf Clean” Dockerfile from the hint nr3 (Deactivate the package manager cache) give the following results:
docker-slim lint
Conclusion
As you could see there are a few ways to create lighter images; some of the hints are “low hanging fruits” and can be applied systematically, like the usage of the squash flag (hint nr. 5) and the minimization of RUN commands (hint nr. 4); some others demand a little bit of thinking and try and error, like the usage of the right base image (hint nr. 1) or the usage of multi-stage builds (hint nr. 2).
Today, the container landscape is rather crowded and Docker is not the predominant player anymore.
The goal of this ticket is to present different products and/or projects and/or vendors that are part of the containers landscape and classify them using the existing standards.
For this classification I will use the standards from Open Container Initiative (OCI) and Cloud Native Computing Foundation (CNCF).
Open Container Initiative
The goal of the Open Container Initiative (OCI) is to promote a set of common, minimal, open standards and specifications around container technology more precisely container formats and runtime . At the moment of this writing it offers the following standards:
The goal of Cloud Native Computing Foundation (CNCF) is to drive adoption of cloud native technologies (Containers, service meshes, microservices, immutable infrastructure) by fostering and sustaining an ecosystem of open source, vendor-neutral projects. In the specific case of containers we will focus on the Container Runtime Interface (CRI).
If you wonder if there is any link between OCI and CNCF, the answer is that both initiatives are operating under the Linux Foundation umbrella, the OCI focusing only on the container formats and runtime.
OCI Image Specification
The image specification defines the structure of an OCI Image which should contain a manifest, an image index (optional), a set of filesystem layers, and a configuration. The goal of this specification is to enable the creation of interoperable tools for building, transporting, and preparing a container image to run.
In order to see the content of an OCI image the following command could be used (for a nginx image in this example):
On the tooling side here are a few tools that are able to generate OCI compliant images and this list is far from being exhaustive:
Kaniko – tool to build container images from a Dockerfile, inside a container or Kubernetes cluster. Kaniko doesn’t depend on a Docker daemon and executes each command within a Dockerfile completely in userspace. This enables building container images in environments that can’t easily or securely run a Docker daemon, such as a standard Kubernetes cluster. The tool was created by Google.
Jib – tool to build Docker and OCI images for your Java applications without a Docker daemon. It is available as plugins for Maven and Gradle and as a Java library. The tool was created by Google.
Buildah – tool to build OCI images from a Dockerfile that is daemonless and rootless. It is also capable to generate a pod file from one or more images and also mimic the execution of a pod.
Tools to build OCI compliant images
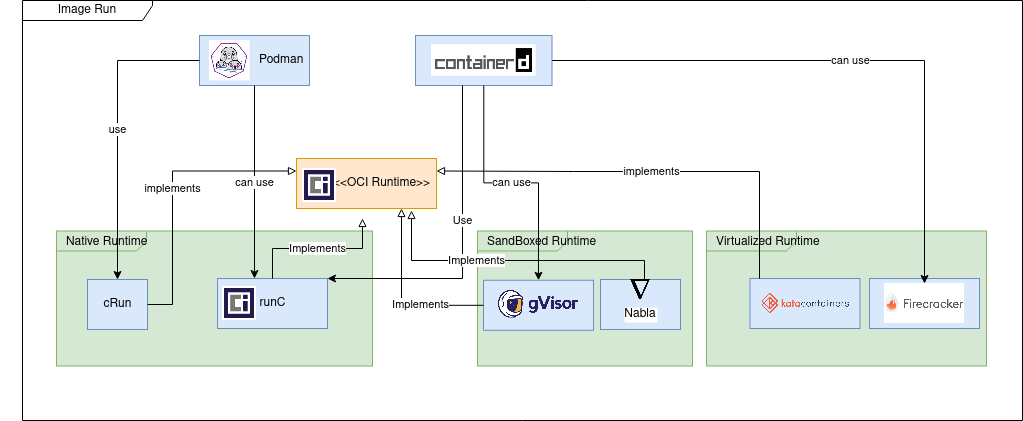
OCI Runtime Specification
The runtime specification goal is to specify the configuration, execution environment, and lifecycle of a container. A container’s configuration is specified as the config.json for the supported platforms and details the fields that enable the creation of a container.
The execution environment is specified to ensure that applications running inside a container have a consistent environment between runtimes along with common actions defined for the container’s lifecycle.
From the implementation point of view we can distinguish three types of runtimes.
Native runtimes are using the host kernel to run the containers. The isolation of containers which are sharing the same kernel can be improved by using “out of the box” security mechanisms like seccomp, AppArmor or SELinux.
The most used native container runtimes projects today are (a few other existed in the past but now are deprecated: railcar, rkt):
runC – the de-facto standard container runtime maintained by Docker under Apache 2 license
cRun – created and maintained by RedHat is part of the Podman/Buildah family tools.
Sandboxed runtimes instead of sharing the host kernel, the containerized process runs on a kernel proxy layer, which then interacts with the host kernel on the container’s behalf. Because of this increased isolation, these runtimes have a reduced attack surface and make it less likely that a containerized process can “escape” from the original container.
gVisor provides a virtualized environment in order to sandbox containers. The system interfaces normally implemented by the host kernel are moved into a distinct, per-sandbox application kernel in order to minimize the risk of a container escape exploit.
To do this, a component of gVisor called the Sentry intercepts syscalls from the application. Sentry is heavily sandboxed using seccomp, such that it is unable to access filesystem resources itself. When it needs to make systemcalls related to file access, it off-loads them to an entirely separate process called the Gofer. Even those system calls that are unrelated to filesystem access are not passed through to the host kernel directly but instead are reimplemented within the Sentry. Essentially it’s a guest kernel, operating in user space.
A containerized application can avoid making a Linux system call if it links to a library OS component that implements the system call functionality. Nabla containers use library OS (aka unikernel) techniques, specifically those from the Solo5 project, to avoid system calls and thereby reduce the attack surface. Nabla containers only use 7 system calls; all others are blocked via a Linux seccomp policy.
Virtualized runtimes takes a different approach to achieve container isolation; the goal of virtualized runtimes is to create a lightweight virtual machines on which the host kernel and application will run.
The idea with Kata Containers is to run containers within a separate virtual machine. This approach gives the ability to run applications from regular OCI format container images, with all the isolation of a virtual machine.
Kata uses a proxy between the container runtime and a separate target host where the application code runs. The runtime proxy creates a separate virtual machine using QEMU to run the container on its behalf.
Is a virtual machine offering the benefits of secure isolation through a hypervisor and no shared kernel, but with startup times around 100ms.
Firecracker designers have stripped out functionality that is generally included in a kernel but that isn’t required in a container like enumerating devices. The main saving comes from a minimal device model that strips out all but the essential devices.
Tools to run OCI images
OCI Distribution Specification
The Open Container Initiative Distribution Specification (a.k.a. “OCI Distribution Spec”) defines an API protocol to facilitate and standardize the distribution of content. The specification is designed to be agnostic of content types, OCI Image types being currently the most prominent.
Artifact Verification: Help enable trust between registries.
Resumable Push: Improve communication to help reduce re-uploading for transfers interrupted midway.
Resumable Pull: Similarly, it could help reduce unneeded downloads on the incoming side.
Layer Upload Deduplication: The spec could help container registries avoid duplicating layers.
On the tooling side, most probably any tool/vendor that offers support for Docker Registry Api will also support the new specification.
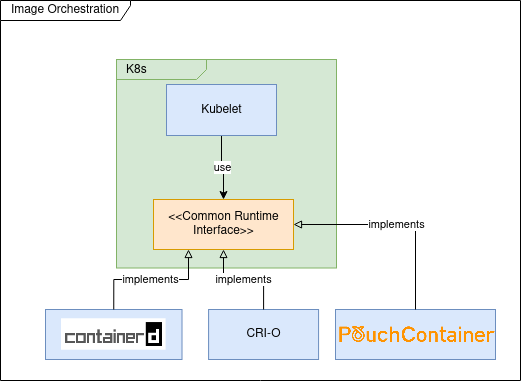
CNCF Container Runtime Interface (CRI)
In the first versions of Kubernetes (prior to 1.5) Docker was used as (default and only) container runtime engine; the usage of Docker was hardcoded into the Kubelet (k8s component that is installed and running on each cluster node having as goal to ensure that the containers described by Pod specifications are running and healthy).
The goal of CRI was to define an API that any container runtime should implement in order to be used by Kubelet.
The most important tools implementing CRI are :
containerd is Docker high-level container runtime, able to push and pull images, manage storage and define network capabilities. It is also capable of managing the lifecycle of running containers by passing corresponding commands to a low-level container runtime like runc.
CRI-O is the RedHat implementation of CRI and is the default container runtime for OpenShift since version 4. CRI-O has less features compared to containerd and delegates to components from “Container Tools” project for image management and storage. Most probably as a low level runtime container it’s using cRun.
Tools implementing CRI
Most probably my previous list is not exhaustive and other projects are implementing the CRI specification; for example PouchContainer which is container engine open sourced by Alibaba. If you are interested in knowing how the CRI implementation is done you could read this: Design and Implementation of PouchContainer CRI.


You must be logged in to post a comment.