Recently, I encountered some issues with a (Jenkins) declarative pipeline running on CloudBees CI, specifically for a Python project. The CloudBees CI instance was operating within an OpenShift Platform (OCP) cluster, and I was employing the Kubernetes plugin for managing agents/slaves.
Here are the lessons learned, some of them linked to OCP/K8S, some linked to CloudBees CI, some linked to Python and some other linked to all this technologies put together:
Make sure that the application packaged as image is running properly when executed from a plain Docker/Podman system.
The container/s will be run into a pod so the (Dockerfile) WORKDIR instruction (if defined) in the container/s will be ignored. If you need to define a working directory then you should specify this into the pod definition via pod.spec.template.spec.containers.workingDir.
The default working directory for the running container/s will be (Jenkins) ${env.WORKSPACE}.
If the pipeline code is fetched from a Git repository then the repository will be automatically mapped as volume inside the container/s under the folder ${env.WORKSPACE}
For container/s running Python the sys.path variable will be: ‘ ‘, ${env.WORKSPACE}, container.PYTHONPATH in this specific order, where ‘ ‘ is the current directory which by default will be ${env.WORKSPACE} (see point number 3). So the default sys.path will be: ${env.WORKSPACE}, ${env.WORKSPACE}, container.PYTHONPATH
The (nasty) side effect of the previous point is that if there are Python modules in Git repository (which is mounted in the container, see point number 4) and in the container/s, having the same name, then the module/s from the Git repository will be used for execution and not the one from container/s.
If you want to revert the situation from previous point the only way is to play on the first element of the sys.path variable which will always be the current directory (‘ ‘). If the first element of the sys.path is / then the container/s modules will be used for execution instead of the Git repository modules.
The sys.path variable is computed at runtime by the Python interpreter so it cannot be modified in advance (like the PYTHONPATH environment variable) prior to the execution of a program.
The goal of this ticket is to present a few ways to obtain lighter container images. But why it’s so important to build and use lighter containers ?
Lighter containers means :
less disk space used to store the images
faster transfer (pull/push) of the images to/from the container registry,
faster build process of images and easier to update them (because it contains less components)
better security posture (less components, less vulnerabilities, smaller attack surface).
The hints that I will present could be sorted in two different categories: what to put into an image (to be lighter) and how to build an image (to be lighter).
What to put into your image
1. Use the lighter base image as possible
Choose the base image based of your needs of you application and try to use the minimal base image. If for example your application is Java based then choose as base image something like openjdk:19-slim-buster not a base image containing Java + other components that you don’t need. Following this approach is almost effortless but you will depend of the (base) image maintainer for any updates.
A better, but more difficult and more time consuming approach is to start from a bare minimal image like Alpineor Red Hat Universal Base Image 8 Minimal and install on top whatever components/packages you need. Following this approach will give you much more flexibility because you will be able to patch the needed components as the pace of their update; the drawback is that you have to spend some time creating the Dockerfile that builds the needed image.
2. Use multi-stage build
With multi-stage builds you can use multiple FROM statements in your Dockerfile. Each FROM instruction can use a different base, and each of them begins a new stage of the build. For a very good explanation of this feature you can see the Docker documentation.
The example given in the Docker documentation is around compiling a Go application into a stage and just copy the desired artifacts into another stage that will be used in the final image.
To illustrate the multi-stage build I will use as example Java 9 and the jlink tool that generates a custom Java runtime image that contains only the platform modules that are required for a given application:
FROM openjdk:11.0.14-jdk AS initial_jdk

# build a custom JRE
RUN jlink --add-modules java.management,java.base,java.logging,java.naming,java.sql,java.xml \
 --output ./customJre/ --strip-debug --no-man-pages --no-header-files \
 --compress=2

# use as base image the ubi minimal
FROM registry.access.redhat.com/ubi8/ubi-minimal:8.5-230

# copy the custom JRE into the final image
COPY --from=initial_jdk ./customJre /opt/java/openjdk

ENV JAVA_HOME=/opt/java/openjdk \
    PATH="/opt/java/openjdk/bin:$PATH"
3. Deactivate the package manager cache
Different package managers are copying the installed dependencies also in cache folders so it’s not needed to re-download a dependency if is necessary to be re-installed. Obviously, in the case of containers the cache feature should be deactivated or the cache folders should be deleted after the dependencies installation.
A few examples of package managers and how to deactivate or delete the cache:
pip cache purge – Remove all items from the cache.
dnf clean – Performs cleanup of temporary files kept for repositories. This includes any such data left behind from disabled or removed repositories as well as for different distribution release versions.
Here is an example of a Dockerfile with and without the usage of the cache clean:
#No dnf Clean
FROM registry.access.redhat.com/ubi8/ubi-minimal:8.5-230

RUN microdnf install fontconfig \
&& microdnf install libXtst
#With dnf clean
FROM registry.access.redhat.com/ubi8/ubi-minimal:8.5-230

RUN microdnf install fontconfig \
&& microdnf install libXtst \
&& microdnf clean all
And here are the size of the two images:
The usage of deactivation of package manager cache should be combined with either hint number 4 (Minimize the number of RUN, COPY, ADD instructions) or hint number 5 (Use the squash flag of docker/podman build).
How to build a lighter image
This hints are around the container UnionFS (Union File System) and will explain how to create less or smaller image layers.
4. Minimize the number of RUN, COPY, ADD instructions
Only the instructions RUN, COPY, ADD create layers; each usage of one of this instructions will create a new layer into the final image. Minimizing the number of this instructions will minimize the number of image layers which will minimize the size of the final image.
Let’s use the following Dockerfile as (faulty) example:
FROM registry.access.redhat.com/ubi8/ubi-minimal:8.5-230
# call twice the RUN instruction
RUN microdnf install fontconfig
RUN microdnf install libXtst
In this Dockerfile we called twice the RUN instruction; the image (having an id starting with 14e7) will have 4 layers:
The squash flag is a flag of the docker build command which is still experimental that will squash newly built layers into a single new layer.
Podman build command also have a similar flag; Podman also have a squash-all flag that will squash all of the new image’s layers (including those inherited from a base image) into a single new layer.
6. Use .dockerignore to filter the content of Docker build context
The .dockerignore file is used to filter the content that will be used by the Docker build context to create an image.
The goal of this feature is just to have a faster build process ( because less files will be present in the build context) but it can help also in the case when accidentally the Dockerfile defines more files than needed.
7. Use external tools
I have to admit using external tools to obtain a slimmer image should not be the default or preferred solution especially after docker and podman implemented the squash flags. But if is not possible to use the existing solutions then here are some free tools that you could try:
docker-slim try to figure it out what files are useful from the target image by running a container of the target image.
docker-slim is capable to run static or dynamic analysis; it also capable to probe the running container using http requests.
docker-slim contains also a linter for Dockerfiles; Running the linter on the “No dnf Clean” Dockerfile from the hint nr3 (Deactivate the package manager cache) give the following results:
docker-slim lint
Conclusion
As you could see there are a few ways to create lighter images; some of the hints are “low hanging fruits” and can be applied systematically, like the usage of the squash flag (hint nr. 5) and the minimization of RUN commands (hint nr. 4); some others demand a little bit of thinking and try and error, like the usage of the right base image (hint nr. 1) or the usage of multi-stage builds (hint nr. 2).
All the Linux security mechanisms that are used under the hood by containers are very well explained with multiple (valuable) examples; namespaces, cgroups, capabilities, system calls, AppArmor, SecComp. At the end of the day, container security is just a subset of Linux security.
No hidden (or un-hidden) publicity to any commercial tools, despite the fact that the author is working for AquaSecurity company.
A lot of references towards Internet accessible resources; unfortunately, the author is using url shortening so I wish you good luck to copy them into a browser if you have the paper version of the book.
Clear and concise writing style.
What I think could have been done better:
Even if the book is about security of/in containers, there is no general introduction of the container notion or the actual container landscape.
A lot of forward references in different chapters; usually in technical books you find backward references because (very often) the knowledge is build on top of the knowledge of previous chapters.
There are a few chapters which are very thin, especially toward the end; the last chapter (chapter 14) for example is just 2 pages long.
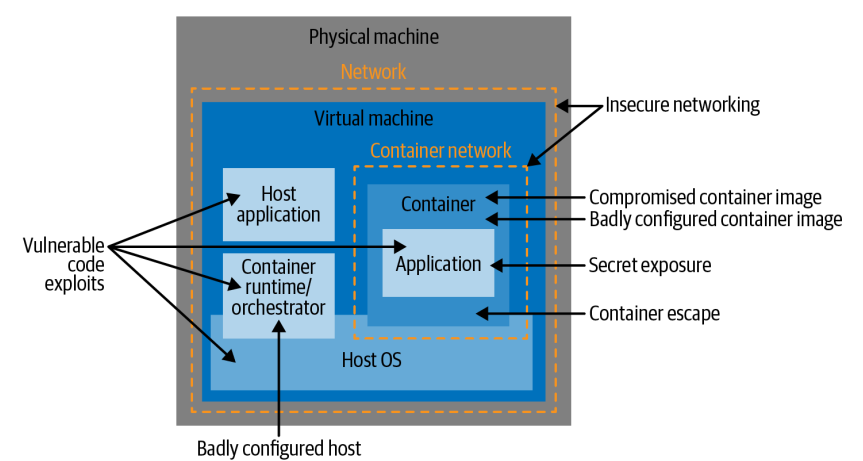
This chapter defines different attack vectors for the containers and the infrastructure that they are running on. This attack vectors specifically linked to containers are:
Application code vulnerabilities
Badly configured images
Badly configured containers
Build Image attack
Supply chain attack
Vulnerable hosts
Exposed secrets
Insecure networking
Container runtime vulnerabilities
Containers attack vectors
The containers very often are deployed on cloud infrastructures very often using a multi-tenant model which brings new threats and new attack vectors on top of previous ones.
After presenting and explaining the problems that usage of containers will bring the author is focusing on (security) general guidelines that should be used when implementing different mitigations controls:
least privilege
each container should have a minimum set of permissions to fulfill it’s function.
defense in depth
reducing the attack surface
split the monolithic application in smaller, simpler microservices that would imply a less complex architecture that would reduce the attack surface.
limiting the blast radius
if one container is compromised some controls should be put in place to not affect the others software components
segregation of duties
permissions and credentials can be passed only into the containers that need them
2. Linux System Calls, Permissions and Capabilities
This chapter it presents the basics of Linux System calls, the Linux file permissions (an extensive explanation is done on the usage of of setuid and getuid) and the Linux Capabilities. For each of this Linux features some examples are given and the author emphasizes that this capabilities are heavily used by the containers and the containers run-times because at the end of the day, a container is just a Linux process running on a host.
3. Control Groups
This chapter is very similar with the previous one in the sense that it does not speak about containers but about a Linux security feature that is heavily used by the containers. This chapter is dedicated to Linux control groups (a.k.a cgroups) which have as goal to limit the resources, such as memory, CPU, network input/output, that a process or a group of processes can use.
Containers runtimes are using cgroups behind the scene to limit resources used by containers, so cgroups provides protection against a class of attacks that attempt to disrupt running applications by consuming excessive resources, thereby starving legitimate applications.
4. Container Isolation
This chapter treats another Linux feature that is cornerstone for container security: Linux namespaces.
Linux namespaces are a feature of the Linux kernel that partitions kernel resources such that one or more processes sees one set of resources while another set of processes sees a different set of resources. If cgroups control the resources that a process can use, namespaces control what it can see.
For each of the existing namespaces (Unix Timesharing System, Process IDs, Mount Points, Network, Users and Group Ids, Inter-Process Communications) the author shows how can be created from command line. For some namespaces a comparison is done between the isolation implemented by a container runtime and the isolation offered just using the tools offered out of the box by Linux.
5. Virtual Machines
This chapter is an introduction to virtual machines. It is explained different types of hypervisors (a.k.a VMM – Virtual Machine Monitor):
Type1 – the hypervisor is installed directly on top of the hardware with no operating system underneath (ex: Hyper-V, Xen)
Type2 – the hypervisor is installed on top of a Host Os (ex: VirtualBox, Parallels, QEMU)
Kernel Based Virtual Machines – this is a kind of hybrid type because it consists in a hypervisor running within the kernel of the hos Os (ex: Linux KVM).
Different types of hypervisors
After describing the types of hypervisors the author explained how the hypervisors are achieving the virtualization via a mechanism called “trap and emulate“. When an OS is running as a virtual machine in a hypervisor, some of its instructions may conflict with the host operation system. So the hypervisor will emulates the effect of that specific instruction or action without carrying it out. In this way, the host OS is not effected by the guest’s actions.
The chapter is concluded with the advantages of hypervisors for process isolation compared with the kernel processes (which are the cornerstone of containers) and the main drawbacks of hypervisors.
From the process isolation point of view the hypervisors are offering a greater isolation and the difference is that hypervisors have a simpler job to fulfill comparing with OS kernels. In a kernel, user space processes are allowed some visibility of each other, but there is no sharing of memory or sharing of processes in the case of hypervisors.
On the drawback side, the VMs have start-up times that are several orders of magnitude greater than a container, containers give developers a convenient ability to “build once, run anywhere” quickly and efficiently, each virtual machine has the overhead of running a whole kernel compared with containers that are sharing a kernel so containers can be very efficient in both resource use and performance.
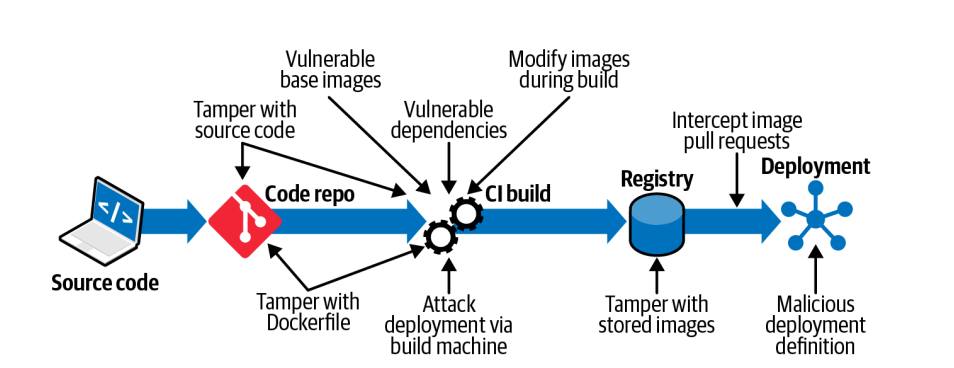
6. Container Images
This chapter is focusing on the images; it starts by explaining the OCI standards covering the image specification. In this chapter you will be able to see how different topics from previous chapters (namespaces, capabilities, control groups, root file system) are fitting together so the end user can define, build and execute a container.
The second par of the chapter is focusing on different attack vectors on an image:
Image Attack Vectors
Some of this attack vectors are not really linked to container technology (tamper source code, vulnerable dependencies, attack deployment via build machine) but others are container specific attack vectors (tamper the docker file, usage of vulnerable base images, modify images during build).
7. Software Vulnerabilities in Images
The chapter is dedicated to vulnerabilities managements in general and also in the context of containers. For the general/generic part, the author explains what is the workflow when a vulnerability is discovered:
after the discovery the person the new issue will get a unique identifier that begins with “CVE” (Common Vulnerabilities and Exposures) , followed by the year and an unique id.
A responsible security disclosure is agreed between the entity that found the vulnerability and the entity that “owns” the software. Both parties agree on a timeframe after which the researcher can publish their findings.
The entity that “owns” the software is fixing the vulnerability and delivers a patch.
Once the vulnerability can be disclosed, it receive a unique identifier that begins with “CVE,” which stands for Common Vulnerabilities and Exposures.
Strangely enough, the author does not mention the usage of CVSS (Common Vulnerability Scoring System) score of a vulnerability. Usually CVSS score is used to judge the impact of the vulnerability.
The second part of the chapter is focusing on ways to handle the vulnerability management in the context of containers. A few interesting and valuable ideas:
(always) use immutable containers :
If containers are downloading code at runtime, different instances of the container could be running different versions of that code, but it would be difficult to know which instance is running what version.
It’s harder to control and ensure the provenance of the software running in each container if it could be downloaded at any time and from anywhere.
Building a container image and storing it in a registry is very simple to automate in a CI/CD pipeline.
regular scan of images.
Regularly re-scanning container images allows the scanning tool to check the contents against its most up-to-date knowledge about vulnerabilities. A very common approach is to re-scan all deployed images every 24 hours, in addition to scanning new images as they are built, as part of an automated CI/CD pipeline.
use a tool that can do more than scanning for vulnerabilities (if possible). A (non-exhaustive) list of extra features that the scanner could have:
Known malware within the image
Executables with the setuid bit
Images configured to run as root
Secret credentials such as tokens or passwords
Sensitive data in the form of credit card or Social Security numbers or something similar
8. Strengthening Container Isolation
This chapter is an extension of the Chapter 4 (Container Isolation); it presents other ways to extend the container isolation using mechanisms and framework beyond the Linux kernel features.
The first part of the chapter presents mechanisms already present in Linux ecosystem that can be used in other contexts than containers, namely:
Seccomp is a mechanism for restricting the set of system calls that an application is allowed to make.
The Docker default seccomp profile blocks more than 40 of the 300+ syscalls (including all the examples just listed) without ill effects on the vast majority of containerized applications. Unless you have a reason not to do so, it’s a good default profile to use.
In AppArmor, a profile can be associated with an executable file, determining what that file is allowed to do in terms of capabilities and file access permissions.
AppArmor implement mandatory access controls. A mandatory access control is set by a central administrator, and once set, other users do not have any ability to modify the control or pass it on to another user.
SElinux lets you constrain what a process is allowed to do in terms of its interactions with files and other processes. Each process runs under an SELinux domain and every file has a type.
Every file on the machine has to be labeled with its SELinux information before you can enforce policies. These policies can dictate what access a process of a particular domain has to files of a particular type.
In the second part of the chapter the author presents container specific technologies that could be used to enforce the containers isolation:
gVisor provides a virtualized environment in order to sandbox containers. The system interfaces normally implemented by the host kernel are moved into a distinct, per-sandbox application kernel in order to minimize the risk of a container escape exploit.
To do this, a component of gVisor called the Sentry intercepts syscalls from the application. Sentry is heavily sandboxed using seccomp, such that it is unable to access filesystem resources itself. When it needs to make systemcalls related to file access, it off-loads them to an entirely separate process called the Gofer. Even those system calls that are unrelated to filesystem access are not passed through to the host kernel directly but instead are reimplemented within the Sentry. Essentially it’s a guest kernel, operating in user space.
The idea with Kata Containers is to run containers within a separate virtual machine. This approach gives the ability to run applications from regular OCI format container images, with all the isolation of a virtual machine.
Kata uses a proxy between the container runtime and a separate target host where the application code runs. The runtime proxy creates a separate virtual machine using QEMU to run the container on its behalf.
Is a virtual machine offering the benefits of secure isolation through a hypervisor and no shared kernel, but with startup times around 100ms.
Firecracker designers have stripped out functionality that is generally included in a kernel but that isn’t required in a container like enumerating devices. The main saving comes from a minimal device model that strips out all but the essential devices.
9. Breaking Container Isolation
After explaining in previous chapters what can be done to enhance the container isolation, this chapter is focusing on how a container could be misconfigured so this isolation is broken.
The following misconfigurations are explained:
Run containers using the default (root) user.
Unless your container image specifies a non-root user or you specify a non default user when you run a container, by default the container will run as root.
The best option is to define a custom user inside the container but if this option is not available then a few other options are presented:
override the user id; this is possible in Docker using the –user flag of the docker run command.
use user namespaces (covered in chapter 2) within the container, so that root inside the container is not the same as root on the host. You can enable the use of user namespaces in Docker, but it’s not turned on by default. If you’re interested about how to do it please take a look to Isolate containers with a user namespace
The use of —priviledged flag
The usage of priviledged flag give extended (Linux) capabilities to the process representing the running container. Docker introduced the –privileged flag to enable DinD (Docker in Docker) which can be used by build tools(very often in the CI/CD context) running as containers, which need access to the Docker daemon in order to use Docker to build container images.
Mounting sensitive directories
Mounting inside the containers the root file system or specific host folders is not a very good idea. List of folders to avoid mounting:
Mounting /etc would permit modifying the host’s /etc/passwd file from within the container.
Mounting /bin, /usr/bin or /usr/sbin would allow the container to write executables into the host directory.
Mounting host log directories into a container could enable an attacker to modify or erase the logs.
Mounting the Docker Socket
In a Docker environment, there is a Docker daemon process that essentially does all the work. When you run the docker command-line utility, this sends instructions to the daemon over the Docker socket that lives at /var/run/docker.sock . Any entity that can write to that socket can also send instructions to the Docker daemon. The daemon runs as root and will happily build and run any software of your choosing on your behalf.
Accessing the Docker Daemon via REST API with no authentication
This in not really mentioned in the book (even that I think that it should) but it’s very similar with the previous paragraph. The docker daemon can be also accessed via a REST API; by default the API is accessible with no authentication.
Sharing namespaces between the container and the host
Containerized processes are all visible from the host; thus, sharing the process namespace to a container lets that container see the other containerized processes.
10. Container Network Security
The chapter starts with an introduction to ISO/OCI networking model and this model is used during the chapter to explain different topics related to network security. The author is focusing on explaining the networking model for containers running under Kubernetes orchestrator but even if you’re not interested on K8s it is still possible to find some technology agnostic best practices:
Default Deny Ingress: define a network policy that denies ingress traffic by default and then add policies to permit traffic only where you expect it
Default Deny Egress: Same as the Ingress part.
Restricts ports: Restrict traffic so that it is accepted only to specific ports for each application.
11. Securely Connecting Components with TLS
Most of the chapter content have noting to do with containers (this is highlighted even by the author itself) and is treating the history of SSL/TLS protocol and the basics of PKI : Public/Private Key, X509 certificates, Certificate Signing Requests, Certificate Revocation and Certificate Authorities.
The only piece of information linked to containers that I found important is the that rather than writing your own code to set up secure connections, you can choose to use a service mesh to do it for you.
12. Passing Secrets to Containers
The chapter starts by enumerating properties that a secret must have:
it should be stored in encrypted form so that it’s not accessible to every user or entity.
it should never be written to disk unencrypted (and even better just held it in memory and never write it on disk).
it should be revocable (make them invalid in the event that the secret should no longer be trusted).
it should be able to rotate it.
it should be independent of the lifecycle of the consumers.
only software components that need the access to it should be able to read the secret
Next paragraph enumerates different ways of injecting information (secrets included) into containers:
store the information into the image
obviously this is not a very good idea for secrets because can be accessed by anyone having the image and it cannot be changed unless the images are rebuild.
use environment variables as part of the configuration that goes along with the image
same problems as the hard-coded secrets
pass the secret over the network
the running container will make the appropriate network calls to retrieve or receive the information.
in this case the date(secret) in transit should be encrypted, most probably using a service mesh
the principal drawback of this approach is how the container will be able to authenticate to this service offering the secret; the author does not offer any solution
pass the secrets at runtime using the environment variables.
environment variables defined for the container can be seen using different commands like docker inspect.
pass the secrets through files.
This option consists in write the secrets into files that the container can access through a mounted volume.
Combining this with a secure secrets store ensures that secrets are never stored “at rest” unencrypted.
I found this chapter rather strange because it explains how to not pass secrets to containers instead of presenting the good practices. Speaking about good practices, this are very briefly mentioned like the usage of a third-party (commercial) solution for secret storage. I would have preferred to have more insights on how this tools are working.
13. Container Runtime Protection
This chapter treats the controls to put in place in order to assure the protection of the running containers.
The first idea is to compute a container profile. This profile should be computed prior to the deployment of the container in live and should contains the normal behavior of the container. Once this profile is known, then at runtime a (container security)tool would be able to compare the profile with the real behavior of the container and detect any discrepancy.
This container profile could contains the following information:
network traffic – the other containers and or hosts that the container normally communicates with.
executable – what kind of commands the normal cunning container is executing. In this case the author suggests to use eBPF (which stands for extended Berkeley Packet Filter) technology.
file access – what files from the container file system are usually accessed.
user IDs – as a general rule, if the container is doing one job, it probably needs to operate under only one user identity.
(Linux) capabilities – the (minimal) list of capabilities the container needs in order to execute properly; any attempt to use a capability not present in the list should raise a red flag.
The second idea presented is the drift prevention. It’s considered best practice to treat containers as immutable. The container is instantiated from its image, and then the contents of the container should not change. In the case of drift prevention the (container security) tool will be able to make the difference between the software that came from the image, and the software that is running in the workload so it gives the ability to immediately stop any software that doesn’t belong to the (original) image.
14. Containers and the OWASP Top 10
This sounds a very interesting topic but unfortunately the author it expedite it very fast. In some of the cases the author is even confessing that the type of risk is not linked to containers and could be applied to non containers world also.
Same OWASP Top 10 (2017) have direct applicability in the container word:
This can be linked with the usage of secrets in container word. These secrets need to be stored with care and passed into containers at runtime, as discussed in Chapter 12.
The containerized applications that must communicate between them would need to identify each other using certificates, and communicate using secure connections. This can be handled directly by containers, or you can use a service mesh
Today, the container landscape is rather crowded and Docker is not the predominant player anymore.
The goal of this ticket is to present different products and/or projects and/or vendors that are part of the containers landscape and classify them using the existing standards.
For this classification I will use the standards from Open Container Initiative (OCI) and Cloud Native Computing Foundation (CNCF).
Open Container Initiative
The goal of the Open Container Initiative (OCI) is to promote a set of common, minimal, open standards and specifications around container technology more precisely container formats and runtime . At the moment of this writing it offers the following standards:
The goal of Cloud Native Computing Foundation (CNCF) is to drive adoption of cloud native technologies (Containers, service meshes, microservices, immutable infrastructure) by fostering and sustaining an ecosystem of open source, vendor-neutral projects. In the specific case of containers we will focus on the Container Runtime Interface (CRI).
If you wonder if there is any link between OCI and CNCF, the answer is that both initiatives are operating under the Linux Foundation umbrella, the OCI focusing only on the container formats and runtime.
OCI Image Specification
The image specification defines the structure of an OCI Image which should contain a manifest, an image index (optional), a set of filesystem layers, and a configuration. The goal of this specification is to enable the creation of interoperable tools for building, transporting, and preparing a container image to run.
In order to see the content of an OCI image the following command could be used (for a nginx image in this example):
On the tooling side here are a few tools that are able to generate OCI compliant images and this list is far from being exhaustive:
Kaniko – tool to build container images from a Dockerfile, inside a container or Kubernetes cluster. Kaniko doesn’t depend on a Docker daemon and executes each command within a Dockerfile completely in userspace. This enables building container images in environments that can’t easily or securely run a Docker daemon, such as a standard Kubernetes cluster. The tool was created by Google.
Jib – tool to build Docker and OCI images for your Java applications without a Docker daemon. It is available as plugins for Maven and Gradle and as a Java library. The tool was created by Google.
Buildah – tool to build OCI images from a Dockerfile that is daemonless and rootless. It is also capable to generate a pod file from one or more images and also mimic the execution of a pod.
Tools to build OCI compliant images
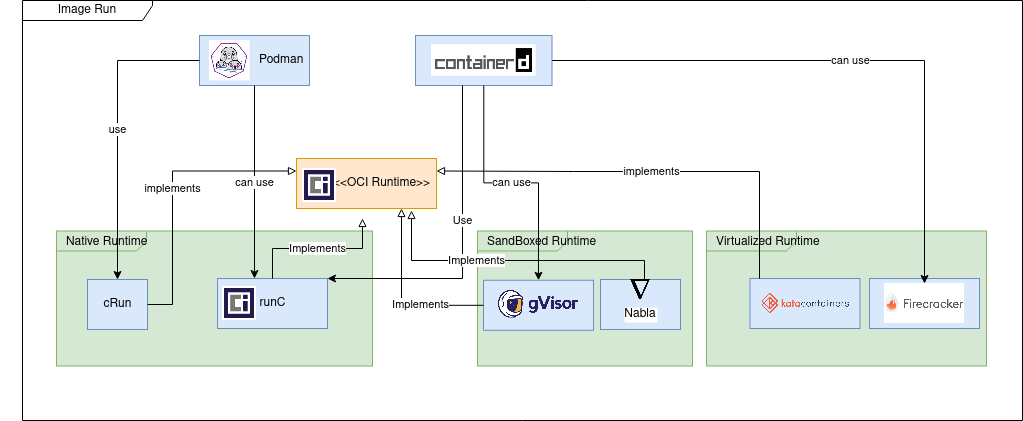
OCI Runtime Specification
The runtime specification goal is to specify the configuration, execution environment, and lifecycle of a container. A container’s configuration is specified as the config.json for the supported platforms and details the fields that enable the creation of a container.
The execution environment is specified to ensure that applications running inside a container have a consistent environment between runtimes along with common actions defined for the container’s lifecycle.
From the implementation point of view we can distinguish three types of runtimes.
Native runtimes are using the host kernel to run the containers. The isolation of containers which are sharing the same kernel can be improved by using “out of the box” security mechanisms like seccomp, AppArmor or SELinux.
The most used native container runtimes projects today are (a few other existed in the past but now are deprecated: railcar, rkt):
runC – the de-facto standard container runtime maintained by Docker under Apache 2 license
cRun – created and maintained by RedHat is part of the Podman/Buildah family tools.
Sandboxed runtimes instead of sharing the host kernel, the containerized process runs on a kernel proxy layer, which then interacts with the host kernel on the container’s behalf. Because of this increased isolation, these runtimes have a reduced attack surface and make it less likely that a containerized process can “escape” from the original container.
gVisor provides a virtualized environment in order to sandbox containers. The system interfaces normally implemented by the host kernel are moved into a distinct, per-sandbox application kernel in order to minimize the risk of a container escape exploit.
To do this, a component of gVisor called the Sentry intercepts syscalls from the application. Sentry is heavily sandboxed using seccomp, such that it is unable to access filesystem resources itself. When it needs to make systemcalls related to file access, it off-loads them to an entirely separate process called the Gofer. Even those system calls that are unrelated to filesystem access are not passed through to the host kernel directly but instead are reimplemented within the Sentry. Essentially it’s a guest kernel, operating in user space.
A containerized application can avoid making a Linux system call if it links to a library OS component that implements the system call functionality. Nabla containers use library OS (aka unikernel) techniques, specifically those from the Solo5 project, to avoid system calls and thereby reduce the attack surface. Nabla containers only use 7 system calls; all others are blocked via a Linux seccomp policy.
Virtualized runtimes takes a different approach to achieve container isolation; the goal of virtualized runtimes is to create a lightweight virtual machines on which the host kernel and application will run.
The idea with Kata Containers is to run containers within a separate virtual machine. This approach gives the ability to run applications from regular OCI format container images, with all the isolation of a virtual machine.
Kata uses a proxy between the container runtime and a separate target host where the application code runs. The runtime proxy creates a separate virtual machine using QEMU to run the container on its behalf.
Is a virtual machine offering the benefits of secure isolation through a hypervisor and no shared kernel, but with startup times around 100ms.
Firecracker designers have stripped out functionality that is generally included in a kernel but that isn’t required in a container like enumerating devices. The main saving comes from a minimal device model that strips out all but the essential devices.
Tools to run OCI images
OCI Distribution Specification
The Open Container Initiative Distribution Specification (a.k.a. “OCI Distribution Spec”) defines an API protocol to facilitate and standardize the distribution of content. The specification is designed to be agnostic of content types, OCI Image types being currently the most prominent.
Artifact Verification: Help enable trust between registries.
Resumable Push: Improve communication to help reduce re-uploading for transfers interrupted midway.
Resumable Pull: Similarly, it could help reduce unneeded downloads on the incoming side.
Layer Upload Deduplication: The spec could help container registries avoid duplicating layers.
On the tooling side, most probably any tool/vendor that offers support for Docker Registry Api will also support the new specification.
CNCF Container Runtime Interface (CRI)
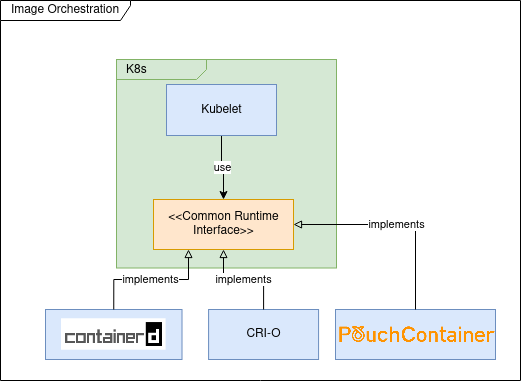
In the first versions of Kubernetes (prior to 1.5) Docker was used as (default and only) container runtime engine; the usage of Docker was hardcoded into the Kubelet (k8s component that is installed and running on each cluster node having as goal to ensure that the containers described by Pod specifications are running and healthy).
The goal of CRI was to define an API that any container runtime should implement in order to be used by Kubelet.
The most important tools implementing CRI are :
containerd is Docker high-level container runtime, able to push and pull images, manage storage and define network capabilities. It is also capable of managing the lifecycle of running containers by passing corresponding commands to a low-level container runtime like runc.
CRI-O is the RedHat implementation of CRI and is the default container runtime for OpenShift since version 4. CRI-O has less features compared to containerd and delegates to components from “Container Tools” project for image management and storage. Most probably as a low level runtime container it’s using cRun.
Tools implementing CRI
Most probably my previous list is not exhaustive and other projects are implementing the CRI specification; for example PouchContainer which is container engine open sourced by Alibaba. If you are interested in knowing how the CRI implementation is done you could read this: Design and Implementation of PouchContainer CRI.


You must be logged in to post a comment.