OSGI: How to handle the (wrong) bundles startup order

Context

In some situations it is needed that some of the OSGI bundles are started in a specific order.

A concrete case is when the Apache Camel is used in the context of the OSGI. If one of the OSGI bundles are an user defined Apache Camel component and another bundle uses this user defined Camel component into a (Camel) route then the bundle containing the Camel component should be started before the bundle that is using the Camel component.

Solution – modify the bundle/s start level

The first solution would be to modify the start level of the bundle that you want to start later.

Apache Felix offers the “bundlelevel” command:

bundlelevel - set bundle start level or initial bundle start level
scope.
flags:
-i, --setinitial set the initial bundle start level
-s, --setlevel set the bundle's start level

So something like:

 bundlelevel -s newStartLevel bundleId

will do the trick.

The advantage  of this solution is that you do not need any programming skills to do it and you can apply it on any bundle (even on the bundles that you are not controlling the content).

The drawback of this solution is that is totally manual (at least in case of Apache Felix server).

The OSGI specification also  defines the OSGI Start Level API which provides the following functions:

  • Controls the beginning start level of the OSGi Framework.
  • Is used to modify the active start level of the Framework.
  • Can be used to assign a specific start level to a bundle.
  • Can set the initial start level for newly installed bundles.

Using the OSGI Start Level API it is possible to programmatically set the start level:

Bundle bundle = framework.getBundleContext().installBundle(location);
BundleStartLevel bundleStartLevel = bundle.adapt(BundleStartLevel.class);
bundleStartLevel.setStartLevel(xxx);

Solution – use a BundleListener

The basic idea is that the bundle B (than needs the bundle A to be active) will wait until the the bundle A is marked as started. This can be achieved by implementing a BundleListener to the level of bundle B.

The implementation of the “bundleChanged” method of the listener will look like this:

public void bundleChanged(BundleEvent bundleEvent) {
    String symbolicName = bundleEvent.getBundle().getSymbolicName();
    int eventType = bundleEvent.getType();

    if ("The Bundle A Symbolic Name".equals(symbolicName)
        && BundleEvent.STARTED == eventType) {
        //here we know that bundle A is started
        //so can do something that will need
        //bundle A
     }
}

The advantage of this approach is that the bundle developer is in control of the behavior. On the the other side this approach will not work if you do not own the code of the bundle that you want to start later.

How to write a (Java) Burp Suite Professional extension for Tabnabbing attack

Context and goal

The goal of this ticket is to explain how to create an extension for the Burp Suite Professional taking as implementation example the “Reverse Tabnabbing” attack.

“Reverse Tabnabbing” is an attack where an (evil) page linked from the (victim) target page is able to rewrite that page, such as by replacing it with a phishing site. The cause of this attack is the capacity of a new opened page to act on parent page’s content or location.

For more details about the attack himself you can check the OWASP Reverse Tabnabbing.

The attack vectors are the HTML links and JavaScript window.open function so to mitigate the vulnerability you have to add the attribute value: rel="noopener noreferrer" to all the HTML links and for JavaScriptadd add the values noopener,noreferrer in the windowFeatures parameter of the window.openfunction. For more details about the mitigation please check the OWASP HTML Security Check.

Basic steps for (any Burp) extension writing

The first step is to add to create an empty (Java) project and add into your classpath the Burp Extensibility API (the javadoc of the API can be found here). If you are using Maven then the easiest way is to add this dependency into your pom.xml file:

<dependency>
    <groupId>net.portswigger.burp.extender</groupId>
    <artifactId>burp-extender-api</artifactId>
    <version>LATEST</version>
</dependency>

Then the extension should contain  a class called BurpExtender (into a package called burp) that should implement the IBurpExtender interface.

The IBurpExtender  interface have only a single method (registerExtenderCallbacks) that is invoked by burp when the extension is loaded.

For more details about basics of extension writing you can read Writing your first Burp Suite extension from the PortSwigger website.

Extend the (Burp) scanner capabilities

In order to find the Tabnabbing vulnerability we must scan/parse the HTML responses (coming from the server), so the extension must extend the Burp scanner capabilities.

The interface that must be extended is IScannerCheck interface. The BurpExtender class (from the previous paragraph) must register the custom scanner, so the BurpExtender code will look something like this (where ScannerCheck is the class that extends the IScannerCheck interface):

public class BurpExtender implements IBurpExtender {

    @Override
    public void registerExtenderCallbacks(
            final IBurpExtenderCallbacks iBurpExtenderCallbacks) {

        // set our extension name
        iBurpExtenderCallbacks.setExtensionName("(Reverse) Tabnabbing checks.");

        // register the custom scanner
        iBurpExtenderCallbacks.registerScannerCheck(
                new ScannerCheck(iBurpExtenderCallbacks.getHelpers()));
    }
}

Let’s look closer to the methods offered by the IScannerCheck interface:

  • consolidateDuplicateIssues – this method is called by Burp engine to decide whether the issues found for the same url are duplicates.
  • doActiveScan – this method is called by the scanner for each insertion point scanned. In the context of Tabnabbing extension this method will not be implemented.
  • doPassiveScan – this method is invoked for each request/response pair that is scanned.  The extension will implement this method to find the Tabnabbing vulnerability. The complete signature of the method is the following one: List<IScanIssue> doPassiveScan(IHttpRequestResponse baseRequestResponse). The method receives as parameter an IHttpRequestResponse instance which contains all the information about the HTTP request and HTTP response. In the context of the Tabnabbing extension we will need to check the HTTP response.

Parse the HTTP response and check for Tabnabbing vulnerability

As seen in the previous chapter the Burp runtime gives access to the HTTP requests and responses. In our case we will need to access the HTTP response using the method IHttpRequestResponse#getResponse. This method returns a byte array (byte[]) representing the HTTP response as HTML.

In order to find the Tabnabbing vulnerability we must parse the HTML represented by the HTML response. Unfortunately, there is nothing in the API offered by Burp for parsing HTML.

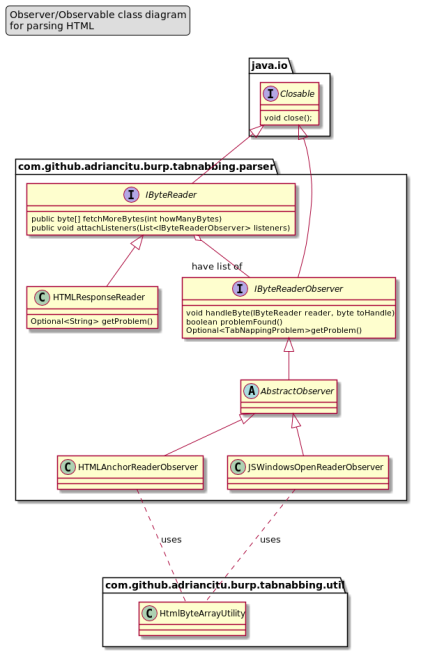
The most efficient solution that I found to parse HTML was to create few classes and interfaces that are implementing the observer pattern (see the next class diagram ):


The most important elements are :

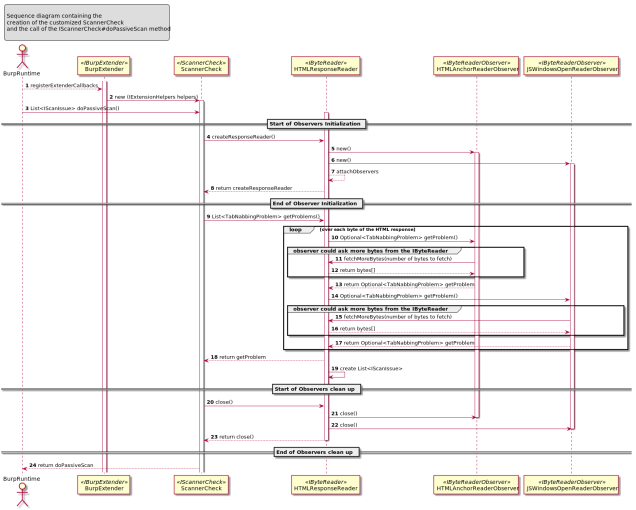
The following sequence diagram try to explains how the classes are interacting  together in order to find the Tabnabbing vulnerability.

Final words

If you want to download the code or try the extension you can find all you need on github repository: tabnabbing-burp-extension.

If you are interested about some metrics about the code you can the sonarcloud.io: tabnnabing project.


How to programmatically set-up a (HTTP) proxy for a Selenium test

Context

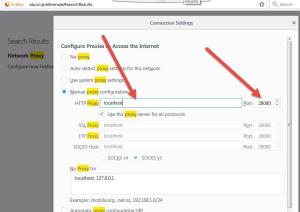
In the context of a (Java) Selenium test it was needed to set-up a http proxy at the level of the browser. What I wanted to achieve it was exactly what is shown in the next picture but programmatically. In this specific case the proxy was BurpPro proxy but the same workflow can be applied for any kind of (http) proxy.

Solution

I know this is not really rocket science but I didn’t found elsewhere any clear explanation about how to do it. In my code the proxy url is injected via a (Java) system property called “proxy.url“.

And the  code looks like this:

String proxyUrl = System.getProperty("proxy.url");
if (proxyUrl != null) {
    Proxy proxy = new Proxy();
    proxy.setHttpProxy(proxyUrl);

    FirefoxOptions options = new FirefoxOptions();
    options.setProxy(proxy);
    
    driver = new FirefoxDriver(options);
} else {
    driver = new FirefoxDriver();
}

How to intercept and modify Java stacktraces

This ticket was triggered by a “simple” requirement: “Change all the package names in the logs of a Java application (especially the stacktraces) from ‘abc.efg’ (put here whatever you want as name) to ‘hij.klm’ (put here also whatever you want as name) “. The first idea that popped in my mind was to change the packages names at the code level, but this was not feasible because of (rather) big codebase, the use of the (Java) reflexion and the tight timeline.

In the following lines, I will discuss possible solutions to implement this (weird) requirement.


Extend the log4j ThrowableRenderer

If the project is using log4j1x as log library, then a solution would be to create your own throwable renderer by extending the org.apache.log4j.spi.ThrowableRenderer. The (log4j) renderers are used to render instances of java.lang.Throwable (exceptions and errors) into a string representation.

The custom renderer that replaces the packages starting with “org.github.cituadrian” by “xxx.yyy” will look like this:

package org.github.cituadrian.stacktraceinterceptor.log4j;

import org.apache.log4j.DefaultThrowableRenderer;
import org.apache.log4j.spi.ThrowableRenderer;

public class CustomThrowableRenderer implements ThrowableRenderer {
    private final DefaultThrowableRenderer defaultRenderer =  
                   new DefaultThrowableRenderer(); 
    
    @Override 
    public String[] doRender(Throwable t) {
      String[] initialResult = defaultRenderer.doRender(t); 
      for (int i = 0; i < initialResult.length; i++) { 
        String line = initialResult[i]; 
        if (line.contains("org.github.cituadrian")) { 
           initialResult[i] = line.replaceAll("org.github.cituadrian", "xxx.yyy"); 
        } 
       } 
      return initialResult; 
    }
}

Basically, the custom renderer is delegating the task of creating a String from a Throwable to a DefaultThrowableRenderer and then it checks and replace the desired package names.

In order to be used, the renderer should be defined in the log4j.xml file:

<?xml version="1.0" encoding="UTF-8" ?>
<!DOCTYPE log4j:configuration SYSTEM "log4j.dtd">
<log4j:configuration debug="true"
    xmlns:log4j='http://jakarta.apache.org/log4j/'>
 
  <throwableRenderer class= 
     "org.github.cituadrian.stacktraceinterceptor.log4j.CustomThrowableRenderer"/>
...

Use a log4j2 pattern layout

If your project is using log4j2 as logging library, then you can use a (log4j2) layout pattern.  The layout pattern will look like:

<?xml version="1.0" encoding="UTF-8"?>
<Configuration>
 <Appenders>
 <Console name="STDOUT" target="SYSTEM_OUT">
 <PatternLayout pattern=
  "%replace{%class %log %msg %ex}{org\.github\.cituadrian}{xxx\.yyy}"/>
 </Console>
...


Modify (a.k.a. Weaving) the java.lang.StackTraceElement class with AOP

Before even explaining what it really means, I have to warn you that weaving JDK classes is rarely necessary (and usually a bad idea) even if it’s possible using an AOP framework like AspectJ.

For this case I used the AspectJ as AOP framwork because the weaver (aop compiler) is able to do binary weaving, meaning the weaver takes classes and aspects in .class form and weaves them together to produce binary-compatible .class files that run in any Java VM. The command line to obtain a weaved jar is the following one:

ajc -inpath rt.jar Aspect.java -outjar weavedrt.jar

In the case of weaving JDK classes one extra step is necessary in order to make the application work; we must create a new version of the rt.jar file  or create just a small JAR file with the JDK woven classes which then must be appended to the boot-classpath of the JDK/JRE when firing up the target application. The command line to execute the target application is the following one:

java -Xbootclasspath/<path to weavedrt.jar>;<path to aspectjrt.jar> TargetApplication

If you don’t want to worry about all the technical details of weaving and executing the application and you are using Maven then you can use the (marvelous) SO_AJ_MavenWeaveJDK project from gitHub (that handles everything using Maven)

The aspect that will modify the stacktrace packages looks like:

package org.github.cituadrian.stacktraceinterceptor.app;

import org.aspectj.lang.ProceedingJoinPoint;
import org.aspectj.lang.annotation.Around;
import org.aspectj.lang.annotation.Aspect;
import org.aspectj.lang.annotation.Pointcut;
@Aspectpublic class StackTraceInterceptorAspect {
    @Pointcut("execution(String java.lang.StackTraceElement.getClassName()) "
            + "&& !within(StackTraceInterceptorAspect)")     
    public void executeStackTraceElementGetClassNamePointcut() {}        
    
    @Around("executeStackTraceElementGetClassNamePointcut()")    
    public Object executeStackTraceElementGetClassNameAdvice(    
                   final ProceedingJoinPoint pjp) throws Throwable {        
        Object initialResponse =  pjp.proceed();         
        if (initialResponse instanceof String 
               && ((String)initialResponse).startsWith("org.github.cituadrian")) {     
                 return ((String)initialResponse).replaceFirst("org.github.cituadrian", "xxx.zzz"); 
        }        
        return initialResponse;    
    }
 }

In a nutshell, the StackTraceInterceptorAspect will intercept all the calls to the java.lang.StackTraceElement#getClassName method and it will change the returned result of the method if the class name contains the string “org.github.cituadrian”.

If you are interested to learn more about AspectJ I really recommend you to buy a copy of the AspectJ in action (second edition) book.


Modify and shadow the java.lang.StackTraceElement class

 Using AOP just to intercept and modify a single method of a single class is a little bit over-killing. In this case there is another solution; the solution would be create a custom version of the java.lang.StackTraceElement class and add this custom class in the boot-classpath of the JDK/JRE when firing up the target application, so the initial version will be shadowed by the custom version.

An implementation of StacktraceElement class can be found here. So you can modify by hand the java.lang.StackTraceElement#getClassName method or the java.lang.StackTraceElement#toString method.

 To execute the target application, you must create a jar with the modified class and add it into the boot-classpath (something similar to the AspectJ solution):

java -Xbootclasspath/<path to custom class.jar> TargetApplication


5 (software) security books that every (software) developer should read

I must admit that the title is a little bit catchy; a better title would have been “5 software security books that every developer should be aware of“. Depending on your interest you might want to read entirely these books or you could just know that they exists. There must be tons of software security books on the market but this is my short list of books about software security that I think that each developer that is interested in software security should be aware of.

Hacking – the art of exploitation This book explains the basics of different hacking techniques, especially the non-web hacking techniques: how to find vulnerabilities (and defend against)  like buffer overflow or stack-based buffer overflow , how to write shellcodes, some basic concepts on cryptography and attacks linked to the cryptography like the man-in-the-middle attack of an SSL connection. The author tried to make the text easy for non-technical peoples but some programming experience is required (ideally C/C++) in order to get the best of this book. You can see my full review of the book here.

Iron-Clad Java: Building secure web applications This book presents the hacking techniques and the countermeasures for the web applications; you can see this books as complementary of the previous one; the first one contains the non-web hacking techniques, this one contains (only) web hacking techniques; XSS, CSRF, how to protect data at rest, SQL injection and other types of injections attacks. In order to get the most of the book some Java knowledge is required. You can see my full review of the book here.

Software Security-Building security in  This books explains how to introduce the security into the SDLC; how to introduce abuse cases and security requirements in the requirements phase, how to introduce risk analysis (also known as Threat Modeling) in the design phase and software qualification phase. I really think that each software developer should at least read the first chapter of the book where the authors explains why the old way of securing application (seeing the software applications as “black boxes” than can be protected using firewalls and IDS/IPS) it cannot work anymore in the today software landscape. You can see my full review of the book here: Part 1, Part 2 and Part 3.

The Tangled Web: A Guide to Securing Modern Web Applications This is another technical book about security on which you will not see a single line of code (the Software Security-Building security in is another one) but it highly instructive especially if you are a web developer. The book presents all the “bricks” of the today Internet: HTTP, WWW, HTML, Cookies, Scripting languages, how these bricks are implemented in different browsers and especially how the browsers are implementing the security mechanism against rogue applications. You can see my full review of the book here.

Threat modeling – designing for security Threat modeling techniques (also known as Architectural Risk Analysis) were around for some time but what it has changed in the last years is the accessibility of these technique for the software developers.  This book is one of the reasons for which the threat modeling is accessible to the developers. The book is very dense but it  suppose that you have no knowledge about the subject. If you are interested in the threat modeling topic you can check this ticket: threat modeling for mere mortals.