This is the review of the API Security in action book.
(My) Conclusion
This book is doing a very good job in covering different mechanisms that could be used in order to build secure (RESTful) APIs. For each security control the author explains what kind of attacks the respective control is able to mitigate.
The reader should be comfortable with Java and Maven because most of the code examples of the book (and there are a lot) are implemented in Java.
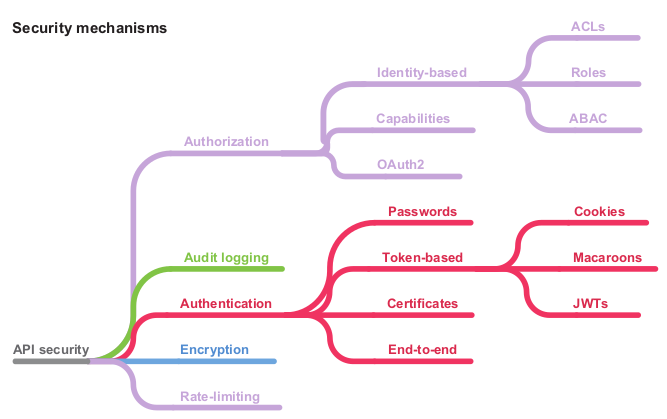
The diagram of all the security mechanism presented:
Part 1: Foundations
The goal of the first part is to learn the basics of securing an API. The author starts by explaining what is an API from the user and from developer point of view and what are the security properties that any software component (APIs included) should fill in:
- Confidentiality – Ensuring information can only be read by its intended audience
- Integrity – Preventing unauthorized creation, modification, or destruction of information
- Availability – Ensuring that the legitimate users of an API can access it when they need to and are not prevented from doing so.
Even if this security properties looks very theoretical the author is explaining how applying specific security controls would fulfill the previously specified security properties. The following security controls are proposed:
- Encryption of data in transit and at rest – Encryption prevents data being read or modified in transit or at rest
- Authentication – Authentication is the process of verifying whether a user is who they say they are.
- Authorization/Access Control – Authorization controls who has access to what and what actions they are allowed to perform
- Audit logging – An audit log is a record of every operation performed using an API. The purpose of an audit log is to ensure accountability
- Rate limiting – Preserves the availability in the face of malicious or accidental DoS attacks.
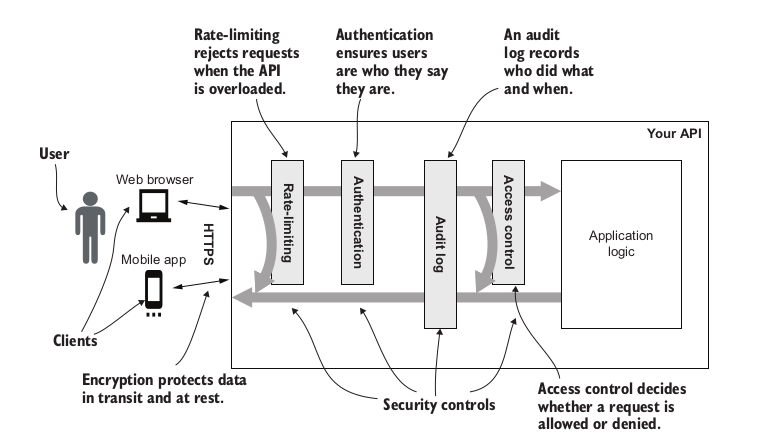
This different controls should be added into a specific order as shown in the following figure:
To illustrate each control implementation, an example API called Natter API is used. The Natter API is written in Java 11 using the Spark Java framework. To make the examples as clear as possible to non-Java developers, they are written in a simple style, avoiding too many Java-specific idioms. Maven is used to build the code examples, and an H2 in-memory database is used for data storage.
The same API is also used to present different types of vulnerabilities (SQL Injection, XSS) and also the mitigations.
Part 2: Token-based Authentication
This part presents different techniques and approaches for the token-based authentication.
Session cookie authentication
The first authentication technique presented is the “classical” HTTP Basic Authentication. HTTP Basic Authentication have a few drawbacks like there is no obvious way for the user to ask the browser to forget the password, the dialog box presented by browsers for HTTP Basic authentication cannot be customized.
But the most important drawback is that the user’s password is sent on every API call, increasing the chance of it accidentally being exposed by a bug in one of those operations. This is not very practical that’s why a better approach for the user is to login once then be trusted for a specific period of time. This is basically the definition of the Token-Based authentication:
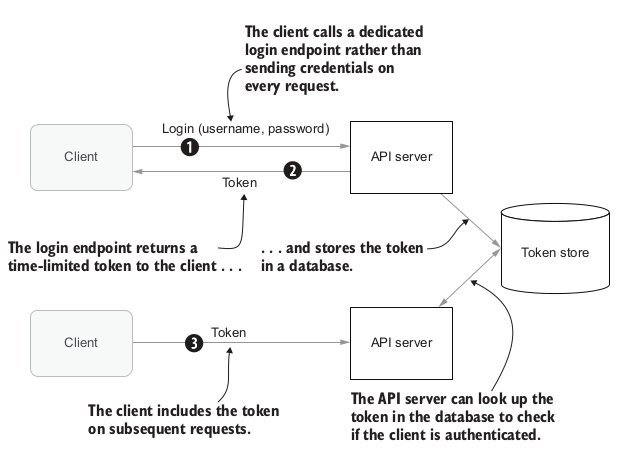
The first presented example of Token-Based authentication is using the HTTP Base Authentication for the dedicated login endpoint (step number 1 from the previous figure) and the session cookies for moving the generated token between the client and the API server.
The author take the opportunity to explain how session cookies are working and what are the different attributes but especially he presents the attacks that are possible in the case of using session cookies. The session fixation attack and the Cross-Site Request Forgery attack (CSRF) are presented in details with different options to avoid or mitigate those attacks.
Tokens whiteout cookies
The usage of session cookies is tightly linked to a specific domain and/or sub-domains. In case you want to make requests cross domains then the CORS (Cross-Origin Resource Sharing) mechanism can be used. The last part of the chapter treating the usage of session cookies contains detailed explanations of CORS mechanism.
Using the session cookies as a mechanism to store the authentication tokens have a few drawbacks like the difficulty to share cookies between different distinguished domains or the usage of API clients that do not understand the web standards (mobile clients, IOT clients).
Another option that is presented are the tokens without cookies. On the client side the tokens are stored using the WebStorage API. On the server side the tokens are stored into a “classical” relational data base. For the authentication scheme the Bearer authentication is used (despite the fact that the Bearer authentication scheme was created in the context of OAuth 2.0 Authorization framework is rather popular in other contexts also).
In case of this solution the least secure component is the storage of the authentication token into the DB. In order to mitigate the risk of the tokens being leaked different hardening solutions are proposed:
- store into the DB the hash of tokens
- store into the DB the HMAC of the tokens and the (API) client will then send the bearer token and the HMAC of the token
This authentication scheme is not vulnerable to session fixation attacks or CSRF attacks (which was the case of the previous scheme) but an XSS vulnerability on the client side that is using the WebStorage API would defeat any kind of mitigation control put in place.
Self-contained tokens and JWTs
The last chapter of this this (second) part of the book treats the self-contained or stateless tokens. Rather than store the token state in the database as it was done in previous cases, you can instead encode that state directly into the token ID and send it to the client.
The most client-side tokens used are the Json Web Token/s (JWT). The main features of a JWT token are:
- A standard header format that contains metadata about the JWT, such as which MAC or encryption algorithm was used.
- A set of standard claims that can be used in the JSON content of the JWT, with defined meanings, such as exp to indicate the expiry time and sub for the subject.
- A wide range of algorithms for authentication and encryption, as well as digital signatures and public key encryption.
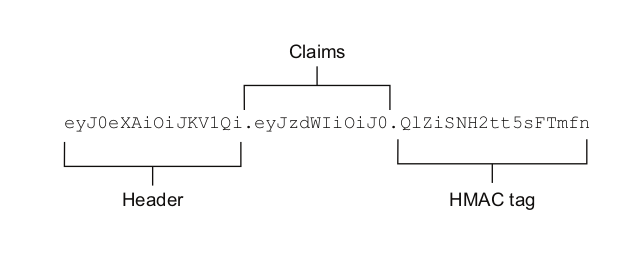
A JWT token can have three parts:
- Header – indicates the algorithm of how the JWT was produced, the key used to authenticate the JWT to or an ID of the key used to authenticate. Some of the header values:
- alg: Identifies which algorithm is used to generate the signature
- kid: Key Id; as the key ID is just a string identifier, it can be safely looked up in server-side set of keys.
- jwk: The full key. This is not a safe header to use; Trusting the sender to give you the key to verify a message loses all security properties.
- jku: An URL to retrieve the full key. This is not a safe header to use. The intention of this header is that the recipient can retrieve the key from a HTTPS endpoint, rather than including it directly in the message, to save space.
- Payload/Claims – pieces of information asserted about a subject. The list of standard claims:
iss(issuer): Issuer of the JWT
sub(subject): Subject of the JWT (the user)aud(audience): Recipient for which the JWT is intendedexp(expiration time): Time after which the JWT expiresnbf(not before time): Time before which the JWT must not be accepted for processingiat(issued at time): Time at which the JWT was issued; can be used to determine age of the JWTjti(JWT ID): Unique identifier; can be used to prevent the JWT from being replayed (allows a token to be used only once)
- Signature – Securely validates the token. The signature is calculated by encoding the header and payload using Base64url Encoding and concatenating the two together with a period separator. That string is then run through the cryptographic algorithm specified in the header.
Even if the JWT could be used as self-contained token by adding the algorithm and the signing key into the header, this is a very bad idea from the security point of view because you should never trust a token sign by an external entity. A better solution is to store the algorithm as metadata associated with a key on the server.
Storing the algorithm and the signing key on the server side it also helps to implement a way to revoke tokens. For example changing the signing key it can revoke all the tokens using the specified key. Another way to revoke tokens more selectively would be to add to the DB some token metadata like token creation date and use this metadata as revocation criteria.
Part 3: Authorization
OAuth2 and OpenID Connect
A way to implement authorization using JWT tokens is by using scoped tokens. Typically, the scope of a token is represented as one or more string labels stored as an attribute of the token. Because there may be more than one scope label associated with a token, they are often referred to as scopes. The scopes (labels) of a token collectively define the scope of access it grants.
A scoped token limits the operations that can be performed with that token. The set of operations that are allowed is known as the scope of the token. The scope of a token is specified by one or more scope labels, which are often referred to collectively as scopes.
Scopes allow a user to delegate part of their authority to a third-party app, restricting how much access they grant using scopes. This type of control is called discretionary access control (DAC) because users can delegate some of their permissions to other users.
Another type of control is the mandatory access control (MAC), in this case the user permissions are set and enforced by a central authority and cannot be granted by users themselves.
OAuth2 is a standard to implement the DAC. OAuth uses the following specific terms:
- The authorization server (AS) authenticates the user and issues tokens to clients.
- The user also known as the resource owner (RO), because it’s typically their resources that the third-party app is trying to access.
- The third-party app or service is known as the client.
- The API that hosts the user’s resources is known as the resource server (RS).
To access an API using OAuth2, an app must first obtain an access token from the Authorization Server (AS). The app tells the AS what scope of access it requires. The AS verifies that the user consents to this access and issues an access token to the app. The app can then use the access token to access the API on the user’s behalf.
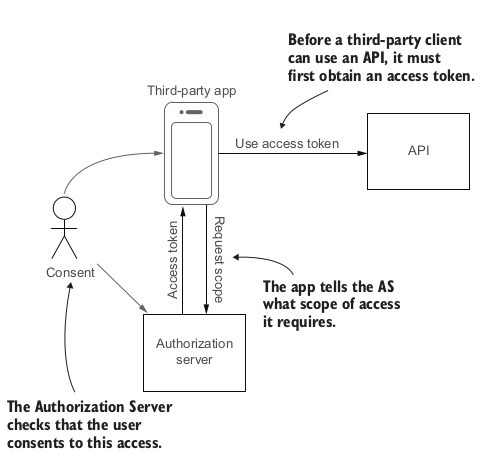
One of the advantages of OAuth2 is the ability to centralize authentication of users at the AS, providing a single sign-on (SSO) experience. When the user’s client needs to access an API, it redirects the user to the AS authorization endpoint to get an access token. At this point the AS authenticates the user and asks for consent for the client to be allowed access.
OAuth can provide basic SSO functionality, but the primary focus is on delegated third-party access to APIs rather than user identity or session management. The OpenID Connect (OIDC) suite of standards extend OAuth2 with several features:
- A standard way to retrieve identity information about a user, such as their name, email address, postal address, and telephone number.
- A way for the client to request that the user is authenticated even if they have an existing session, and to ask for them to be authenticated in a particular way, such as with two-factor authentication.
- Extensions for session management and logout, allowing clients to be notified when a user logs out of their session at the AS, enabling the user to log out of all clients at once.
Identity-based access control
In this chapter the author introduces the notion of users, groups, RBAC (Role-Based Access Control) and ABAC (Access-Based Access Control). For each type of access control the author propose an ad-hoc implementation (no specific framework is used) for the Natter API (which is the API used all over the book to present different security controls.)
Capability-based security and macaroons
A capability is an unforgeable reference to an object or resource together with a set of permissions to access that resource. Compared with the more dominant identity-based access control techniques like RBAC and ABAC capabilities have several differences:
- Access to resources is via unforgeable references to those objects that also grant authority to access that resource. In an identity-based system, anybody can attempt to access a resource, but they might be denied access depending on who they are. In a capability-based system, it is impossible to send a request to a resource if you do not have a capability to access it.
- Capabilities provide fine-grained access to individual resources.
- The ability to easily share capabilities can make it harder to determine who has access to which resources via your API.
- Some capability-based systems do not support revoking capabilities after they have been granted. When revocation is supported, revoking a widely shared capability may deny access to more people than was intended.
The way to use capability-based security in the context of a REST API is via capabilities URIs. A capability URI (or capability URL) is a URI that both identifies a resource and conveys a set of permissions to access that resource. Typically, a capability URI encodes an unguessable token into some part of the URI structure. To create a capability URI, you can combine a normal URI with a security token.
The author adds the capability URI to the Netter API and implements this with the token encoded
into the query parameter because this is simple to implement. To mitigate any threat from tokens leaking in log files, a short-lived tokens are used.
But putting the token representing the capability in the URI path or query parameters is less than ideal because these can leak in audit logs, Referer headers, and through the browser history. These risks are limited when capability URIs are used in an API but can be a real problem when these URIs are directly exposed to users in a web browser client.
One approach to this problem is to put the token in a part of the URI that is not usually sent to the server or included in Referer headers.
The capacities URIs can be also be mixed with identity for handling authentication and authorization.There are a few ways to communicate identity in a capability-based system:
- Associate a username and other identity claims with each capability token. The permissions in the token are still what grants access, but the token additionally authenticates identity claims about the user that can be used for audit logging or additional access checks. The major downside of this approach is that sharing a capability URI lets the recipient impersonate you whenever they make calls to the API using that capability.
- Use a traditional authentication mechanism, such as a session cookie, to identify the user in addition to requiring a capability token. The cookie would no longer be used to authorize API calls but would instead be used to identify the user for audit logging or for additional checks. Because the cookie is no longer used for access control, it is less sensitive and so can be a long-lived persistent cookie, reducing the need for the user to frequently log in
The last part of the chapter is about macaroons which is a technology invented by Google (https://research.google/pubs/pub41892/). The macaroons are extending the capabilities based security by adding more granularity.
A macaroon is a type of cryptographic token that can be used to represent capabilities and other authorization grants. Anybody can append new caveats to a macaroon that restrict how it can be used
For example is possible to add new capabilities that allows only read access to a message created after a specific date. This new added extensions are called caveats.
Part 4: Microservice APIs in Kubernetes
Microservice APIs in K8S
This chapter is an introduction to Kubernetes orchestrator. The introduction is very basic but if you are interested in something more complete then Kubernetes in Action, Second Edition is the best option. The author also is deploying on K8S a (H2) database, the Natter API (used as demo through the entire book) and a new API called Linked-Preview service; as K8S “cluster” the Minikube is used.
Having an application with multiple components is helping him to show how to secure communication between these components and how to secure incoming (outside) requests. The presented solution for securing the communication is based on the service mesh idea and K8s network policies.
A service mesh works by installing lightweight proxies as sidecar containers into every pod in your network. These proxies intercept all network requests coming into the pod (acting as a reverse proxy) and all requests going out of the pod.
Securing service-to-service APIs
The goal of this chapter is to apply the authentication and authorization techniques already presented in previous chapters but in the context of service-to-service APIs. For the authentication the API’s keys, the JWT are presented. To complement the authentication scheme, the mutual TLS authentication is also used.
For the authorization the OAuth2 is presented. A more flexible alternative is to create and use service accounts which act like regular user accounts but are intended for use by services. Service accounts should be protected with strong authentication mechanisms because they often have elevated privileges compared to normal accounts.
The last part of the chapter is about managing service credentials in the context of K8s. Kubernetes includes a simple method for distributing credentials to services, but it is not very secure (the secrets are Base64 encoded and can be leaked by cluster administrator).
Secret vaults and key management services provide better security but need an initial credential to access. Using secret vaults have the following benefits:
- The storage of the secrets is encrypted by default, providing better protection of secret data at rest.
- The secret management service can automatically generate and update secrets regularly (secret rotation).
- Fine-grained access controls can be applied, ensuring that services only have access to the credentials they need.
- The access to secrets can be logged, leaving an audit trail.
Part 5: APIs for the Internet of Things
Securing IoT communications
This chapter is treating how different IoT devices could communicate securely with an API running on a classical system. The IoT devices, compared with classical computer systems have a few constraints:
- An IOT device has significantly reduced CPU power, memory, connectivity, or energy availability compared to a server or traditional API client machine.
- For efficiency, devices often use compact binary formats and low-level networking based on UDP rather than high-level TCP-based protocols such as HTTP and TLS.
- Some commonly used cryptographic algorithms are difficult to implement securely or efficiently on devices due to hardware constraints or threats from physical attackers.
In order to cope with this constraints new protocols have been created based on the existing protocols and standards:
- Datagram Transport Layer Security (DTLS). DTLS is a version of TLS designed to work with connectionless UDP-based protocols rather than TCP based ones. It provides the same protections as TLS, except that packets may be reordered or replayed without detection.
- JOSE (JSON Object Signing and Encryption) standards. For IoT applications, JSON is often replaced by more efficient binary encodings that make better use of constrained memory and network bandwidth and that have compact software implementations.
- COSE (CBOR Object Signing and Encryption) provides encryption and digital signature capabilities for CBOR and is loosely based on JOSE.
In the case when the devices needs to use public key cryptography then the key distribution became a complex problem. This problem could be solved by generating random keys during manufacturing of the IOT device (device-specific keys will be derived from a master key and some device-specific information) or through the use of key distribution servers.
Securing IoT APIs
The last chapter of the book is focusing on how to secure access to APIs in Internet of Things (IoT) environments meaning APIs provided by the devices or cloud APIs which are consumed by devices itself.
For the authentication part, the IoT devices could be identified using credentials associated with a device profile. These credentials could be an encrypted pre-shared key or a certificate containing a public key for the device.
For the authorization part, the IoT devices could use the OAuth2 for IoTwhich is a new specification that adapts the OAuth2 specification for constrained environments .

You must be logged in to post a comment.