OSGI: How to handle the (wrong) bundles startup order

Context

In some situations it is needed that some of the OSGI bundles are started in a specific order.

A concrete case is when the Apache Camel is used in the context of the OSGI. If one of the OSGI bundles are an user defined Apache Camel component and another bundle uses this user defined Camel component into a (Camel) route then the bundle containing the Camel component should be started before the bundle that is using the Camel component.

Solution – modify the bundle/s start level

The first solution would be to modify the start level of the bundle that you want to start later.

Apache Felix offers the “bundlelevel” command:

bundlelevel - set bundle start level or initial bundle start level
scope.
flags:
-i, --setinitial set the initial bundle start level
-s, --setlevel set the bundle's start level

So something like:

 bundlelevel -s newStartLevel bundleId

will do the trick.

The advantage  of this solution is that you do not need any programming skills to do it and you can apply it on any bundle (even on the bundles that you are not controlling the content).

The drawback of this solution is that is totally manual (at least in case of Apache Felix server).

The OSGI specification also  defines the OSGI Start Level API which provides the following functions:

  • Controls the beginning start level of the OSGi Framework.
  • Is used to modify the active start level of the Framework.
  • Can be used to assign a specific start level to a bundle.
  • Can set the initial start level for newly installed bundles.

Using the OSGI Start Level API it is possible to programmatically set the start level:

Bundle bundle = framework.getBundleContext().installBundle(location);
BundleStartLevel bundleStartLevel = bundle.adapt(BundleStartLevel.class);
bundleStartLevel.setStartLevel(xxx);

Solution – use a BundleListener

The basic idea is that the bundle B (than needs the bundle A to be active) will wait until the the bundle A is marked as started. This can be achieved by implementing a BundleListener to the level of bundle B.

The implementation of the “bundleChanged” method of the listener will look like this:

public void bundleChanged(BundleEvent bundleEvent) {
    String symbolicName = bundleEvent.getBundle().getSymbolicName();
    int eventType = bundleEvent.getType();

    if ("The Bundle A Symbolic Name".equals(symbolicName)
        && BundleEvent.STARTED == eventType) {
        //here we know that bundle A is started
        //so can do something that will need
        //bundle A
     }
}

The advantage of this approach is that the bundle developer is in control of the behavior. On the the other side this approach will not work if you do not own the code of the bundle that you want to start later.

How to write a (Java) Burp Suite Professional extension for Tabnabbing attack

Context and goal

The goal of this ticket is to explain how to create an extension for the Burp Suite Professional taking as implementation example the “Reverse Tabnabbing” attack.

“Reverse Tabnabbing” is an attack where an (evil) page linked from the (victim) target page is able to rewrite that page, such as by replacing it with a phishing site. The cause of this attack is the capacity of a new opened page to act on parent page’s content or location.

For more details about the attack himself you can check the OWASP Reverse Tabnabbing.

The attack vectors are the HTML links and JavaScript window.open function so to mitigate the vulnerability you have to add the attribute value: rel="noopener noreferrer" to all the HTML links and for JavaScriptadd add the values noopener,noreferrer in the windowFeatures parameter of the window.openfunction. For more details about the mitigation please check the OWASP HTML Security Check.

Basic steps for (any Burp) extension writing

The first step is to add to create an empty (Java) project and add into your classpath the Burp Extensibility API (the javadoc of the API can be found here). If you are using Maven then the easiest way is to add this dependency into your pom.xml file:

<dependency>
    <groupId>net.portswigger.burp.extender</groupId>
    <artifactId>burp-extender-api</artifactId>
    <version>LATEST</version>
</dependency>

Then the extension should contain  a class called BurpExtender (into a package called burp) that should implement the IBurpExtender interface.

The IBurpExtender  interface have only a single method (registerExtenderCallbacks) that is invoked by burp when the extension is loaded.

For more details about basics of extension writing you can read Writing your first Burp Suite extension from the PortSwigger website.

Extend the (Burp) scanner capabilities

In order to find the Tabnabbing vulnerability we must scan/parse the HTML responses (coming from the server), so the extension must extend the Burp scanner capabilities.

The interface that must be extended is IScannerCheck interface. The BurpExtender class (from the previous paragraph) must register the custom scanner, so the BurpExtender code will look something like this (where ScannerCheck is the class that extends the IScannerCheck interface):

public class BurpExtender implements IBurpExtender {

    @Override
    public void registerExtenderCallbacks(
            final IBurpExtenderCallbacks iBurpExtenderCallbacks) {

        // set our extension name
        iBurpExtenderCallbacks.setExtensionName("(Reverse) Tabnabbing checks.");

        // register the custom scanner
        iBurpExtenderCallbacks.registerScannerCheck(
                new ScannerCheck(iBurpExtenderCallbacks.getHelpers()));
    }
}

Let’s look closer to the methods offered by the IScannerCheck interface:

  • consolidateDuplicateIssues – this method is called by Burp engine to decide whether the issues found for the same url are duplicates.
  • doActiveScan – this method is called by the scanner for each insertion point scanned. In the context of Tabnabbing extension this method will not be implemented.
  • doPassiveScan – this method is invoked for each request/response pair that is scanned.  The extension will implement this method to find the Tabnabbing vulnerability. The complete signature of the method is the following one: List<IScanIssue> doPassiveScan(IHttpRequestResponse baseRequestResponse). The method receives as parameter an IHttpRequestResponse instance which contains all the information about the HTTP request and HTTP response. In the context of the Tabnabbing extension we will need to check the HTTP response.

Parse the HTTP response and check for Tabnabbing vulnerability

As seen in the previous chapter the Burp runtime gives access to the HTTP requests and responses. In our case we will need to access the HTTP response using the method IHttpRequestResponse#getResponse. This method returns a byte array (byte[]) representing the HTTP response as HTML.

In order to find the Tabnabbing vulnerability we must parse the HTML represented by the HTML response. Unfortunately, there is nothing in the API offered by Burp for parsing HTML.

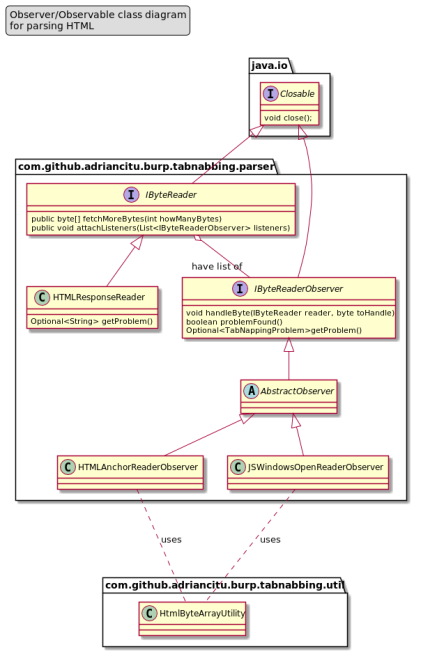
The most efficient solution that I found to parse HTML was to create few classes and interfaces that are implementing the observer pattern (see the next class diagram ):


The most important elements are :

The following sequence diagram try to explains how the classes are interacting  together in order to find the Tabnabbing vulnerability.

Final words

If you want to download the code or try the extension you can find all you need on github repository: tabnabbing-burp-extension.

If you are interested about some metrics about the code you can the sonarcloud.io: tabnnabing project.


How to programmatically set-up a (HTTP) proxy for a Selenium test

Context

In the context of a (Java) Selenium test it was needed to set-up a http proxy at the level of the browser. What I wanted to achieve it was exactly what is shown in the next picture but programmatically. In this specific case the proxy was BurpPro proxy but the same workflow can be applied for any kind of (http) proxy.

Solution

I know this is not really rocket science but I didn’t found elsewhere any clear explanation about how to do it. In my code the proxy url is injected via a (Java) system property called “proxy.url“.

And the  code looks like this:

String proxyUrl = System.getProperty("proxy.url");
if (proxyUrl != null) {
    Proxy proxy = new Proxy();
    proxy.setHttpProxy(proxyUrl);

    FirefoxOptions options = new FirefoxOptions();
    options.setProxy(proxy);
    
    driver = new FirefoxDriver(options);
} else {
    driver = new FirefoxDriver();
}

(My) OWASP Belgium Chapter meeting notes

These are my notes of OWASP Belgium Chapter meeting of 19th of March.

KRACKing WPA2 in Practice Using Key Reinstallation Attacks (by Mathy Vanhoef)

This talk subject was about the attack on the WPA2 protocol that was made the (security) headlines last year. The original paper can be found here and the slides can  be found here.

The talk had 4 parts :

  • presentation of the attack.
  • practical impact
  • common misconceptions
  • lesson learned

 Presentation of the attack

The 4-way handshake is used in any WPA2 protected network. His use if for mutual authentication and to negotiate a new pairwise temporal key (PTK).

The messages sent between the client and the access point (AP) are the following ones:


The PTK is computed in the following way: PTK = Combine (shared secret, ANonce, SNonce) where ANonce, SNonce are random numbers.

Re-installation attack:

  • the attacker will clone the access point on different channel.
  • the attacker will/can forward or block frames.
  • the first 3 messages are sent back to client and AP.
  • message 4 is not sent to the AP; the attacker block this, and the client install the PTK (as per protocol specification)

  • client can sent encrypted data but the AP will try to recover from this by re-sending message 3.
  • then the client will reinstall the PTK meaning that will reset the nonce used to send encrypted data.

  • the effect of this key re-installation is that the attacker can decrypt the frames sent by the client.

Other types of handshake protocols are vulnerable to this kind of attack:

  • group key handshake.
  • fp handshake.

Practical impact of the attack

The main impact is that the attacker can decrypt the data frames sent by the victim to the AP (access point) and the attacker can replay frames sent to the victim.

  • iOS 10 and Windows, the 4-way handshake is not affected (because they are not following the WPA2 specification), but the group key handshake is affected.
  • Linux and Android 6.0+ that are using the wpa_supplicant 2.4+ version are exposed to install all-zero key vulnerability. The basic explanation of the vulnerability is the following one; the application do not keep the key, the PTK is installed at the kernel level and the application will zeroed the memory buffer that contains the key. But when the key re-installation is triggered, then the all-zero key will be sent to the kernel to be installed.

Countermeasures:

  • AP (access point) can prevent most of the attacks on clients:
    •  Don’t retransmit message 3/4.
    • Don’t retransmit group message 1/2.

Common missconceptions

  • update only the client or AP is sufficient.
    • in fact both vulnerable clients & vulnerable APs must apply patches
  • must be connected to network as attacker.
    • in fact the attacker only need to be nearby victim and network.

Lessons learned

4-way handshake proven secure AND encryption protocol proven secure BUT the combination of both of them was not proven secure.
This proves the limitation of formal proofs so abstract model ≠ real code.

Making the web secure by design (by Glenn Ten Cate and Riccardo Ten Cate)

This talk was about the new version of the OWASP SKF.  I already covered  the SKF in some of my previous tickets (see here and here) so for me was not really a novelty. The main changes that I was able to catch comparing with the previous version :

Book Review: Clean Architecture

This is the review of the Clean Architecture (A Craftsman’s Guide to Software Structure and Design) book.

(My) Conclusion

I personally have mixed feelings about this book; the first 4 parts of the book that presents the paradigms and different design principles are quite good (for me it contains all the theory that you need in order to tackle the IT architectural problems). You start reading from the first chapter and gradually you build knowledge on top of previous chapter/s.

On the other side, the part 5 and 6 of the book (which are representing the backbone of the book) have a different cognitive structure; the chapters are not really linked together, you cannot read and build on top of previous chapter/s because there is no coherency between chapters (some of the chapters are extended versions of blog tickets from https://8thlight.com/blog/).

The book explains very well the rules and patterns to apply in order to build an application easy to extend and test but the subjects like the scalability, availability and security that are qualities that an (every) application should have, are not treated at all.

Part I Introduction

The author tries to express the fact that good software design and (good) software architecture are intimately linked and that is very important to invest time and resources in having a good software design even if it looks like the project it advances slower.

The quality of the (software) design will influence the overall quality of the software product and to prove this the author comes with some figures/numbers (unfortunately there are reference to the source of this figures).

Part II Starting with the bricks: Programming Paradigms

The following programming paradigms are explained: Structured ProgrammingObject Oriented Programming and Functional Programming.

For each paradigm a brief history is done and also the author expresses how each paradigm characteristics can help and impact the software architecture.

  • the immutability characteristic of Functional Programming can help to simplify the design in respect of concurrency issues.
  • the polymorhism characteristic of Object Oriented Programming  can help the design to not care about the implementation details of the used components.
  • the Structured Programming helped us to decompose a (big) problem in smaller problems that can be then handled independently.

Part III Design Principles

This part is about the SOLID design principles; each one of these design principles are clearly explained using sometimes UML diagrams. The solid design principles are (usually) applied by software developers to write clean(er) code but  the author also explains how these principles can be applied to an architecture level:

  • SRP (Single Responsabilty Principle)  for a software developer is “A class should have only one reason to change.” but for an architect became “A module should be responsible to one, and only one author”.
  • OCP (Open-Closed principle) is translated in architectural terms by replacing the classes with high level components the goal being to arrange those components into a hierarchy that protects higher-level components from changes in lower-level components.
  • LSP (Liskov Substitution Principle) is translated in architectural terms by extending the interface concept from a programming language structure to gateways that different system components are using to communicate. The violation of substitutability of these gateways (interfaces) are causing the system architecture to be poluted.
  • ISP (Interface Segregation Principle) is translated in architectural terms by stating that generally is harmful that your systems depends on frameworks that has more features that you need.
  • DIP (Dependency Inversion Principle) is used to create architectural boundaries between different system components.

Part IV Component Principles

The components principles are categorized in two types: (component) cohesion and coupling.

The component cohesion principles are :

  • (REP) The Reuse/Release Equivalence Principle : This principle states that “The unit of reuse is the unit of release”. Classes and modules that are formed into a component must belong to a cohesive group and should be released together.
  • (CCP) The Common Closure Principle: This principle is actually the Single Responsibility Principle for components. The principle states that should gather into same component classes that changes for the same reason at the same time.
  • (CRP) The Common Reuse Principle: This principle states that “should not depend on things that you don’t need it”. This principle rather tell which classes should not be put together in the same module; classes that are not tightly bound to each other should not be in the sane component.

This principles are linked together and applying them could be contradictory. The following diagram express this contradiction; each edge express the cost hat it must be payed to abandon the principle for the opposite vertex.

The component coupling principles are:

  • (ADP) The Acyclic Dependencies Principle: The principle states that should have no cycle into the component dependency graph, the dependency graph should be a DAG (Directed Acyclic Graph). Solutions to eliminate dependencies cycles are: apply the Dependencies Injection Principle (DIP) or create a new component that will contain the classes that other components are depending on.
  • (SDP) The Stable Dependencies Principle: This principle states that modules that are intended to be easy to change should not be dependent on by modules that are harder to change. The component stability metric, called I (for instability) is computed in the following way: I = Incoming dependencies / (Incoming dependencies + Outgoing dependencies). So SDP can be restated as :the  I metric of a component should be larger than the I metric of the components that it depends on, a component should depend on more stable components only.
  • (SAP)The Stable Abstraction Principle: For this principle, the author introduces a new metric called abstractness which is defined as follow: A = Number of classes in the component / Number of abstract classes and interfaces in the component.  A value of 0 implies that the component have no abstract classes, a value of 1 implies that the component contains only abstract classes. The SAP principle sets up a relationship between stability (I) and abstractness (A) that have the form of a graph:

Part V Architecture

This part of the book is made of 14 chapters (almost 120 pages) and treats different aspects of a good architecture: how to define appropriate boundaries and layers (“Boundary Anatomy” chapter, “Partial Boundaries” chapter, “Layers and Boundaries” chapter, “The Test Boundary”), how to make a system that is easy to understand, develop (“The Clean Architecture” chapter, “Presenters and Humble Objects” chapter), maintain and deploy, how to organize components and services (“Screaming Architecture” chapter).

It would be very difficult to resume 120 pages in few phrases but the most important take-away would be the characteristics of a system produced by a good architecture:

  • independent of any frameworks – must see the (technical) frameworks as tools and the architecture should not depend of this frameworks (“Screaming Architecture” chapter develops and argued more about this topic).
  • testable – the business rules of the system should be testable without any external element.
  • independent of the UI – the UI can change without affecting the use cases of the system.
  • independent of the database – the business rules/ use cases should not be bounded to any database.
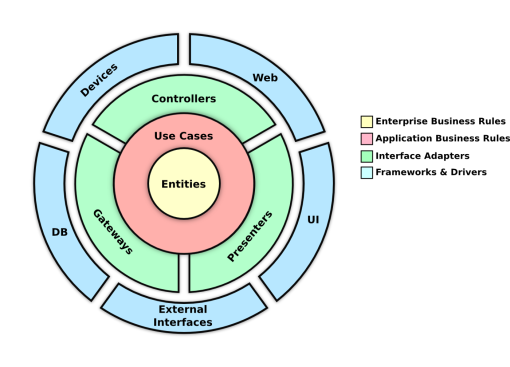
Clean Architecture

The golden rule for a clean architecture is: Source code dependencies must point only inward toward higher-level policies; any item from a circle should know nothing about the items from outer circle/s. (see the following image).

For more information for the earlier concept of Clean architecture you can check the Uncle Bob initial blog post: The Clean Architecture.

Part VI Details

The last part of the book tries to explain why some of the (technological) items used in it projects like the database, the UI technology or (technical) frameworks should not influence/contaminate the system architecture and it should always be positioned at the outer circle (see the previous image). This part also has a case study on which some of the rules and thoughts about architecture are put together and applied.