How to fix “ClassNotFoundException” for Burp Suite extension using Jersey

Context

I am the maintainer of a BurpSuite extension that is implementing a REST API on top of Burp Suite. The goal of this REST API is to offer basic actions (retrieve a report, trigger a scan, retrieve the list of scanned url) and is executed on a headless Burp Suite from a CICD pipeline.

From the technical point of view, the extension is implemented in Java and I’m using the JAX-RS specification in order to implement the REST-APIs and Jersey as JAX-RS implementation.

Problem

One of the REST entry points was returning a Set<OBJECT> where OBJECT is a POJO specific to the extension. When a client was calling this entry point, the following exception was thrown:

Caused by: java.lang.ClassNotFoundException: org.eclipse.persistence.internal.jaxb.many.CollectionValue
at java.base jdk.internal.loader.BuiltinClassLoader.loadClass(BuiltinClassLoader.java:641)
at java.base/jdk.internal.loader.ClassLoaders$AppClassLoader.loadClass(ClassLoaders.java:188)
at java.base/java.lang.ClassLoader.loadClass(ClassLoader.java:520)
at org.eclipse.persistence.internal.jaxb.JaxbClassLoader.loadClass(JaxbClassLoader.java:110)

Root Cause

A ClassNotFoundException is thrown when the JVM tries to load a class that is not available in the classpath or when there is a class loading issue. I was sure that the missing class (CollectionValue) was in the extension classpath so the root cause of the problem was a class loading issues.

In Java the classes are loaded by a Java classloader. A Java classloader is a component of the Java Virtual Machine (JVM) responsible for loading Java classes into memory at runtime. The classloader’s primary role is to locate and load class files from various sources, such as the file system, network.

Classloaders in Java typically follow a hierarchical delegation model. When a class is requested for loading, the classloader first delegates the request to its parent classloader. If the parent classloader cannot find the class, the child classloader attempts to load the class itself. This delegation continues recursively until the class is successfully loaded or all classloaders in the hierarchy have been exhausted.

The classloader hierarchy of a thread that is serving a JAX-RS call looks like this:

The classloader hierarchy of the thread that is executing the Burp Suite extension looks like this:

So, the root cause of the ClassNotFoundException is that the classloader hierarchy of the threads serving the JAX-RS calls it does not include the (Burp Suite) extension classloader and so none of the classes from the (Burp Suite) extension classpath can be loaded by the JAX-RS calls.

Solution

The solution is to create a custom classloader that will have to be injected into the classloader hierarchy of the threads serving the JAX-RS calls. This custom classloader will implement the delegation pattern and will contains the original JAX-RS classloader and the Burp Suite extension classloader.

The custom classloader will delegate all the calls to the original Jersey classloader and in the case of loadClass method (which is throwing a ClassNotFoundException) if the Jersey classloader is not finding a class then it will delegate the call to the Burp Suite extension classloader.

The custom classloader will look like this:
public class CustomClassLoader extends ClassLoader{
  private final ClassLoader burpClassLoader;
  private final ClassLoader jerseyClassLoader;
  
  public CustomClassLoader(
                            ClassLoader bcl,
                            ClassLoader jcl){
     this.burpClassLoader = bcl;
     this.jerseyClassLoader = jcl;
  }

 @Override
  public String getName(){
     return "CustomJerseyBurpClassloader";
  }
  
 @Override
  public Class<?> loadClass(String name)
      throws ClassNotFoundException {
     try {
        return this.jerseyClassLoader.loadClass(name); 
     } catch (ClassNotFoundException ex) {
         //use the Burp classloader if class cannot be load from the jersey classloader
        return this.burpClassLoader.loadClass(name); 
    }    
  } 

//all the other methods implementation will just delegate 
//to the return jerseyClassLoader
//for ex:
 @Override
  public URL getResource(String name) {
  return return this.jerseyClassLoader.getResource(name);  
  }
 .......
}  

Now, we have the custom classloader; what is missing is to replace the original Jersey classloader with the custom one for each REST call of the API. In order to do this, we will create a Jersey ContainerRequestFilter which will be called before the execution of each request.

The request filter will look like this:
public class ClassloaderSwitchFilter 
  implements ContainerRequestFilter {
  @Override
  public void filter(ContainerRequestContext requestContext) 
        throws IOException {
        Thread currentThread = Thread.currentThread();
        ClassLoader initialClassloader = 
              currentThread.getContextClassLoader();

        //custom classloader already injected
        if (initialClassloader instanceof CustomClassLoader) {
            return;
        }

        ClassLoader customClassloader =
                new CustomClassLoader(
                        CustomClassLoader.class.getClassLoader(),
                        initialClassloader);
        
        currentThread.setContextClassLoader(customClassloader);
  }
}

Introduction to Web Assembly for Java engineers

Introduction

The goal of this ticket is to present the different technological components of WebAssembly  in comparison with the Java technological stack.
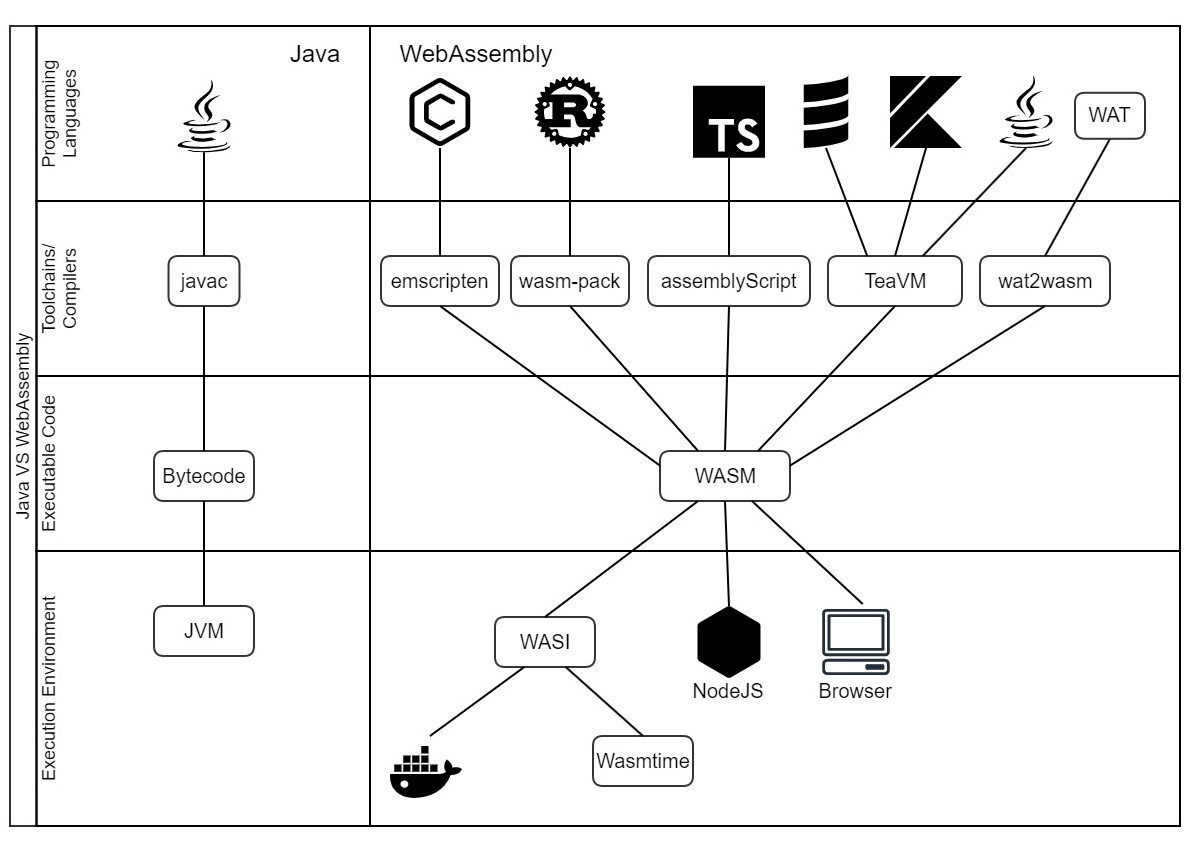
Why comparing WebAssembly with Java ? I think that WebAssembly have more chances to succeed in achieving the slogan “Write once, run anywhere” that have been coined  more than 25 years ago to illustrate the cross-platform benefits of the Java language.

WebAssembly is a standard that contains a virtual Instruction Set Architecture (ISA) for a stack machine. WebAssembly is designed to run on a virtual machine. The virtual machine allows WebAssembly to run on a variety of computer hardware and digital devices but today the most common way to execute WebAssembly code is from browsers.

In a nutshell the comparison will be done using the following points of interest and the next image is summarizing this:

  • Executable Code
  • Programming Languages
  • ToolChains/Compilers
  • Execution Environment

Executable Code

Both technologies, WebAssembly and Java have the notion of executable code.

In Java this is called bytecode and is part of the JVM specification, see See Chapter 4. The class File Format and Chapter 6. The Java Virtual Machine Instruction Set of the The Java Virtual Machine Specification.

In WebAssembly this is called WASM. Actually there are 2 formats; a binary format and a text, human readable format called WAT (WebAssembly Text).

Java bytecode and WebAssembly (WASM) are both low-level, platform-independent binary formats but there are some notable differences:

  • Java bytecode is strongly typed. It has a well-defined type system that enforces type safety. WebAssembly is designed with a more loosely typed system. It operates on a set of basic value types, including integers, floats, and vectors.
  • Java bytecode has built-in support for object-oriented programming features, including classes, interfaces, and inheritance. WebAssembly is more low-level compared to Java bytecode and lacks the rich type system found in Java bytecode.
  • Java bytecode runs in the Java Virtual Machine (JVM), which manages memory automatically, including garbage collection. WebAssembly provides a linear memory model, which is essentially a resizable array of bytes. It allows more direct memory access and manipulation.
  • The JVM abstracts the memory management, making it relatively opaque to developers. In WebAssembly the developers have explicit control over memory allocation and deallocation making it potentially more error-prone.

Programming Language

To develop applications, Java developers have to use the Java language. In contrast, WebAssembly is intentionally crafted to serve as a versatile and language-agnostic platform suitable for a broad spectrum of programming languages.

WebAssembly supports an array of programming languages, including but not limited to C/C++, R, TypeScript (using the AssemblyScript language), Scala, Kotlin, and even Java.

Furthermore,WebAssembly offers a human-readable text format known as WAT. It is designed to be a more readable and writable representation of WebAssembly code compared to the binary format.

ToolChains/Compilers

In order to transform the Java source code into bytecode, the Java developers are using a compiler. The WebAssembly have a similar concept; compilers or toolchains to transform the source code into wasm. Here are a few examples of toolschains:

  • wat2wasm – a command-line tool provided by the WABT (WebAssembly Binary Toolkit)  and its purpose is to convert WebAssembly Text Format code to the binary WebAssembly format (Wasm). The WAT also includes an wasm2wat tool which converts Wasm to Wat.
  • emscriptem – an open-source compiler toolchain that translates C and C++ code into WebAssembly (Wasm) or JavaScript.
  • wasm-pack – to generate WebAssembly from Rust language.
  • AssemblyScript – is a subset of TypeScript specifically designed for WebAssembly.
  • TeaVM – an ahead-of-time compiler for Java bytecode that emits JavaScript and WebAssembly that runs in a browser. Moreover, the source code is not required to be Java, so TeaVM successfully compiles Kotlin and Scala.

Execution Environment

In the Java case the execution environment is the Java Virtual Machine.In the case of WebAssembly there are multiple ways to execute an application.

The initial execution environment for which  WebAssembly was created is the browser. All the modern browsers are offering support for WebAssembly execution; the execution performance is near-native.

Running WebAssembly on browsers have a few constraints:

  • WebAssembly runs in a sandboxed environment within the browser for security reasons. While this is generally beneficial, it also imposes restrictions on certain operations, such as direct access to the DOM or file system. Interactions with the browser environment are typically done through JavaScript
  • WebAssembly modules cannot directly access browser APIs. Interactions with the DOM, events, and other browser features are typically done through JavaScript, requiring careful coordination between the two.
  • Browsers impose memory constraints on WebAssembly applications to ensure a secure and stable user experience. The memory allocated to a WebAssembly module is limited, and exceeding these limits can result in termination of the module.
  • Loading and parsing WebAssembly modules can take time, especially for larger applications. The initial loading time may be impacted, affecting the user experience.

Node.js has support for WebAssembly on the server side through the wasm module. This module allows you to load and interact with WebAssembly modules directly in your Node.js applications.

Last but not least, the WebAssembly Working Group, which is a part of the World Wide Web Consortium (W3C) created WebAssembly System Interface (WASI). The goal of WASI is to provide a standardized set of interfaces that allows WebAssembly modules to interact with the host environment in a secure, and platform-independent manner.

WASI defines a system interface that includes a set of system calls, similar to traditional operating system interfaces. The standard also provides a sandboxed execution environment for WebAssembly modules, ensuring that they have limited and controlled access to the host system.

WASI aims to be platform-independent, allowing WebAssembly modules to run on different operating systems without modification. This is achieved by defining a standardized set of system calls that abstract away the specifics of the underlying host system.

Various WebAssembly execution environments, also known as runtimes, are incorporating the WebAssembly System Interface (WASI). Notable examples include wasmtime, a standalone WebAssembly runtime developed by the Bytecode Alliance; lucet-WASI, a high-performance WebAssembly compiler and runtime created by Fastly; and  wasi-libc, serving as the WASI Reference Implementation.

It’s worth mentioning that Docker started implementing WASI last year, enabling native execution of WebAssembly (wasm) files. For additional information, you can refer to the details provided in the announcement of Docker+Wasm Technical Preview 2.

How to properly use (Java) Text Blocks with String.format

Introduction

As of Java 15 there is a new feature called Text Block (also sometimes called Multi-Line Strings). The Text Blocks can be used by declaring the string with “””:

String multiline = """
                line1
                line2
                """;

Since Java 1.5 the String class have a format method.Java’s String.format() is a static method that returns a formatted String using the given locale, format String, and arguments.

Problem

It is a bad practice (see SpotBugs FS: Format string should use %n rather than \n) to use platform specific <EOL>character/s within strings to be formatted. For example if your string to be formatted contains Linux EOL character (\n) it might be wrongly interpreted if the code is executed on Windows platform on which the EOL character is \r\n.

In format strings, it is generally preferable to use %n, which will produce the platform-specific line separator at runtime.

Now, the Text Blocks will have multiple lines so what is the right way to still use multi-line strings and have a portable format strings ?

Solution

  • use %n format specifier to represent a newline character
  • use \ escape character so that the new lines inserted by the IDE are ignored.The \<line-terminator> escape sequence explicitly suppresses the inclusion of an implicit new line character.
 String multiline = """
                line1%n\
                line2%n\
                """;

Book Review: Secure by Design

This is the review of the Secure by Design  book.

(My) Conclusion

I would definitively add this book to the list of (software) security books that every software engineer should read (see “5 (software) security books that every (software) developer should read”) and I would put it on the first place. This book does not treat software security in a classic way but from  software design point of view. The main idea of the book is that a good software design will drastically improve the application security posture.

For me this book could be seen as an extension of the Domain-Driven Design: Tackling Complexity in the Heart of Software book but applied to software security. The main audience of the book is any software engineer and security professionals that are working with the development teams to help them to have a better security posture.

1: Why Design Matters for Security

The fist chapter explains why when developing software centered on design, security will become a natural part of the development process instead of being perceived as a forced requirement.

The traditional approach to software security have e few shortcomings; the user have to explicitly think about security and it have to be knowledgeable in different security topics. On the other side driving security through design can have the following advantages:

  • Software design is central to the interest and competence of most developers.
  • By focusing on design, business and security concerns gain equal priority in the view of both business experts and developers.
  • By choosing good design constructs, non-security experts are able to write secure code.
  • By focusing on good domain design, many security bugs are solved implicitly.

2: Intermission: The anti-Hamlet

This chapter (which is based on a real case) presents an example of how a flaw in designing a model of an bookstore e-shop application negatively impacted the business.

The mistake done in the model was to represent the quantity of items from a shopping card as an integer, so the users of the application could add negative numbers of items so at the end the customers could receive money from the bookstore.

3: Core concepts of Domain-Driven Design

The chapter starts with the definition of the Domain Driven Design (DDD) and describing what are the qualities of a domain model to be effective:

  • Be simple so you focus on the essentials.
  • Be strict so it can be a foundation for writing code.
  • Capture deep understanding to make the system truly useful and helpful.
  • Be the best choice from a pragmatic viewpoint.
  • Provide you with a language you can use when you talk about the system.

The main notions from DDD that can be beneficial in the context of a more robust model are:

Entities

Entities are objects representing a thread of continuity and identity, going through a lifecycle, though their attributes may change.

Entities are one type of model objects that have some distinct properties. What makes
an entity special is that:

  • It has an identity that defines it and makes it distinguishable from others.
  • It has an identity that’s consistent during its life cycle.
  • It can contain other objects, such as other entities or value objects (see further for a value object definition).
  • It’s responsible for the coordination of operations on the objects it owns.

Value Objects

Value objects are objects describing or computing some characteristics of a thing.The key characteristics of a value object are as follows:

  • It has no identity that defines it, but rather it’s defined by its value.
  • It’s immutable.
  • It should form a conceptual whole.
  • It can reference entities.
  • It explicitly defines and enforces important constraints.
  • It can be used as an attribute of entities and other value objects.
  • It can be short-lived.

Aggregates

An aggregate is a conceptual boundary used to group parts of the model together. The purpose of this grouping is to treat the aggregate as a unit. The key characteristics of a aggregates are:

  • Every aggregate has a boundary and a root.
  • The root is a single, specific entity contained in the aggregate.
  • The root is the only member of the aggregate that objects outside the boundary
    can hold references to.
  • Objects within the aggregate can hold references to other aggregates.

Bounding context

Multiple models are in play on a large project; it’s possible to have two or more models having the same concepts but with different semantics. In the case of different models, there is a need to define explicitly the scope of a particular model as a bounded part of a software system. A bounded context delimits the applicability of a particular model.

Data crossing a semantic boundary is of special interest from a security perspective because this is where the meaning of a concept could implicitly change.

4: Code constructs promoting security

Problems areas addressed and the proposed constructs:

Problem Section
Security problems involving data integrity and availability Immutable objects
Security problems involving illegal input and state Design by Contract
Security problems involving input validation (Input) Validation

Immutable objects

Immutable objects are safe to share between threads and open up high data availability which is an important aspect when protecting a system against denial of service attacks. Immutable object could protect against security problems involving availability of a system.

Mutable objects, on the other hand, are designed for change, which can lead to illegal updates and modifications. Immutable objects will enforce the integrity of the data of an application.

Design by Contract

Design By Contract (see Meyer, Bertrand: Applying “Design by Contract”) is an approach for designing software that uses preconditions and post-conditions to document (or programmatically assert) the change in state caused by a piece of a program. Thinking about design in terms of preconditions and contracts helps you clarify which part of a design takes on which responsibility.

Many security problems arise because one part of the system assumes another part takes responsibility for something when, in fact, that part assumes the opposite.

The authors are presenting some example of checking preconditions for method arguments and constructors. The goal is to fail if the contract is not met and the program is not using the classes in a way they were designed to be used. The program has lost control of what’s happening, and the safest thing to do is to stop as fast as possible.

(Input) Validation

In the case of input validation the authors are going through a framework that tries to separate the different kinds of (input) validation. The list presented also suggests a good order in which to do the different kinds of validation. Cheap operations like checking the length of data come early in the list, and more expensive operations that require calling the database come later. If one the steps is failing then the entire validation process must fail.

Different validation steps:

  • Origin – Is the data from a legitimate sender?
    • Origin checks can be done by checking the origin IP or requiring an access token
  • Size  – Is the size of the data in line with the context on which the data is used?
  • Lexical content  – Does it contain the right characters and encoding?
    • When checking the lexical content of data, the important part is the content not the structure so, the data is scanned to see that it contains the expected characters and the expected encoding.
  • Syntax – Is the format right?
  • Semantics – Does the data make sense from the business point of view?

5: Domain primitives

Problems areas addressed:

Problem Section
Security issues caused by inexact, error-prone, and
ambiguous code
Domain primitives
Security problems due to leakage of sensitive data Read-once objects

Domain primitives

Domain primitives are similar to value objects in Domain-Driven Design. Key difference is and they must be enforced at the point of creation. Also the usage of language primitives or generic types (including null ) are forbidden to represent concepts in the domain model because it could caused inexact, error-prone, and ambiguous code.

At the creation of the domain primitives the different validation steps could be applied as explained into the previous chapter; see (Input) Validation section of chapter 4: Code constructs promoting security

A typical example of a domain primitive is a quantity (see the example from the chapter 2: Intermission: The anti-Hamlet) that should not be defined as a primitive type (a float or an int) but as a distinguish type that will contains all the necessary logic for creation of valid (from the domain point of view) instances of quantity type.

For example in the context of a book shop a quantity which is negative or a not an integer greater is not valid from the business domain point of view.

Read-once objects

A read-once object is an object designed to be read once (or a limited number of times). This object usually represents a value or concept in your domain that’s considered to be sensitive (for example, passport numbers, credit card numbers, or passwords). The main purpose of the read-once object is to facilitate detection of unintentional use of the data it encapsulates.

Here’s a list of the key aspects of a read-once object:

  • Its main purpose is to facilitate detection of unintentional use.
  • It represents a sensitive value or concept.
  • It’s often a domain primitive.
  • Its value can be read once, and once only.
  • It prevents serialization of sensitive data.
  • It prevents sub-classing and extension.

6: Ensuring integrity of state

This chapter it’s about the integrity of the DDD entities objects.Entities contains the state that represents the business rules so it is important that a newly created entity follow the business rules.

The first goal is to have entities already consisted at the creation time. This can be done forcing the object creation through a constructor with all mandatory attributes and optional attributes set via method calls. This works very well for simple business rules; for more complex business rules the usage of the Builder pattern is advised.

The second goal is to keep the entities consistency after the creations time during the usage of the entities by other software components. The main idea is to share only final attributes (that cannot be changed), not share mutable objects and use immutable domain primitives.

In the case of attributes containing collections, should not expose a collection but rather expose a useful property of the collection (for example to add an item into a collection, add a method that receive as parameter the item to be added). Collection can be protected by exposing an non modifiable version (see Collections.unmodifiableCollection)

7: Reducing complexity of state

This chapter is extending the discussion from the previous chapter and it presents how to handle DDD entities objects that can have multiple states. For example an entity representing an order can have a few valid states like “paid”, “shipped”, “lost” or “delivered”. Keeping the state of entities controlled becomes hard when entities become complex, especially when there are lots of states with complex transitions between them.

The authors are proposing 3 patterns to handle the entities state complexity:

  • Entity state object
    • The proposal is to have entity state be explicitly designed and implemented as a class of its own. With this approach, the state object is used as a delegated helper object for the entity. Every call to the entity is first checked with the state object. This approach makes it easier to grasp what states the entity can have.
  • Entity Snapshot
    • The pattern consist of generating immutable objects called snapshots from the an entity. The clients will use the snapshots for the read only operations. For changing the state of the underlying entity, the clients will have to use a domain service to which they’ll have to send updates.
    • A drawback of this approach is that it violates some of the ideas of object orientation, especially the guideline to keep data and its accompanying behavior close together, preferably in the same class.
    • From the security point of view this pattern it improves the integrity because because the snapshot is immutable so there’s no risk at all of the representation mutating to a foul state.
  • Entity relay
    • This pattern is to be used in the case when the entity have a big number of possible states with a complex graph of changing states. The basic idea of entity relay is to split the entity’s lifespan into phases, and let each entity represent its own phase. When a phase is over, the entity goes away, and another kind of entity takes over—like a relay race.

8: Leveraging your delivery pipeline for security

The chapter treats different test strategies that could be applied in order to have a better security posture.

For the unit tests, the authors propose to divide the tests into:

  • normal testing – Verifies that the design accepts input that clearly passes the domain rules
  • boundary testing – Verifies that only structurally correct input is accepted. Examples of boundary checks are length, size, and quantity,
  • invalid input testing – Verifies that the design doesn’t break when invalid input is handled. Empty data structures, null, and strange characters are often considered invalid input.
  • extreme input testing – Verifies that the design doesn’t break when extreme input is handled. For example, such input might include a string of 40 million characters.

Other topics covered are :

  • testing of feature toggles that can cause security vulnerabilities. A good rule of thumb is to create a test for every existing toggle and should test all possible combinations using automated tests.
  • testing of the availability of the application by simulating DOS attacks.

9: Handling failures securely

The chapter treats different topics around handling failures and program exceptions.

It’s a good practice to separate business exceptions and technical exceptions. For business exception the best practice is to create exception having a business meaning.

As a practice to avoid, shouldn’t intermix technical and business exceptions using the same type and never include business data in technical exceptions, regardless of whether it’s sensitive or not.

Another interesting idea is to not handle business failures as exceptions. A failure should be modeled as a possible result of a performed operation in the same way a success is. By designing failures as unexceptional outcomes, it’s possible to avoid the problems that come from using exceptions including ambiguity between domain and technical exceptions, and inadvertently leaking sensitive information.

Resilience and responsiveness are attributes of a system that are improving the system availability. To achieve this attributes the authors are presenting 2 patterns:

  • circuit breaker pattern – Circuit Breaker allows graceful handling of failed remote services. It’s especially useful when all parts of an application are highly decoupled from each other, and failure of one component doesn’t mean the other parts will stop working.
  • bulkhead pattern – The Bulkhead pattern is a type of application design that is tolerant of failure. In a bulkhead architecture, elements of an application are isolated into pools so that if one fails, the others will continue to function.

10: Benefits of cloud thinking

This chapter is treating design concepts to be used for achieving a better security posture in the context of cloud deployments.

The most important concept it’s the “The three R’s of enterprise security“. The methodology of three Rs is: Rotate, Repave and Repair and it offers a simple approach towards greater security of cloud deployments.

The basic idea is to be proactive than be reactive as seen in traditional enterprise security. Speed is of essence. The longer a deployment stays in a given configuration, the greater is the opportunity for threats to exploit any vulnerabilities.

  • Rotate: Rotate secrets every few minutes or hours. Rotating secrets doesn’t improve the security of the secrets themselves, but it’s an
    effective way of reducing the time during which a leaked secret can be misused.
  • Repave: Repave servers and applications every few hours.Recreating all servers and containers and the applications running on them from a known good state every few hours is an effective way of making it hard for malicious software to spread through the system.
  • Repair: Repair vulnerable software as soon as possible after a patch is available. This goes for both operating systems and applications third party dependencies. The reason for repairing as often as you can is that for every new version of the software, something will have changed so an attacker constantly needs to find new ways to break it.

11: Intermission: An insurance policy for free

This chapter is very similar with the chapter 2, Intermission: The anti-Hamlet. It presents a real case (of an insurance company) that migrated a monolithic application to a micro-service application.

Due to this migration, the application was split into 2 different micro-services handled by 2 different teams. Having 2 independent teams handling different parts of the application and some functional changes in one of the micro-services will have as impact that the notion of Payment will have different meanings for the 2 micro-services. This miss-match will generate some subtle bugs even if none of the 2 systems were not broken.

12: Guidance in legacy code

This chapter is a kind of review of all the practices described in previous chapters that are applicable to legacy code.

It treats about the usage of domain primitives (see chapter 5 Domain primitives) to replace ambiguous parameters in APIs which are a common source of security bugs, the usage of read-once objects (see chapter 5 Domain primitives) which limits the number of times a sensitive values can be accessed allowing it to detect unintentional access, the usage of security tests that are testing look for invalid and extreme inputs (see chapter 8 Leveraging your delivery pipeline for security)

13: Guidance in micro-services

This chapter is very similar with the previous one but the context is the new approach of writing applications using micro-services.

Implementing security for a micro-service architecture is more difficult that in a case of a monolithic architecture because of the loose coupling of micro-services.

Splitting a monolithic application to different micro-services is rather a difficult task but a good design principle is to think of each service as a bounded context (see chapter 3 Core concepts of Domain-Driven Design for definition of bounded context).

Analyzing confidentiality, integrity, availability, and traceability across all services and data sensitivity is more difficult than in a case of classical architecture. The only way to treat this security topics in a complete way is to have a broader view of the entire applications and not only on a subset of the micro-services.

14: A final world: Don’t forget about security!

The entire book was talking about how to not think about security, but still getting a good security posture anyway. This chapter speaks about how important is to think and learn about the security anyway and it gives advises that could be found in more “classical” security books:

  • Should use code security reviews as a recurring part of secure development lifecycle (SDLC)
  • It is important to invest in tooling that provides quick access to information about security vulnerabilities across the technological entire stack.
  • Penetration tests should be done recurrently and the feedback from this tests should be used as an opportunity to improve the application design.
  • Having a team and processes to handle security incidents and the security incident mechanism should focus on learning to become more resistant to attacks.


.

7 ways to build slimmer/lighter (Linux) containers

The goal of this ticket is to present a few ways to obtain lighter container images. But why it’s so important to build and use lighter containers ?

Lighter containers means :

  • less disk space used to store the images
  • faster transfer (pull/push) of the images to/from the container registry,
  • faster build process of images and easier to update them (because it contains less components)
  • better security posture (less components, less vulnerabilities, smaller attack surface).

The hints that I will present could be sorted in two different categories: what to put into an image (to be lighter) and how to build an image (to be lighter).

What to put into your image

1. Use the lighter base image as possible

Choose the base image based of your needs of you application and try to use the minimal base image. If for example your application is Java based then choose as base image something like openjdk:19-slim-buster not a base image containing Java + other components that you don’t need. Following this approach is almost effortless but you will depend of the (base) image maintainer for any updates.

A better, but more difficult and more time consuming approach is to start from a bare minimal image like Alpine or Red Hat Universal Base Image 8 Minimal and install on top whatever components/packages you need. Following this approach will give you much more flexibility because you will be able to patch the needed components as the pace of their update; the drawback is that you have to spend some time creating the Dockerfile that builds the needed image.

2. Use multi-stage build

With multi-stage builds you can use multiple FROM statements in your Dockerfile. Each FROM instruction can use a different base, and each of them begins a new stage of the build. For a very good explanation of this feature you can see the Docker documentation.

The example given in the Docker documentation is around compiling a Go application into a stage and just copy the desired artifacts into another stage that will be used in the final image.

To illustrate the multi-stage build I will use as example Java 9 and the jlink tool that generates a custom Java runtime image that contains only the platform modules that are required for a given application:

FROM openjdk:11.0.14-jdk AS initial_jdk

# build a custom JRE
RUN jlink --add-modules java.management,java.base,java.logging,java.naming,java.sql,java.xml \
 --output ./customJre/ --strip-debug --no-man-pages --no-header-files \
 --compress=2

# use as base image the ubi minimal
FROM registry.access.redhat.com/ubi8/ubi-minimal:8.5-230

# copy the custom JRE into the final image
COPY --from=initial_jdk ./customJre /opt/java/openjdk

ENV JAVA_HOME=/opt/java/openjdk \
    PATH="/opt/java/openjdk/bin:$PATH"

3. Deactivate the package manager cache

Different package managers are copying the installed dependencies also in cache folders so it’s not needed to re-download a dependency if is necessary to be re-installed. Obviously, in the case of containers the cache feature should be deactivated or the cache folders should be deleted after the dependencies installation.

A few examples of package managers and how to deactivate or delete the cache:

  • pip cache purge – Remove all items from the cache.
  • dnf clean – Performs cleanup of temporary files kept for repositories. This includes any such data left behind from disabled or removed repositories as well as for different distribution release versions.
  • microndnf clean
  • yum clean – Same definition as dnf clean

Here is an example of a Dockerfile with and without the usage of the cache clean:

#No dnf Clean
FROM registry.access.redhat.com/ubi8/ubi-minimal:8.5-230

RUN microdnf install fontconfig \
&& microdnf install libXtst
#With dnf clean
FROM registry.access.redhat.com/ubi8/ubi-minimal:8.5-230

RUN microdnf install fontconfig \
&& microdnf install libXtst \
&& microdnf clean all

And here are the size of the two images:

The usage of deactivation of package manager cache should be combined with either hint number 4 (Minimize the number of RUN, COPY, ADD instructions) or hint number 5 (Use the squash flag of docker/podman build).

How to build a lighter image

This hints are around the container UnionFS (Union File System) and will explain how to create less or smaller image layers.

4. Minimize the number of RUN, COPY, ADD instructions

Only the instructions RUN, COPY, ADD create layers; each usage of one of this instructions will create a new layer into the final image. Minimizing the number of this instructions will minimize the number of image layers which will minimize the size of the final image.

Let’s use the following Dockerfile as (faulty) example:

FROM registry.access.redhat.com/ubi8/ubi-minimal:8.5-230
# call twice the RUN instruction
RUN microdnf install fontconfig 
RUN microdnf install libXtst

In this Dockerfile we called twice the RUN instruction; the image (having an id starting with 14e7) will have 4 layers:

docker inspect --format '{{join .RootFS.Layers "\n "}}' 14e7

sha256:44f62afd0479b4c2059f2a01b61a33a6e47b0a903b17a9fd65a8df8d4cfe806c
sha256:87cd41b1f9f880f62765bc510b9f241c5532cb919182ba453d87a28783b24d5b
sha256:acf320641a3c8165491b3b022d088ce7170820dbcaf31789db9b9b8a55568594
sha256:9c29e387846f1413e91046c9c194c9556ee4a66d993aa56a7ad7ecbe78304dbd

Now let’s minimize the number of RUN instructions; we will have a single RUN instruction containing multiple install commands:

FROM registry.access.redhat.com/ubi8/ubi-minimal:8.5-230
# call RUN only once
RUN microdnf install fontconfig && \ 
    microdnf install libXtst

The new image (having the id starting with d73) will have 3 layers:

docker inspect --format '{{join .RootFS.Layers "\n "}}' d73
sha256:44f62afd0479b4c2059f2a01b61a33a6e47b0a903b17a9fd65a8df8d4cfe806c
sha256:87cd41b1f9f880f62765bc510b9f241c5532cb919182ba453d87a28783b24d5b
sha256:5ad98570b3807cbd9dd51fd981e2c15d2fc7793061441ea395d3f332b722af35

5. Use the squash flag of docker/podman build

The squash flag is a flag of the docker build command which is still experimental that will squash newly built layers into a single new layer.

Podman build command also have a similar flag; Podman also have a squash-all flag that will squash all of the new image’s layers (including those inherited from a base image) into a single new layer.

6. Use .dockerignore to filter the content of Docker build context

The .dockerignore file is used to filter the content that will be used by the Docker build context to create an image.

The goal of this feature is just to have a faster build process ( because less files will be present in the build context) but it can help also in the case when accidentally the Dockerfile defines more files than needed.

7. Use external tools

I have to admit using external tools to obtain a slimmer image should not be the default or preferred solution especially after docker and podman implemented the squash flags. But if is not possible to use the existing solutions then here are some free tools that you could try:

  • jwilder/docker-squash
    • docker-squash is a utility to squash multiple docker layers into one in order to create an image with fewer and smaller layers.
    • it looks very similar to the docker build and podman build squash flags
    • project looks not active anymore
  • goldmann/docker-squash
    • can squash last n layers from an image
    • can squash from a selected layer to the end
    • project looks still active
  • docker-slim/docker-slim
    • docker-slim try to figure it out what files are useful from the target image by running a container of the target image.
    • docker-slim is capable to run static or dynamic analysis; it also capable to probe the running container using http requests.
    • docker-slim contains also a linter for Dockerfiles; Running the linter on the “No dnf Clean” Dockerfile from the hint nr3 (Deactivate the package manager cache) give the following results:
docker-slim lint

Conclusion

As you could see there are a few ways to create lighter images; some of the hints are “low hanging fruits” and can be applied systematically, like the usage of the squash flag (hint nr. 5) and the minimization of RUN commands (hint nr. 4); some others demand a little bit of thinking and try and error, like the usage of the right base image (hint nr. 1) or the usage of multi-stage builds (hint nr. 2).