I am the maintainer of a BurpSuite extension that is implementing a REST API on top of Burp Suite. The goal of this REST API is to offer basic actions (retrieve a report, trigger a scan, retrieve the list of scanned url) and is executed on a headless Burp Suite from a CICD pipeline.
From the technical point of view, the extension is implemented in Java and I’m using the JAX-RS specification in order to implement the REST-APIs and Jersey as JAX-RS implementation.
Problem
One of the REST entry points was returning a Set<OBJECT> where OBJECT is a POJO specific to the extension. When a client was calling this entry point, the following exception was thrown:
Caused by: java.lang.ClassNotFoundException: org.eclipse.persistence.internal.jaxb.many.CollectionValue
at java.base jdk.internal.loader.BuiltinClassLoader.loadClass(BuiltinClassLoader.java:641)
at java.base/jdk.internal.loader.ClassLoaders$AppClassLoader.loadClass(ClassLoaders.java:188)
at java.base/java.lang.ClassLoader.loadClass(ClassLoader.java:520)
at org.eclipse.persistence.internal.jaxb.JaxbClassLoader.loadClass(JaxbClassLoader.java:110)
Root Cause
A ClassNotFoundException is thrown when the JVM tries to load a class that is not available in the classpath or when there is a class loading issue. I was sure that the missing class (CollectionValue) was in the extension classpath so the root cause of the problem was a class loading issues.
In Java the classes are loaded by a Java classloader. A Java classloader is a component of the Java Virtual Machine (JVM) responsible for loading Java classes into memory at runtime. The classloader’s primary role is to locate and load class files from various sources, such as the file system, network.
Classloaders in Java typically follow a hierarchical delegation model. When a class is requested for loading, the classloader first delegates the request to its parent classloader. If the parent classloader cannot find the class, the child classloader attempts to load the class itself. This delegation continues recursively until the class is successfully loaded or all classloaders in the hierarchy have been exhausted.
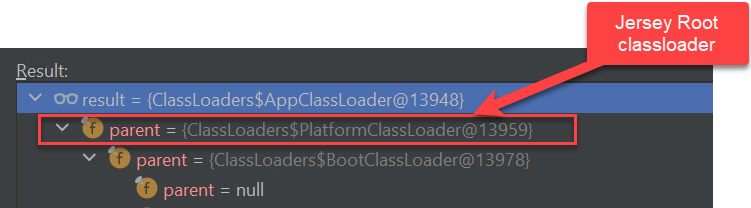
The classloader hierarchy of a thread that is serving a JAX-RS call looks like this:
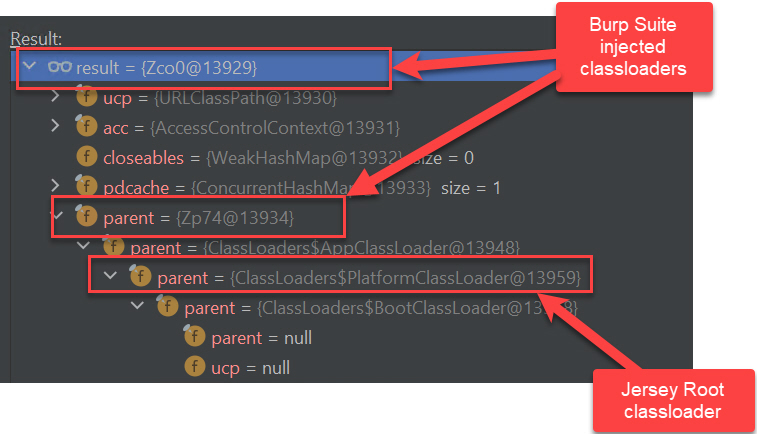
The classloader hierarchy of the thread that is executing the Burp Suite extension looks like this:
So, the root cause of the ClassNotFoundException is that the classloader hierarchy of the threads serving the JAX-RS calls it does not include the (Burp Suite) extension classloader and so none of the classes from the (Burp Suite) extension classpath can be loaded by the JAX-RS calls.
Solution
The solution is to create a custom classloader that will have to be injected into the classloader hierarchy of the threads serving the JAX-RS calls. This custom classloader will implement the delegation pattern and will contains the original JAX-RS classloader and the Burp Suite extension classloader.
The custom classloader will delegate all the calls to the original Jersey classloader and in the case of loadClass method (which is throwing a ClassNotFoundException) if the Jersey classloader is not finding a class then it will delegate the call to the Burp Suite extension classloader.
The custom classloader will look like this:
public class CustomClassLoader extends ClassLoader{
  private final ClassLoader burpClassLoader;
  private final ClassLoader jerseyClassLoader;

  public CustomClassLoader(
                            ClassLoader bcl,
                            ClassLoader jcl){
     this.burpClassLoader = bcl;
     this.jerseyClassLoader = jcl;
  }

 @Override
  public String getName(){
     return "CustomJerseyBurpClassloader";
  }

 @Override
  public Class<?> loadClass(String name)
      throws ClassNotFoundException {
     try {
        return this.jerseyClassLoader.loadClass(name);
     } catch (ClassNotFoundException ex) {
         //use the Burp classloader if class cannot be load from the jersey classloader
        return this.burpClassLoader.loadClass(name);
    }
  }

//all the other methods implementation will just delegate
//to the return jerseyClassLoader
//for ex:
 @Override
  public URL getResource(String name) {
  return return this.jerseyClassLoader.getResource(name);
  }
 .......
}
Now, we have the custom classloader; what is missing is to replace the original Jersey classloader with the custom one for each REST call of the API. In order to do this, we will create a Jersey ContainerRequestFilter which will be called before the execution of each request.
The request filter will look like this:
public class ClassloaderSwitchFilter
  implements ContainerRequestFilter {
  @Override
  public void filter(ContainerRequestContext requestContext)
        throws IOException {
        Thread currentThread = Thread.currentThread();
        ClassLoader initialClassloader =
              currentThread.getContextClassLoader();

        //custom classloader already injected
        if (initialClassloader instanceof CustomClassLoader) {
            return;
        }

        ClassLoader customClassloader =
                new CustomClassLoader(
                        CustomClassLoader.class.getClassLoader(),
                        initialClassloader);

        currentThread.setContextClassLoader(customClassloader);
  }
}
The goal of this ticket is to present the different technological components of WebAssembly in comparison with the Java technological stack.
Why comparing WebAssembly with Java ? I think that WebAssembly have more chances to succeed in achieving the slogan “Write once, run anywhere” that have been coined more than 25 years ago to illustrate the cross-platform benefits of the Java language.
WebAssembly is a standard that contains a virtual Instruction Set Architecture (ISA) for a stack machine. WebAssembly is designed to run on a virtual machine. The virtual machine allows WebAssembly to run on a variety of computer hardware and digital devices but today the most common way to execute WebAssembly code is from browsers.
In a nutshell the comparison will be done using the following points of interest and the next image is summarizing this:
Executable Code
Programming Languages
ToolChains/Compilers
Execution Environment
Executable Code
Both technologies, WebAssembly and Java have the notion of executable code.
Java bytecode and WebAssembly (WASM) are both low-level, platform-independent binary formats but there are some notable differences:
Java bytecode is strongly typed. It has a well-defined type system that enforces type safety. WebAssembly is designed with a more loosely typed system. It operates on a set of basic value types, including integers, floats, and vectors.
Java bytecode has built-in support for object-oriented programming features, including classes, interfaces, and inheritance. WebAssembly is more low-level compared to Java bytecode and lacks the rich type system found in Java bytecode.
Java bytecode runs in the Java Virtual Machine (JVM), which manages memory automatically, including garbage collection. WebAssembly provides a linear memory model, which is essentially a resizable array of bytes. It allows more direct memory access and manipulation.
The JVM abstracts the memory management, making it relatively opaque to developers. In WebAssembly the developers have explicit control over memory allocation and deallocation making it potentially more error-prone.
Programming Language
To develop applications, Java developers have to use the Java language. In contrast, WebAssembly is intentionally crafted to serve as a versatile and language-agnostic platform suitable for a broad spectrum of programming languages.
WebAssembly supports an array of programming languages, including but not limited to C/C++, R, TypeScript (using the AssemblyScript language), Scala, Kotlin, and even Java.
Furthermore,WebAssembly offers a human-readable text format known as WAT. It is designed to be a more readable and writable representation of WebAssembly code compared to the binary format.
ToolChains/Compilers
In order to transform the Java source code into bytecode, the Java developers are using a compiler. The WebAssembly have a similar concept; compilers or toolchains to transform the source code into wasm. Here are a few examples of toolschains:
wat2wasm – a command-line tool provided by the WABT (WebAssembly Binary Toolkit) and its purpose is to convert WebAssembly Text Format code to the binary WebAssembly format (Wasm). The WAT also includes an wasm2wat tool which converts Wasm to Wat.
emscriptem – an open-source compiler toolchain that translates C and C++ code into WebAssembly (Wasm) or JavaScript.
wasm-pack – to generate WebAssembly from Rust language.
AssemblyScript – is a subset of TypeScript specifically designed for WebAssembly.
TeaVM – an ahead-of-time compiler for Java bytecode that emits JavaScript and WebAssembly that runs in a browser. Moreover, the source code is not required to be Java, so TeaVM successfully compiles Kotlin and Scala.
Execution Environment
In the Java case the execution environment is the Java Virtual Machine.In the case of WebAssembly there are multiple ways to execute an application.
The initial execution environment for which WebAssembly was created is the browser. All the modern browsers are offering support for WebAssembly execution; the execution performance is near-native.
Running WebAssembly on browsers have a few constraints:
WebAssembly runs in a sandboxed environment within the browser for security reasons. While this is generally beneficial, it also imposes restrictions on certain operations, such as direct access to the DOM or file system. Interactions with the browser environment are typically done through JavaScript
WebAssembly modules cannot directly access browser APIs. Interactions with the DOM, events, and other browser features are typically done through JavaScript, requiring careful coordination between the two.
Browsers impose memory constraints on WebAssembly applications to ensure a secure and stable user experience. The memory allocated to a WebAssembly module is limited, and exceeding these limits can result in termination of the module.
Loading and parsing WebAssembly modules can take time, especially for larger applications. The initial loading time may be impacted, affecting the user experience.
Node.js has support for WebAssembly on the server side through the wasm module. This module allows you to load and interact with WebAssembly modules directly in your Node.js applications.
Last but not least, the WebAssembly Working Group, which is a part of the World Wide Web Consortium (W3C) created WebAssembly System Interface (WASI). The goal of WASI is to provide a standardized set of interfaces that allows WebAssembly modules to interact with the host environment in a secure, and platform-independent manner.
WASI defines a system interface that includes a set of system calls, similar to traditional operating system interfaces. The standard also provides a sandboxed execution environment for WebAssembly modules, ensuring that they have limited and controlled access to the host system.
WASI aims to be platform-independent, allowing WebAssembly modules to run on different operating systems without modification. This is achieved by defining a standardized set of system calls that abstract away the specifics of the underlying host system.
Various WebAssembly execution environments, also known as runtimes, are incorporating the WebAssembly System Interface (WASI). Notable examples include wasmtime, a standalone WebAssembly runtime developed by the Bytecode Alliance; lucet-WASI, a high-performance WebAssembly compiler and runtime created by Fastly; and wasi-libc, serving as the WASI Reference Implementation.
It’s worth mentioning that Docker started implementing WASI last year, enabling native execution of WebAssembly (wasm) files. For additional information, you can refer to the details provided in the announcement of Docker+Wasm Technical Preview 2.
As of Java 15 there is a new feature called Text Block (also sometimes called Multi-Line Strings). The Text Blocks can be used by declaring the string with “””:
String multiline = """
                line1
                line2
                """;
Since Java 1.5 the String class have a format method.Java’s String.format() is a static method that returns a formatted String using the given locale, format String, and arguments.
Problem
It is a bad practice (see SpotBugs FS: Format string should use %n rather than \n) to use platform specific <EOL>character/s within strings to be formatted. For example if your string to be formatted contains Linux EOL character (\n) it might be wrongly interpreted if the code is executed on Windows platform on which the EOL character is \r\n.
In format strings, it is generally preferable to use %n, which will produce the platform-specific line separator at runtime.
Now, the Text Blocks will have multiple lines so what is the right way to still use multi-line strings and have a portable format strings ?
use\ escape character so that the new lines inserted by the IDE are ignored.The \<line-terminator>escape sequence explicitly suppresses the inclusion of an implicit new line character.
The goal of this ticket is to present a few ways to obtain lighter container images. But why it’s so important to build and use lighter containers ?
Lighter containers means :
less disk space used to store the images
faster transfer (pull/push) of the images to/from the container registry,
faster build process of images and easier to update them (because it contains less components)
better security posture (less components, less vulnerabilities, smaller attack surface).
The hints that I will present could be sorted in two different categories: what to put into an image (to be lighter) and how to build an image (to be lighter).
What to put into your image
1. Use the lighter base image as possible
Choose the base image based of your needs of you application and try to use the minimal base image. If for example your application is Java based then choose as base image something like openjdk:19-slim-buster not a base image containing Java + other components that you don’t need. Following this approach is almost effortless but you will depend of the (base) image maintainer for any updates.
A better, but more difficult and more time consuming approach is to start from a bare minimal image like Alpineor Red Hat Universal Base Image 8 Minimal and install on top whatever components/packages you need. Following this approach will give you much more flexibility because you will be able to patch the needed components as the pace of their update; the drawback is that you have to spend some time creating the Dockerfile that builds the needed image.
2. Use multi-stage build
With multi-stage builds you can use multiple FROM statements in your Dockerfile. Each FROM instruction can use a different base, and each of them begins a new stage of the build. For a very good explanation of this feature you can see the Docker documentation.
The example given in the Docker documentation is around compiling a Go application into a stage and just copy the desired artifacts into another stage that will be used in the final image.
To illustrate the multi-stage build I will use as example Java 9 and the jlink tool that generates a custom Java runtime image that contains only the platform modules that are required for a given application:
FROM openjdk:11.0.14-jdk AS initial_jdk

# build a custom JRE
RUN jlink --add-modules java.management,java.base,java.logging,java.naming,java.sql,java.xml \
 --output ./customJre/ --strip-debug --no-man-pages --no-header-files \
 --compress=2

# use as base image the ubi minimal
FROM registry.access.redhat.com/ubi8/ubi-minimal:8.5-230

# copy the custom JRE into the final image
COPY --from=initial_jdk ./customJre /opt/java/openjdk

ENV JAVA_HOME=/opt/java/openjdk \
    PATH="/opt/java/openjdk/bin:$PATH"
3. Deactivate the package manager cache
Different package managers are copying the installed dependencies also in cache folders so it’s not needed to re-download a dependency if is necessary to be re-installed. Obviously, in the case of containers the cache feature should be deactivated or the cache folders should be deleted after the dependencies installation.
A few examples of package managers and how to deactivate or delete the cache:
pip cache purge – Remove all items from the cache.
dnf clean – Performs cleanup of temporary files kept for repositories. This includes any such data left behind from disabled or removed repositories as well as for different distribution release versions.
Here is an example of a Dockerfile with and without the usage of the cache clean:
#No dnf Clean
FROM registry.access.redhat.com/ubi8/ubi-minimal:8.5-230

RUN microdnf install fontconfig \
&& microdnf install libXtst
#With dnf clean
FROM registry.access.redhat.com/ubi8/ubi-minimal:8.5-230

RUN microdnf install fontconfig \
&& microdnf install libXtst \
&& microdnf clean all
And here are the size of the two images:
The usage of deactivation of package manager cache should be combined with either hint number 4 (Minimize the number of RUN, COPY, ADD instructions) or hint number 5 (Use the squash flag of docker/podman build).
How to build a lighter image
This hints are around the container UnionFS (Union File System) and will explain how to create less or smaller image layers.
4. Minimize the number of RUN, COPY, ADD instructions
Only the instructions RUN, COPY, ADD create layers; each usage of one of this instructions will create a new layer into the final image. Minimizing the number of this instructions will minimize the number of image layers which will minimize the size of the final image.
Let’s use the following Dockerfile as (faulty) example:
FROM registry.access.redhat.com/ubi8/ubi-minimal:8.5-230
# call twice the RUN instruction
RUN microdnf install fontconfig
RUN microdnf install libXtst
In this Dockerfile we called twice the RUN instruction; the image (having an id starting with 14e7) will have 4 layers:
The squash flag is a flag of the docker build command which is still experimental that will squash newly built layers into a single new layer.
Podman build command also have a similar flag; Podman also have a squash-all flag that will squash all of the new image’s layers (including those inherited from a base image) into a single new layer.
6. Use .dockerignore to filter the content of Docker build context
The .dockerignore file is used to filter the content that will be used by the Docker build context to create an image.
The goal of this feature is just to have a faster build process ( because less files will be present in the build context) but it can help also in the case when accidentally the Dockerfile defines more files than needed.
7. Use external tools
I have to admit using external tools to obtain a slimmer image should not be the default or preferred solution especially after docker and podman implemented the squash flags. But if is not possible to use the existing solutions then here are some free tools that you could try:
docker-slim try to figure it out what files are useful from the target image by running a container of the target image.
docker-slim is capable to run static or dynamic analysis; it also capable to probe the running container using http requests.
docker-slim contains also a linter for Dockerfiles; Running the linter on the “No dnf Clean” Dockerfile from the hint nr3 (Deactivate the package manager cache) give the following results:
docker-slim lint
Conclusion
As you could see there are a few ways to create lighter images; some of the hints are “low hanging fruits” and can be applied systematically, like the usage of the squash flag (hint nr. 5) and the minimization of RUN commands (hint nr. 4); some others demand a little bit of thinking and try and error, like the usage of the right base image (hint nr. 1) or the usage of multi-stage builds (hint nr. 2).
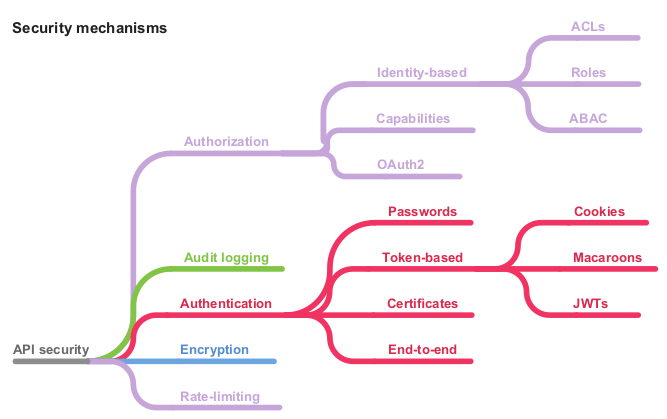
This book is doing a very good job in covering different mechanisms that could be used in order to build secure (RESTful) APIs. For each security control the author explains what kind of attacks the respective control is able to mitigate.
The reader should be comfortable with Java and Maven because most of the code examples of the book (and there are a lot) are implemented in Java.
The diagram of all the security mechanism presented:
Part 1: Foundations
The goal of the first part is to learn the basics of securing an API. The author starts by explaining what is an API from the user and from developer point of view and what are the security properties that any software component (APIs included) should fill in:
Confidentiality – Ensuring information can only be read by its intended audience
Integrity – Preventing unauthorized creation, modification, or destruction of information
Availability – Ensuring that the legitimate users of an API can access it when they need to and are not prevented from doing so.
Even if this security properties looks very theoretical the author is explaining how applying specific security controls would fulfill the previously specified security properties. The following security controls are proposed:
Encryption of data in transit and at rest – Encryption prevents data being read or modified in transit or at rest
Authentication – Authentication is the process of verifying whether a user is who they say they are.
Authorization/Access Control – Authorization controls who has access to what and what actions they are allowed to perform
Audit logging – An audit log is a record of every operation performed using an API. The purpose of an audit log is to ensure accountability
Rate limiting – Preserves the availability in the face of malicious or accidental DoS attacks.
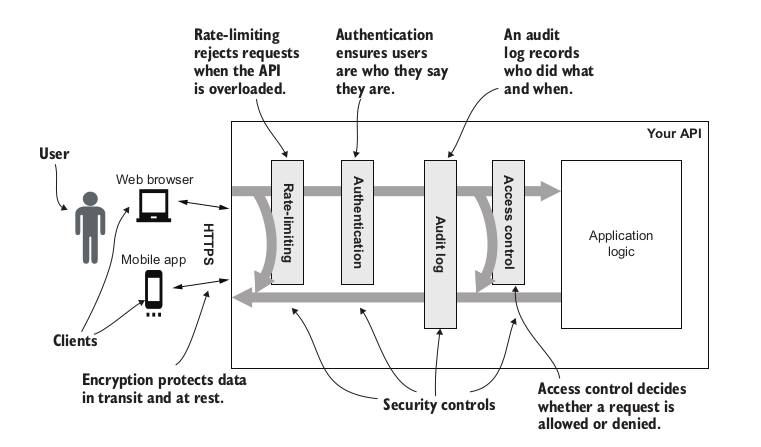
This different controls should be added into a specific order as shown in the following figure:
Different security controls that could/should be applied for any API
To illustrate each control implementation, an example API called Natter API is used. The Natter API is written in Java 11 using the Spark Java framework. To make the examples as clear as possible to non-Java developers, they are written in a simple style, avoiding too many Java-specific idioms. Maven is used to build the code examples, and an H2 in-memory database is used for data storage.
The same API is also used to present different types of vulnerabilities (SQL Injection, XSS) and also the mitigations.
Part 2: Token-based Authentication
This part presents different techniques and approaches for the token-based authentication.
Session cookie authentication
The first authentication technique presented is the “classical” HTTP Basic Authentication. HTTP Basic Authentication have a few drawbacks like there is no obvious way for the user to ask the browser to forget the password, the dialog box presented by browsers for HTTP Basic authentication cannot be customized.
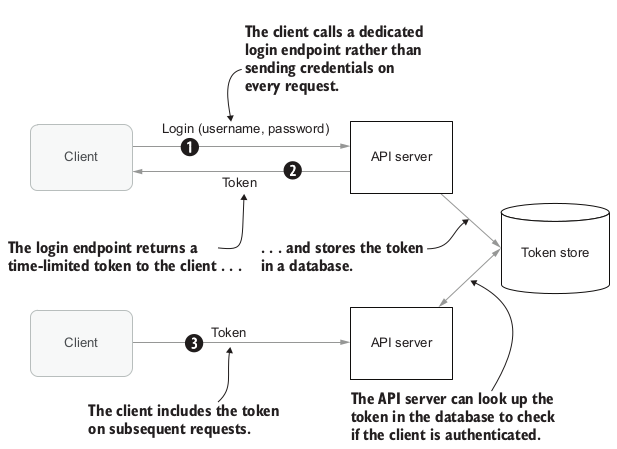
But the most important drawback is that the user’s password is sent on every API call, increasing the chance of it accidentally being exposed by a bug in one of those operations. This is not very practical that’s why a better approach for the user is to login once then be trusted for a specific period of time. This is basically the definition of the Token-Based authentication:
Token Based authentication
The first presented example of Token-Based authentication is using the HTTP Base Authentication for the dedicated login endpoint (step number 1 from the previous figure) and the session cookies for moving the generated token between the client and the API server.
The author take the opportunity to explain how session cookies are working and what are the different attributes but especially he presents the attacks that are possible in the case of using session cookies. The session fixation attack and the Cross-Site Request Forgery attack (CSRF) are presented in details with different options to avoid or mitigate those attacks.
Tokens whiteout cookies
The usage of session cookies is tightly linked to a specific domain and/or sub-domains. In case you want to make requests cross domains then the CORS (Cross-Origin Resource Sharing) mechanism can be used. The last part of the chapter treating the usage of session cookies contains detailed explanations of CORS mechanism.
Using the session cookies as a mechanism to store the authentication tokens have a few drawbacks like the difficulty to share cookies between different distinguished domains or the usage of API clients that do not understand the web standards (mobile clients, IOT clients).
Another option that is presented are the tokens without cookies. On the client side the tokens are stored using the WebStorage API. On the server side the tokens are stored into a “classical” relational data base. For the authentication scheme the Bearer authentication is used (despite the fact that the Bearer authentication scheme was created in the context of OAuth 2.0 Authorization framework is rather popular in other contexts also).
In case of this solution the least secure component is the storage of the authentication token into the DB. In order to mitigate the risk of the tokens being leaked different hardening solutions are proposed:
store into the DB the hash of tokens
store into the DB the HMAC of the tokens and the (API) client will then send the bearer token and the HMAC of the token
This authentication scheme is not vulnerable to session fixation attacks or CSRF attacks (which was the case of the previous scheme) but an XSS vulnerability on the client side that is using the WebStorage API would defeat any kind of mitigation control put in place.
Self-contained tokens and JWTs
The last chapter of this this (second) part of the book treats the self-contained or stateless tokens. Rather than store the token state in the database as it was done in previous cases, you can instead encode that state directly into the token ID and send it to the client.
The most client-side tokens used are the Json Web Token/s (JWT). The main features of a JWT token are:
A standard header format that contains metadata about the JWT, such as which MAC or encryption algorithm was used.
A set of standard claims that can be used in the JSON content of the JWT, with defined meanings, such as exp to indicate the expiry time and sub for the subject.
A wide range of algorithms for authentication and encryption, as well as digital signatures and public key encryption.
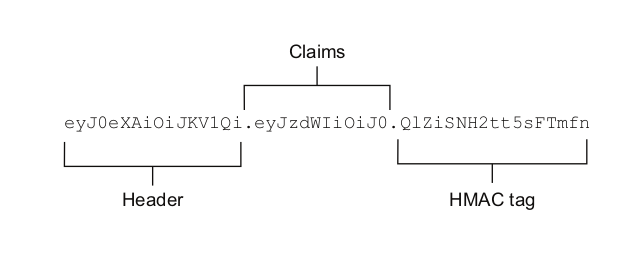
A JWT token can have three parts:
Header – indicates the algorithm of how the JWT was produced, the key used to authenticate the JWT to or an ID of the key used to authenticate. Some of the header values:
alg: Identifies which algorithm is used to generate the signature
kid: Key Id; as the key ID is just a string identifier, it can be safely looked up in server-side set of keys.
jwk: The full key. This is not a safe header to use; Trusting the sender to give you the key to verify a message loses all security properties.
jku: An URL to retrieve the full key. This is not a safe header to use. The intention of this header is that the recipient can retrieve the key from a HTTPS endpoint, rather than including it directly in the message, to save space.
Payload/Claims – pieces of information asserted about a subject. The list of standard claims:
iss (issuer): Issuer of the JWT
sub (subject): Subject of the JWT (the user)
aud (audience): Recipient for which the JWT is intended
exp (expiration time): Time after which the JWT expires
nbf (not before time): Time before which the JWT must not be accepted for processing
iat (issued at time): Time at which the JWT was issued; can be used to determine age of the JWT
jti (JWT ID): Unique identifier; can be used to prevent the JWT from being replayed (allows a token to be used only once)
Signature – Securely validates the token. The signature is calculated by encoding the header and payload using Base64url Encoding and concatenating the two together with a period separator. That string is then run through the cryptographic algorithm specified in the header.
Example of JWT token
Even if the JWT could be used as self-contained token by adding the algorithm and the signing key into the header, this is a very bad idea from the security point of view because you should never trust a token sign by an external entity. A better solution is to store the algorithm as metadata associated with a key on the server.
Storing the algorithm and the signing key on the server side it also helps to implement a way to revoke tokens. For example changing the signing key it can revoke all the tokens using the specified key. Another way to revoke tokens more selectively would be to add to the DB some token metadata like token creation date and use this metadata as revocation criteria.
Part 3: Authorization
OAuth2 and OpenID Connect
A way to implement authorization using JWT tokens is by using scoped tokens. Typically, the scope of a token is represented as one or more string labels stored as an attribute of the token. Because there may be more than one scope label associated with a token, they are often referred to as scopes. The scopes (labels) of a token collectively define the scope of access it grants.
A scoped token limits the operations that can be performed with that token. The set of operations that are allowed is known as the scope of the token. The scope of a token is specified by one or more scope labels, which are often referred to collectively as scopes.
Scopes allow a user to delegate part of their authority to a third-party app, restricting how much access they grant using scopes. This type of control is called discretionary access control (DAC) because users can delegate some of their permissions to other users.
Another type of control is the mandatory access control (MAC), in this case the user permissions are set and enforced by a central authority and cannot be granted by users themselves.
OAuth2 is a standard to implement the DAC. OAuth uses the following specific terms:
The authorization server (AS) authenticates the user and issues tokens to clients.
The user also known as the resource owner (RO), because it’s typically their resources that the third-party app is trying to access.
The third-party app or service is known as the client.
The API that hosts the user’s resources is known as the resource server (RS).
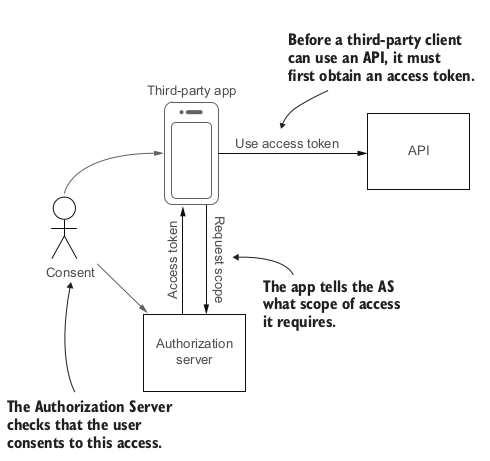
To access an API using OAuth2, an app must first obtain an access token from the Authorization Server (AS). The app tells the AS what scope of access it requires. The AS verifies that the user consents to this access and issues an access token to the app. The app can then use the access token to access the API on the user’s behalf.
One of the advantages of OAuth2 is the ability to centralize authentication of users at the AS, providing a single sign-on (SSO) experience. When the user’s client needs to access an API, it redirects the user to the AS authorization endpoint to get an access token. At this point the AS authenticates the user and asks for consent for the client to be allowed access.
OAuth can provide basic SSO functionality, but the primary focus is on delegated third-party access to APIs rather than user identity or session management. The OpenID Connect (OIDC) suite of standards extend OAuth2 with several features:
A standard way to retrieve identity information about a user, such as their name, email address, postal address, and telephone number.
A way for the client to request that the user is authenticated even if they have an existing session, and to ask for them to be authenticated in a particular way, such as with two-factor authentication.
Extensions for session management and logout, allowing clients to be notified when a user logs out of their session at the AS, enabling the user to log out of all clients at once.
Identity-based access control
In this chapter the author introduces the notion of users, groups, RBAC (Role-Based Access Control) and ABAC (Access-Based Access Control). For each type of access control the author propose an ad-hoc implementation (no specific framework is used) for the Natter API (which is the API used all over the book to present different security controls.)
Capability-based security and macaroons
A capability is an unforgeable reference to an object or resource together with a set of permissions to access that resource. Compared with the more dominant identity-based access control techniques like RBAC and ABAC capabilities have several differences:
Access to resources is via unforgeable references to those objects that also grant authority to access that resource. In an identity-based system, anybody can attempt to access a resource, but they might be denied access depending on who they are. In a capability-based system, it is impossible to send a request to a resource if you do not have a capability to access it.
Capabilities provide fine-grained access to individual resources.
The ability to easily share capabilities can make it harder to determine who has access to which resources via your API.
Some capability-based systems do not support revoking capabilities after they have been granted. When revocation is supported, revoking a widely shared capability may deny access to more people than was intended.
The way to use capability-based security in the context of a REST API is via capabilities URIs. A capability URI (or capability URL) is a URI that both identifies a resource and conveys a set of permissions to access that resource. Typically, a capability URI encodes an unguessable token into some part of the URI structure. To create a capability URI, you can combine a normal URI with a security token.
The author adds the capability URI to the Netter API and implements this with the token encoded into the query parameter because this is simple to implement. To mitigate any threat from tokens leaking in log files, a short-lived tokens are used.
But putting the token representing the capability in the URI path or query parameters is less than ideal because these can leak in audit logs, Referer headers, and through the browser history. These risks are limited when capability URIs are used in an API but can be a real problem when these URIs are directly exposed to users in a web browser client.
One approach to this problem is to put the token in a part of the URI that is not usually sent to the server or included in Referer headers.
The capacities URIs can be also be mixed with identity for handling authentication and authorization.There are a few ways to communicate identity in a capability-based system:
Associate a username and other identity claims with each capability token. The permissions in the token are still what grants access, but the token additionally authenticates identity claims about the user that can be used for audit logging or additional access checks. The major downside of this approach is that sharing a capability URI lets the recipient impersonate you whenever they make calls to the API using that capability.
Use a traditional authentication mechanism, such as a session cookie, to identify the user in addition to requiring a capability token. The cookie would no longer be used to authorize API calls but would instead be used to identify the user for audit logging or for additional checks. Because the cookie is no longer used for access control, it is less sensitive and so can be a long-lived persistent cookie, reducing the need for the user to frequently log in
The last part of the chapter is about macaroons which is a technology invented by Google (https://research.google/pubs/pub41892/). The macaroons are extending the capabilities based security by adding more granularity.
A macaroon is a type of cryptographic token that can be used to represent capabilities and other authorization grants. Anybody can append new caveats to a macaroon that restrict how it can be used
For example is possible to add new capabilities that allows only read access to a message created after a specific date. This new added extensions are called caveats.
Part 4: Microservice APIs in Kubernetes
Microservice APIs in K8S
This chapter is an introduction to Kubernetes orchestrator. The introduction is very basic but if you are interested in something more complete then Kubernetes in Action, Second Edition is the best option. The author also is deploying on K8S a (H2) database, the Natter API (used as demo through the entire book) and a new API called Linked-Preview service; as K8S “cluster” the Minikube is used.
Having an application with multiple components is helping him to show how to secure communication between these components and how to secure incoming (outside) requests. The presented solution for securing the communication is based on the service mesh idea and K8s network policies.
A service mesh works by installing lightweight proxies as sidecar containers into every pod in your network. These proxies intercept all network requests coming into the pod (acting as a reverse proxy) and all requests going out of the pod.
Securing service-to-service APIs
The goal of this chapter is to apply the authentication and authorization techniques already presented in previous chapters but in the context of service-to-service APIs. For the authentication the API’s keys, the JWT are presented. To complement the authentication scheme, the mutual TLS authentication is also used.
For the authorization the OAuth2 is presented. A more flexible alternative is to create and use service accounts which act like regular user accounts but are intended for use by services. Service accounts should be protected with strong authentication mechanisms because they often have elevated privileges compared to normal accounts.
The last part of the chapter is about managing service credentials in the context of K8s. Kubernetes includes a simple method for distributing credentials to services, but it is not very secure (the secrets are Base64 encoded and can be leaked by cluster administrator).
Secret vaults and key management services provide better security but need an initial credential to access. Using secret vaults have the following benefits:
The storage of the secrets is encrypted by default, providing better protection of secret data at rest.
The secret management service can automatically generate and update secrets regularly (secret rotation).
Fine-grained access controls can be applied, ensuring that services only have access to the credentials they need.
The access to secrets can be logged, leaving an audit trail.
Part 5: APIs for the Internet of Things
Securing IoT communications
This chapter is treating how different IoT devices could communicate securely with an API running on a classical system. The IoT devices, compared with classical computer systems have a few constraints:
An IOT device has significantly reduced CPU power, memory, connectivity, or energy availability compared to a server or traditional API client machine.
For efficiency, devices often use compact binary formats and low-level networking based on UDP rather than high-level TCP-based protocols such as HTTP and TLS.
Some commonly used cryptographic algorithms are difficult to implement securely or efficiently on devices due to hardware constraints or threats from physical attackers.
In order to cope with this constraints new protocols have been created based on the existing protocols and standards:
Datagram Transport Layer Security (DTLS). DTLS is a version of TLS designed to work with connectionless UDP-based protocols rather than TCP based ones. It provides the same protections as TLS, except that packets may be reordered or replayed without detection.
JOSE (JSON Object Signing and Encryption) standards. For IoT applications, JSON is often replaced by more efficient binary encodings that make better use of constrained memory and network bandwidth and that have compact software implementations.
COSE (CBOR Object Signing and Encryption) provides encryption and digital signature capabilities for CBOR and is loosely based on JOSE.
In the case when the devices needs to use public key cryptography then the key distribution became a complex problem. This problem could be solved by generating random keys during manufacturing of the IOT device (device-specific keys will be derived from a master key and some device-specific information) or through the use of key distribution servers.
Securing IoT APIs
The last chapter of the book is focusing on how to secure access to APIs in Internet of Things (IoT) environments meaning APIs provided by the devices or cloud APIs which are consumed by devices itself.
For the authentication part, the IoT devices could be identified using credentials associated with a device profile. These credentials could be an encrypted pre-shared key or a certificate containing a public key for the device.
For the authorization part, the IoT devices could use the OAuth2 for IoTwhich is a new specification that adapts the OAuth2 specification for constrained environments .

 The goal of this ticket is to present the different technological components of WebAssembly in comparison with the Java technological stack.
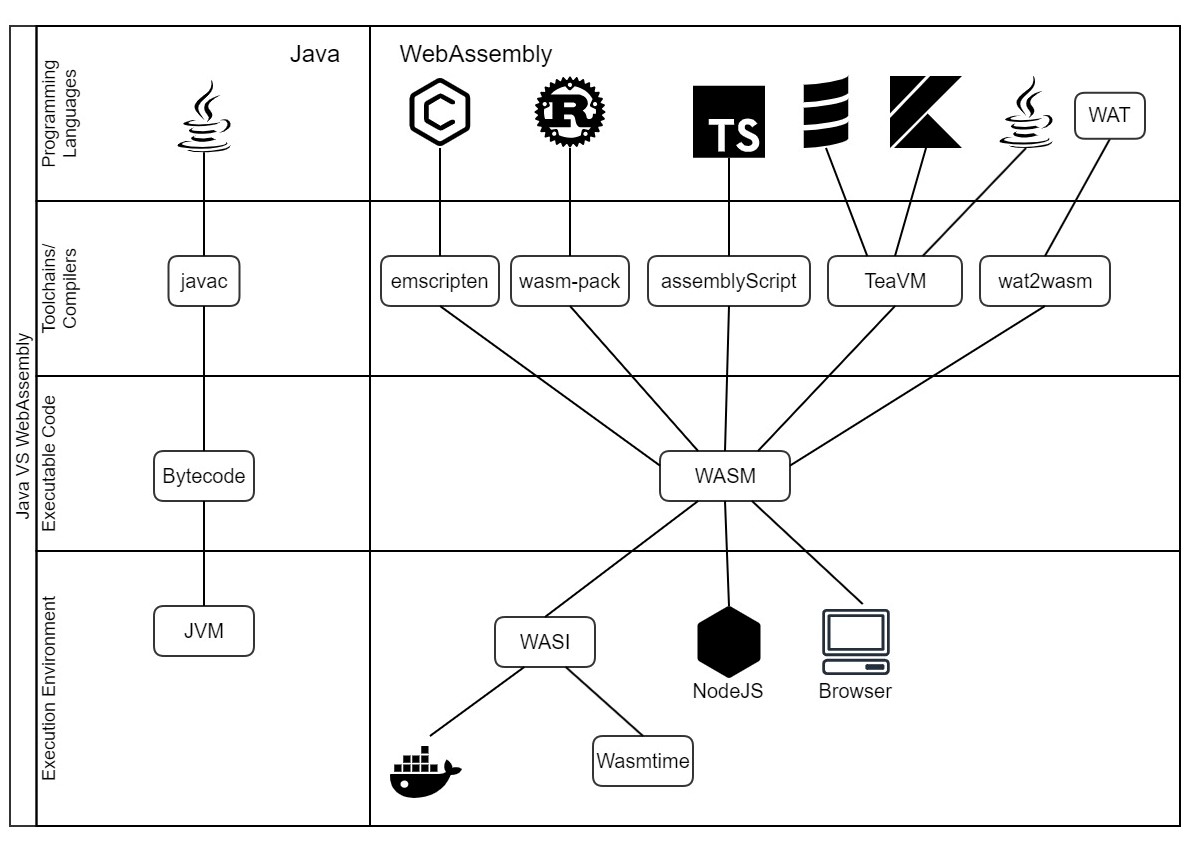


You must be logged in to post a comment.